Перейти к основному содержанию
Присоединяйся к сообществу ремонтников - Создай аккаунт

Lenovo ThinkPad X100e Screen Replacement

Выберете то, что вам нужно

    1. Lenovo ThinkPad X100e Screen Replacement, Screen: шаг 1, изображение 1 из 2 Lenovo ThinkPad X100e Screen Replacement, Screen: шаг 1, изображение 2 из 2
      Инструмент, используемый на этом этапе:
      Spudger
      $2.99
      • Use a Spudger tool to remove the screw covers on each side of the screen.

      • Be sure not to lose screw covers.

      Спросите у FixBot

      Добавить комментарий

    2. Lenovo ThinkPad X100e Screen Replacement: шаг 2, изображение 1 из 1
      • Using a magnetic screwdriver fit with a PH0 Bit, unscrew the two screws and carefully set the aside.

      Спросите у FixBot

      Добавить комментарий

    3. Lenovo ThinkPad X100e Screen Replacement: шаг 3, изображение 1 из 1
      • Pry open the bezel carefully with the spudger tool.

      • You will want to do this until the frame is completely off.

      Спросите у FixBot

      Добавить комментарий

    4. Lenovo ThinkPad X100e Screen Replacement: шаг 4, изображение 1 из 1
      • Remove all exposed screws and carefully set them aside. There should be 6 visible screws.

      • Be sure to set the screws aside on the magnetic mat.

      Спросите у FixBot

      Добавить комментарий

    5. Lenovo ThinkPad X100e Screen Replacement: шаг 5, изображение 1 из 1
      • Lift the screen up carefully, and remove the screws on both sides of the panel. There should be 4 screws.

      • The other two screws are located in the exact place on the other side.

      • Don't forget to place the screws on the magnetic mat, separate from other screws.

      Спросите у FixBot

      Добавить комментарий

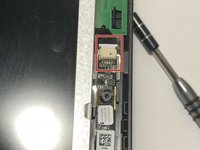
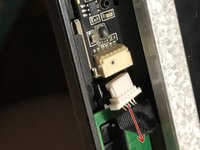
    6. Lenovo ThinkPad X100e Screen Replacement: шаг 6, изображение 1 из 2 Lenovo ThinkPad X100e Screen Replacement: шаг 6, изображение 2 из 2
      • Remove the connector located at the very top of the screen beside the webcam.

      • To remove the connector, simply pull the connector out.

      Спросите у FixBot

      Добавить комментарий

    7. Lenovo ThinkPad X100e Screen Replacement: шаг 7, изображение 1 из 1
      • Fold the panel over until a strip of black tape is visible.

      • Peel the tape down until you get to the base.

      Спросите у FixBot

      Добавить комментарий

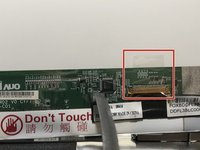
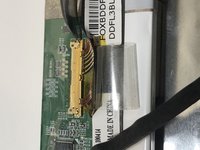
    8. Lenovo ThinkPad X100e Screen Replacement: шаг 8, изображение 1 из 2 Lenovo ThinkPad X100e Screen Replacement: шаг 8, изображение 2 из 2
      • Peel the piece of transparent tape back.

      • At this point there should be some exposed wires underneath the tape.

      Спросите у FixBot

      Добавить комментарий

    9. Lenovo ThinkPad X100e Screen Replacement: шаг 9, изображение 1 из 1
      • Remove the connector carefully with the spudger tool.

      Спросите у FixBot

      Добавить комментарий

    10. Lenovo ThinkPad X100e Screen Replacement: шаг 10, изображение 1 из 1
      • Remove the black tape fully.

      • Now your device is ready for a new panel.

      Спросите у FixBot

      Добавить комментарий

Заключение

To reassemble your device, follow these instructions in reverse order.

Отменить: Я не выполнил это руководство.

Еще один человек закончил это руководство.

Orly Guerra

Участник с: 02/08/18

448 Репутация

Автор 2 руководств

1 Комментарий к руководству

What can be used as a replacement screen, as it's listed not for sale?

Keith Bowe - Ответить Поделиться

Добавить комментарий

Статистика просмотров:

За последние 24 часов: 1

За последние 7 дней: 5

За последние 30 дней: 31

За всё время: 1,339