Введение
This guide will show you how to repair or replace the Hard Drive for the MSI GS70. Replacement of the Hard Drive is fairly easy as you will only need a JIS #1 Screwdriver and a magnetic mat (Optional, but recommended)
Выберете то, что вам нужно
-
-
Using your JIS #1, locate and remove all screws from the backplate.
-
When all the screws are removed, proceed to remove the backplate. The hard drive will be located right next to the battery.
 Спросите у FixBot
-
-
-
Locate the black rubber spacer
-
Remove the spacer by gently pulling the flap
-
-
-
-
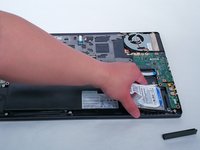
With two hands slide the Hard Drive to the left.
-
-
-
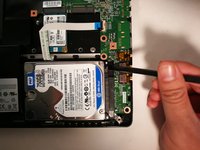
Carfully lift up the Hard Drive using your Spudger.
-
Next, pull up your hard drive from the battery end and proceed to remove the hard drive
-


To reassemble your device, follow these instructions in reverse order.
Отменить: Я не выполнил это руководство.
12 человек успешно провели ремонт по этому руководству.
2 Комментарии к руководству
The screws on my machine were Philips not torx don't know if it is different or has changed at all but all internal and external were Phillips
bonjour
comment accéder au disque dur msata sur le msi gs 70