Введение
Follow this guide to replace the battery on your Mid 2012 MacBook Air 11”.
Note: If there is a thin plastic film on your replacement battery, do not attempt to remove it. It is glued on and protects the battery pack while it is inside the MacBook.
Выберете то, что вам нужно
-
Инструмент, используемый на этом этапе:P5 Pentalobe Screwdriver Retina MacBook Pro and Air$5.99
-
Remove the following ten screws:
-
Two 8 mm 5-point Pentalobe screws
-
Eight 2.5 mm 5-point Pentalobe screws
 Спросите у FixBot
-
-
-
Wedge your fingers between the display and the lower case and pull upward to pop the lower case off the Air.
-
-
-
-
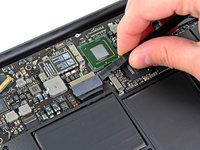
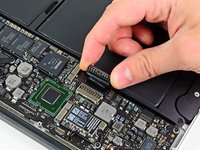
Use the flat end of a spudger to pry both short sides of the battery connector upward to disconnect it from its socket on the logic board.
-
Bend the battery cable slightly away from the logic board so the connector will not accidentally contact its socket.
-
-
-
Remove the following five screws securing the battery to the upper case:
-
Two 5.2 mm T5 Torx screws
-
One 6 mm T5 Torx screw
-
Two 2.6 mm T5 Torx screws
-
-
-
Lift the battery from its edge nearest the logic board and remove it from the upper case.
-
Charge it to 100%, and then keep charging it for at least 2 more hours. Next, unplug and use it normally to drain the battery. When you see the low battery warning, save your work, and keep your laptop on until it goes to sleep due to low battery. Wait at least 5 hours, then charge your laptop uninterrupted to 100%.
-
If you notice any unusual behavior or problems after installing your new battery, you may need to reset your MacBook's SMC.
-


To reassemble your device, follow these instructions in reverse order.
Отменить: Я не выполнил это руководство.
141 человек успешно провели ремонт по этому руководству.


24 Комментарии к руководству
I followed the directions in the reverse order, but now I have the old battery in my laptop again. Help?
I love you Jenny. That is all.
Great guide. Identified my parts, ordered them per the suggestions, and had the battery swapped out in 10 minutes. I like to use a magnetic sheet to hold and organize my screws for repairs like this - it keeps the proper size screws in the proper holes. If you don't have access to magnetic sheeting like I do from my graphics shop, an oval car magnet or a fridge magnet will work as well. The screwdriver recommended are of better quality than I expected. Thanks Ifixit.
I want to marry Jenny
Incredibly easy - done in 15 minutes.