Введение
Use this guide to replace a worn-out battery.
Note: If there is a thin plastic film on your replacement battery, do not attempt to remove it. It is glued on and protects the battery pack while it is inside the MacBook.
Выберете то, что вам нужно
-
Инструмент, используемый на этом этапе:P5 Pentalobe Screwdriver Retina MacBook Pro and Air$5.99
-
Use a P5 Pentalobe driver to remove ten screws securing the lower case, of the following lengths:
-
Two 9 mm screws
-
Eight 2.6 mm screws
 Спросите у FixBot
-
-
-
Wedge your fingers between the display and the lower case and pull upward to pop the lower case off the Air.
-
Remove the lower case and set it aside.
-
-
-
-
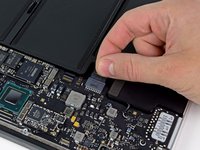
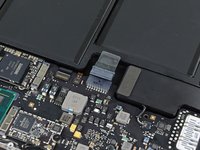
Grab the clear plastic pull tab attached to the battery connector and pull it toward the front edge of the Air to disconnect the battery from the logic board.
-
-
-
Remove the following five screws securing the battery to the upper case:
-
Three 6.3 mm T5 Torx screws
-
Two 2.4 mm T5 Torx screws
-
-
-
Lift the battery from its edge nearest the logic board and remove it from the upper case.
-
Charge it to 100%, and then keep charging it for at least 2 more hours. Then, unplug and use it normally to drain the battery. When you see the low battery warning, save your work, and keep your laptop on until it goes to sleep due to low battery. Wait at least 5 hours, then charge your laptop uninterrupted to 100%.
-
If you notice any unusual behavior or problems after installing your new battery, you may need to reset your MacBook's SMC.
-


To reassemble your device, follow these instructions in reverse order.
Отменить: Я не выполнил это руководство.
614 человек успешно провели ремонт по этому руководству.


96 Комментарии к руководству
My Mid 2012 doesn't have any plastic on the battery connector. Near to impossible to remove it.
Mine did. ¯\_(ツ)_/¯
Worked flawlessly on my MBA. Installed in 5 minutes. Coconut Battery now reports 6801 mAh on a design capacity of 6700 mah. That's an improvement as my old battery was clocking a meager 61% of design capacity (i.e., 4087) after 371 cycles.
Easy. Perfect replacement.
I tried to opened it and I failed. The screw doesn't work well. Worst idea ever!
Be sure to use the required special pentalobe screwdriver. Using the incorrect screwdriver, such as a Philips head, can easily damage the screw head, making it very difficult to remove.