Перейти к основному содержанию

MacBook Pro 13" Function Keys Late 2016 Lower Case Replacement

Выберете то, что вам нужно

  1. MacBook Pro 13" Function Keys Late 2016 Lower Case Replacement, Disable Auto Boot: шаг 1, изображение 1 из 3 MacBook Pro 13" Function Keys Late 2016 Lower Case Replacement, Disable Auto Boot: шаг 1, изображение 2 из 3 MacBook Pro 13" Function Keys Late 2016 Lower Case Replacement, Disable Auto Boot: шаг 1, изображение 3 из 3
    • Before starting this procedure, you must disable your Mac's Auto Boot feature. Auto Boot powers on your Mac when you open the lid, and may be accidentally triggered during disassembly. Use this guide or follow the abbreviated instructions below to disable Auto Boot. This command may not work on all Macs.

    • Power on your Mac and launch Terminal.

    • Copy and paste the following command (or type it exactly) into Terminal:

    • sudo nvram AutoBoot=%00

    • Press [return]. If prompted, enter your administrator password and press [return] again. Note: Your return key may also be labeled ⏎ or "enter."

    • You can now safely power down your Mac and open the bottom case, without it accidentally powering on.

    • When your repair is complete and your Mac is successfully reassembled, re-enable Auto Boot with the following command:

    • sudo nvram AutoBoot=%03

  2. MacBook Pro 13" Function Keys Late 2016 Lower Case Replacement, Lower Case: шаг 2, изображение 1 из 1
    Инструмент, используемый на этом этапе:
    Magnetic Project Mat
    $19.95
    Купить
    • Before proceeding, unplug and power down your MacBook. Close the display and lay it on a soft surface, top-side down.

    • Use a P5 Pentalobe driver to remove the six screws securing the lower case:

    • Two 6.2 mm screws

    • Two 5.3 mm screws

    • Two 3.4 mm screws

    • Throughout this repair, keep track of each screw and make sure it goes back exactly where it came from to avoid damaging your device.

  3. MacBook Pro 13" Function Keys Late 2016 Lower Case Replacement: шаг 3, изображение 1 из 2 MacBook Pro 13" Function Keys Late 2016 Lower Case Replacement: шаг 3, изображение 2 из 2
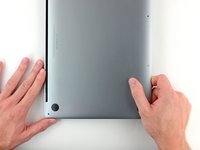
    • Apply a suction handle to the lower case near the front-center area of the MacBook Pro.

    • Lift the suction handle to create a slight separation between the lower case and the chassis.

  4. MacBook Pro 13" Function Keys Late 2016 Lower Case Replacement: шаг 4, изображение 1 из 3 MacBook Pro 13" Function Keys Late 2016 Lower Case Replacement: шаг 4, изображение 2 из 3 MacBook Pro 13" Function Keys Late 2016 Lower Case Replacement: шаг 4, изображение 3 из 3
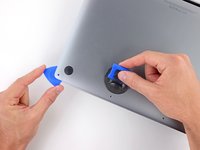
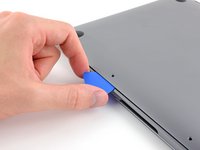
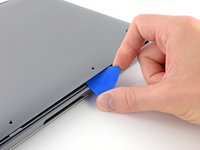
    • Insert one corner of an opening pick into the space between the lower case and the chassis.

    • Slide the opening pick around the nearest corner and halfway up the side of the case.

    • This releases the first of the hidden clips securing the lower case to the chassis. You should feel and hear the clip pop free.

  5. MacBook Pro 13" Function Keys Late 2016 Lower Case Replacement: шаг 5, изображение 1 из 3 MacBook Pro 13" Function Keys Late 2016 Lower Case Replacement: шаг 5, изображение 2 из 3 MacBook Pro 13" Function Keys Late 2016 Lower Case Replacement: шаг 5, изображение 3 из 3
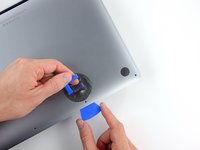
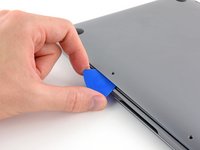
    • Repeat the previous step on the opposite side, sliding your opening pick under the lower case and up the side to pop the second clip free.

  6. MacBook Pro 13" Function Keys Late 2016 Lower Case Replacement: шаг 6, изображение 1 из 3 MacBook Pro 13" Function Keys Late 2016 Lower Case Replacement: шаг 6, изображение 2 из 3 MacBook Pro 13" Function Keys Late 2016 Lower Case Replacement: шаг 6, изображение 3 из 3
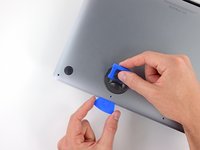
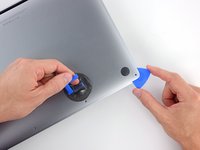
    • Insert your opening pick once again under the front edge of the lower case, near one of the two centermost screw holes.

    • Give the pick a firm twist to pop free the third clip securing the lower case to the chassis.

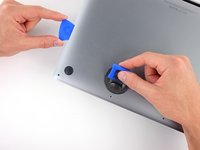
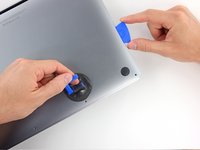
    • Repeat this procedure near the other of the two centermost screw holes, popping the fourth clip free.

  7. MacBook Pro 13" Function Keys Late 2016 Lower Case Replacement: шаг 7, изображение 1 из 3 MacBook Pro 13" Function Keys Late 2016 Lower Case Replacement: шаг 7, изображение 2 из 3 MacBook Pro 13" Function Keys Late 2016 Lower Case Replacement: шаг 7, изображение 3 из 3
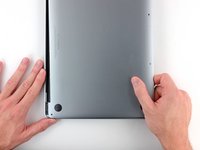
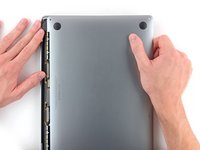
    • Pull the lower case firmly towards the front of the MacBook (away from the hinge area) to separate the last of the clips securing the lower case.

    • It may help to pull first at one corner, then the other.

    • This may require a lot of force.

  8. MacBook Pro 13" Function Keys Late 2016 Lower Case Replacement: шаг 8, изображение 1 из 1
    • Remove the lower case.

Заключение

To reassemble your device, follow the above steps in reverse order.

Take your e-waste to an R2 or e-Stewards certified recycler.

Repair didn’t go as planned? Check out our Answers community for troubleshooting help.

25 участников успешно повторили данное руководство.

Jeff Suovanen

Участник с: 08/06/13

427 118 Репутация

Автор 259 руководств

Команда

iFixit Участник iFixit

Staff

136 членов

Автор 16 573 руководств

Один комментарий

Une ventouse de fixation de crochet sur carrelage,

permet de soulever le fond du macBP.

M. Can - Ответить

Добавить комментарий

Просмотр статистики:

За последние 24часов: 10

За последние 7 дней: 40

За последние 30 дней: 163

За всё время: 21,536