Этот перевод был сделан машиной и пока не проверен человеком. Говорите на этом языке? Просмотрите его.
Введение
Используйте это руководство для замены шумного или сгоревшего вентилятора.
Выберете то, что вам нужно
-
-
-
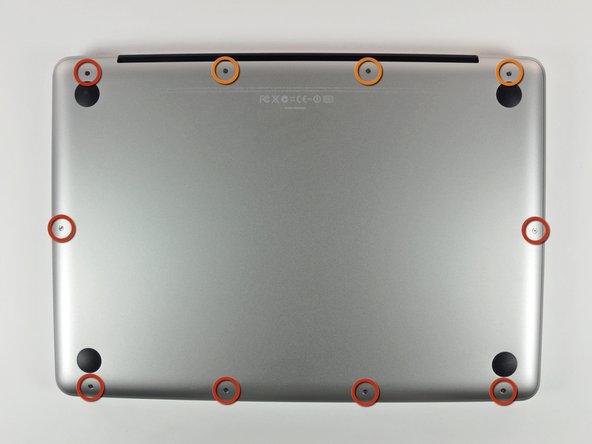
Выкрутите следующие 10 винтов, удерживающих нижнюю крышку MacBook Pro 13" Unibody:
-
Семь винтов Phillips длиной 3 мм.
-
Три винта Phillips длиной 13,5 мм.
 Спросите у FixBot
-
-
-
Слегка приподнимите нижнюю крышку и сдвиньте ее в сторону задней части компьютера, чтобы вывести из пазов монтажные выступы.
-
-
-
-
-
-
Используйте плоский конец пластиковой лопатки (spudger), чтобы поддеть и извлечь разъем аккумулятора из гнезда на логической плате.
-
-
-
-
-
Используйте лопатку (spudger), чтобы поддеть разъем вентилятора и извлечь его из гнезда на логической плате.
-
-
-
Открутите следующие три винта:
-
Один винт T6 Torx длиной 7 мм
-
Два винта T6 Torx длиной 5,4 мм
-
-
-
Извлеките вентилятор из верхней части корпуса.
-
-


Для сборки устройства выполните эти инструкции в обратном порядке.
Отменить: Я не выполнил это руководство.
133 человек успешно провели ремонт по этому руководству.

4 Комментарии к руководству
Thanks Walter Galan for this guide its my first repair using fixit.
So I noticed MacBook Pro’s Fan is not working leaving the equipment very hot.
I bought a new part in Ifixit and repair my laptop.
The trickiest part is removing the motherboard connector. I did this using spudger tool with success but spend some time with careful.
Just I noticed again before install new part that is noising when spinning. So I force a little the the metal case to put away propellers that was contacting with her.
Another suggestion is clean fan before with a hair dryer for example, same to the place where will put the new fan.
So repair made with sucess!!!
The repair was quick and simple with the use of an iFixit toolkit that I conveniently already had. The fan works well. Thank you to Walter Galan for this easy-to-follow guide and thank you to the guys at the iFixit store for the speedy shipment.
Image #4 is very misleading. This is why many people are breaking their connectors. Please correct this and make it VERY clear that one has to put the spudger straight behind the cables, NOT behind the connector, as shown in the pic.
Yea I broke my connector thanks to you guys that was very misleading!!!! 😡
