Введение
Did your display assembly have an unfortunate encounter with a hard surface? Use this guide to replace it.
Выберете то, что вам нужно
-
-
-
Remove the following P5 pentalobe screws securing the lower case to the MacBook Pro:
-
Eight 3.0 mm
-
Two 2.3 mm
 Спросите у FixBot
-
-
-
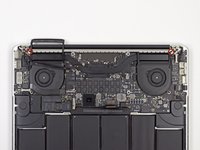
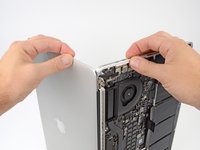
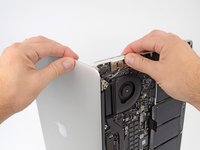
Lifting from the edge nearest the clutch cover, lift the lower case off the MacBook Pro.
-
Set the lower case aside.
-
-
-
-
-
Peel back the warning label covering the battery connector.
-
-
-
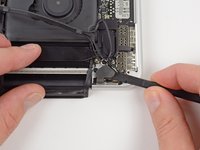
Using the flat end of a spudger, gently pry the battery connector straight up out of its socket on the logic board.
-
Bend the battery cables back and out of the way, ensuring that the battery connector doesn't accidentally make contact with the logic board.
-
-
-
-
Инструмент, используемый на этом этапе:Tweezers$4.99
-
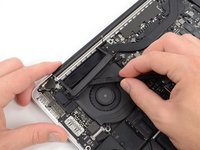
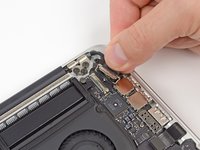
Use a spudger or tweezers to pry the three AirPort antenna cables straight up off of their sockets on the AirPort board.
-
-
-
-
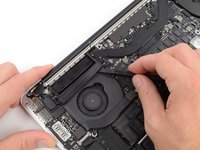
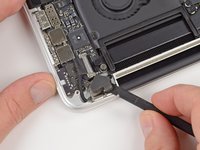
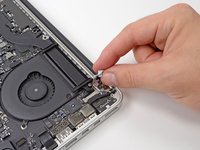
Use the tip of a spudger to push the camera cable's plug toward the fan and out of its socket on the logic board.
-
-
-
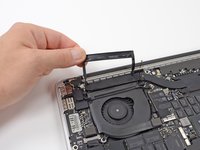
Insert the flat end of a spudger underneath the rubber heat sink cover on the right fan.
-
Slide the spudger underneath the length of the cover, releasing the adhesive.
-
Lift the cover and flip it back so that you can access the cables underneath.
-
-
-
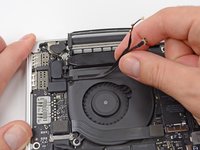
Use your fingers to pull the AirPort/Camera cables up off the fan.
-
Carefully de-route the cables from the plastic cable guide.
-
-
-
-
-
Use the flat end of a spudger to pry off the two rubber hinge covers, one from each end of the device.
-
-
-
Remove the two 3.1 mm T5 Torx screws securing the aluminum hinge covers to the upper case.
-
Remove the two aluminum hinge brackets from the MacBook Pro.
-
-
-
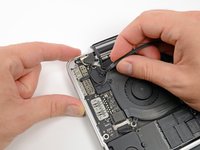
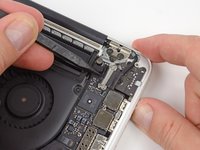
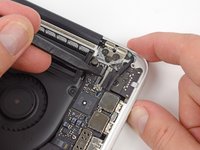
Use the tip of a spudger to pry the display data cable lock and rotate it toward the DC-In side of the computer.
-
Pull the display data cable straight out of its socket on the logic board.
-
-
-
Remove four out of the six 5.3 mm T8 Torx screws securing the display to the upper case.
-
-
-
Open the MacBook Pro approximately 110 degrees, and place it sideways on the table, as shown.
-
While holding the display and upper case together with your left hand, remove the remaining T8 Torx screw from the lower (closer to the table) display bracket.
-
-
-
While holding the display and upper case together with your left hand, remove the remaining T8 Torx screw from the upper display bracket.
-
-
-
Grip both halves of the device, one in each hand.
-
Gently push forward on the bottom half of the device to detach it from the display assembly.
-
Carefully set each component aside, making sure to set down the lower half keyboard-side down.
-
-


To reassemble your device, follow these instructions in reverse order.
Отменить: Я не выполнил это руководство.
161 человек успешно провели ремонт по этому руководству.

12 Комментарии к руководству
I found that this was a really easy project. even easier than replacing my iphone 5 screen. however the replacement screen I purchased from a third party did not have the wires for the webcam connected. they had been severed off. Also the antenna and connectors were not included either so I had to take them from the old broken screen. this was at first frustrating but then I thought about how often I use a webcam and quickly carried on with the project because I really don't need a webcam (and now the NSA can't see me hehe). also the plastic covering for the antenna which is talked about in the retina display teardown as easy to remove was in fact far more difficult for me to remove than anything. I ended up nearly breaking the plastic covering in half trying to remove it.
Overall, this was an easy and painless 2/10 difficulty to perform and had the cords for the webcam been present it would not have made it any more difficult. Piece of cake.
Hi there. I see you noted the antenna cover was difficult. But can you remember how things are connected on thre antenna? I've just got a machine, and someone has broken all the antenna connectors. The antenna doesn't cost much but all come with isight cables too. I'm hoping you can just disconnect and remove the isight cable that comes with the new antenna and just connect the one that is already there.
Very easy thank you,
Most difficult for me was step 15 (to put back the new screen) and step 5 (put back the little things) but very easy actually !
i would like to thank you for the guide-very easy
Who rates these difficulty levels?