Перейти к основному содержанию
Присоединяйся к сообществу ремонтников - Создай аккаунт

Marshall Woburn Tweeter Replacement

Выберете то, что вам нужно

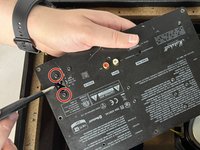
    1. Marshall Woburn Tweeter Replacement, Back Panel: шаг 1, изображение 1 из 2 Marshall Woburn Tweeter Replacement, Back Panel: шаг 1, изображение 2 из 2
      • Before starting, unplug the speaker from any power source. After unplugging the device, wait around 10 minutes before starting to let the capacitor fully discharge.

      • On a flat surface, orient the device so that the front grille is facing downward.

      • Using a Phillips #1 screwdriver, remove the ten outer 28.6 mm screws marked in red.

      • Remove the eight inner 28.6 mm screws with the Phillips #1 screwdriver.

      Спросите у FixBot

      Добавить комментарий

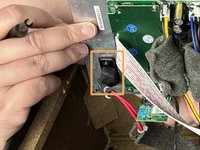
    2. Marshall Woburn Tweeter Replacement: шаг 2, изображение 1 из 2 Marshall Woburn Tweeter Replacement: шаг 2, изображение 2 из 2
      • Lift the back input board slightly above the back panel.

      • Rotate the input board so that you can slide it into the hole in the back panel that it came from.

      • Fully slide the input board through the back panel and set it down gently inside the speaker.

      Спросите у FixBot

      Добавить комментарий

    3. Marshall Woburn Tweeter Replacement: шаг 3, изображение 1 из 1
      • Grab the panel by the large hole and lift one side until you can fit your hand under.

      • Use your hand to fully remove the back panel from the rest of the frame.

      Спросите у FixBot

      Добавить комментарий

    1. Marshall Woburn Tweeter Replacement, I/O Board: шаг 4, изображение 1 из 1
      • Disconnect the 5 wires circled in red from the back input board.

      • Grip and pull the connectors, not the wires.

      • There may be a little resistance when pulling on the connectors, but it should not require excessive force.

      Спросите у FixBot

      Добавить комментарий

    2. Marshall Woburn Tweeter Replacement: шаг 5, изображение 1 из 2 Marshall Woburn Tweeter Replacement: шаг 5, изображение 2 из 2
      • Remove the two 12.7 mm screws marked in red from the front of the back input panel with a Phillips #1 screwdriver.

      • Remove the power input from the back side of the panel.

      Спросите у FixBot

      Добавить комментарий

    3. Marshall Woburn Tweeter Replacement: шаг 6, изображение 1 из 1
      • Completely remove the I/O board and the attached plate.

      Спросите у FixBot

      Добавить комментарий

    1. Marshall Woburn Tweeter Replacement, Tweeter: шаг 7, изображение 1 из 1
      • Using a Phillips #1 screwdriver, remove the eight 15.8 mm screws attaching the tweeters to the frame.

      • Disconnect the two wires from the back of each tweeter.

      Спросите у FixBot

      Добавить комментарий

    2. Marshall Woburn Tweeter Replacement: шаг 8, изображение 1 из 1
      • Lift the tweeter from the frame to remove it.

      Спросите у FixBot

      Добавить комментарий

Заключение

To reassemble your device, follow these instructions in reverse order.

Отменить: Я не выполнил это руководство.

Kenneth

Участник с: 10/29/23

174 Репутация

Автор 2 руководств

Команда

UMass Dartmouth, Team 2-4, Gulbrandsen Fall 2023 Участник UMass Dartmouth, Team 2-4, Gulbrandsen Fall 2023

UMASSD-GULBRANDSEN-F23S2G4

3 членов

Автор 12 руководств

1 Комментарий к руководству

Any ideas to which new tweeters to buy?

Lars - Ответить Поделиться

Добавить комментарий

Статистика просмотров:

За последние 24 часов: 3

За последние 7 дней: 13

За последние 30 дней: 33

За всё время: 1,001