Введение
If you need to replace the LCD screen of your Minolta Dimage Xt, follow this guide. The LCD screen is held into the camera by the outer casing and an internal bracket. It is one component, so there isn't a way to just replace the LCD screen, without first removing other parts. Once screen is out of the bracket, wires must be removed to completely remove the LCD screen.
Before beginning this guide, be sure to remove the batteries from the camera.
Выберете то, что вам нужно
-
-
-
Locate and remove the silver screws on each side of the camera.
 Спросите у FixBot
-
-
-
Then, carefully pry apart the front and back outer casing away from the internal components.
-
-
-
-
-
-
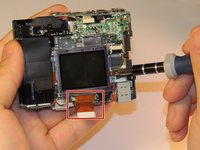
The LCD screen has wires connecting it to the rest of the camera. A bracket holds the LCD in place, so there are no screws beyond this point.
-
-
-
Detach the connector at the bottom from the LCD screen.
-
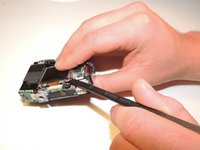
Starting from the side or a corner gently slide the spudger underneath the screen.
-
Press the tip of the spudger down as far is you can and slowly pry the LCD screen away from the bracket.
-
-
-
Check to make sure the wires are connected, so it will receive proper power supply.
-
To remove the bracket from the LCD screen, remove two 1.5 mm screws using the Phillips #00 screwdriver.
-
-



To install a new LCD screen you will have to reconnect the wires and properly place them in the bracket. Make sure to reattach the ribbon wire before finishing repairs.
Отменить: Я не выполнил это руководство.
Еще один человек закончил это руководство.

Команда

Clemson, Team 12-4, Benson Spring 2013 Участник Clemson, Team 12-4, Benson Spring 2013
CLEM-BENSON-S13S12G4
3 членов
Автор 14 руководств
1 Комментарий к руководству
Great procedure, thank you.
Do you know where I can buy the LCD replacement part?
I have a Konica Minolta Dimage X1 8.0 MP
