Эта версия возможно содержит некорректные исправления. Переключить на последнюю проверенную версию.
Выберете то, что вам нужно
-
Этот шаг не переведен. Помогите перевести
-
Use a SIM eject bit, SIM eject tool, or paper clip to remove the SIM card from your phone.
-
-
Этот шаг не переведен. Помогите перевести
-
Prepare an iOpener and heat the front of the phone along its left edge for about two minutes, or until it's slightly too hot to touch. This will help soften the adhesive securing the display.
-
-
Этот шаг не переведен. Помогите перевести
-
Refer to the second and third images and familiarize yourself with the width of the adhesive around edges of the display.
-
-
Этот шаг не переведен. Помогите перевести
-
Apply a suction cup to the display, near the middle of the left edge.
-
Pull the suction cup with firm, constant pressure to create a slight gap between the display panel and the rear case.
-
If the display doesn't separate even with significant force, apply more heat to further soften the adhesive and try again. The adhesive cools quickly, so you may need to heat it repeatedly.
-
-
Этот шаг не переведен. Помогите перевести
-
Slide the tool along the left edge of the phone, cutting through the adhesive securing the display.
-
-
Этот шаг не переведен. Помогите перевести
-
Slide the opening pick down and cut the adhesive around the bottom of the display.
-
-
Этот шаг не переведен. Помогите перевести
-
Continue cutting through the adhesive on the top and right sides of the phone.
-
-
-
Этот шаг не переведен. Помогите перевести
-
Once all the adhesive is cut, carefully lift open the display from the left edge.
-
Prop the display unit at a 90 degree angle against a box to prevent the display and fingerprint cables from bending or tearing.
-
-
Этот шаг не переведен. Помогите перевести
-
Remove the yellow sticker covering two of the black Phillips screws below the earpiece.
-
-
Этот шаг не переведен. Помогите перевести
-
Remove the following Phillips screws from the midframe:
-
Sixteen 3.8 mm black screws
-
Three 2.4 mm silver screws
-
-
Этот шаг не переведен. Помогите перевести
-
Insert the flat end of a spudger between the midframe and the left edge of the phone and carefully pry to release the two clips holding the midframe in place.
-
-
Этот шаг не переведен. Помогите перевести
-
Use the point of a spudger to disconnect the larger of the two display cable connectors.
-
-
Этот шаг не переведен. Помогите перевести
-
Disconnect the smaller display cable connector.
-
Gently continue lifting the cable to break the adhesive seal and pull the cable away from the motherboard.
-
-
Этот шаг не переведен. Помогите перевести
-
At the opposite end of the phone, disconnect the fingerprint sensor cable.
-
-
Этот шаг не переведен. Помогите перевести
-
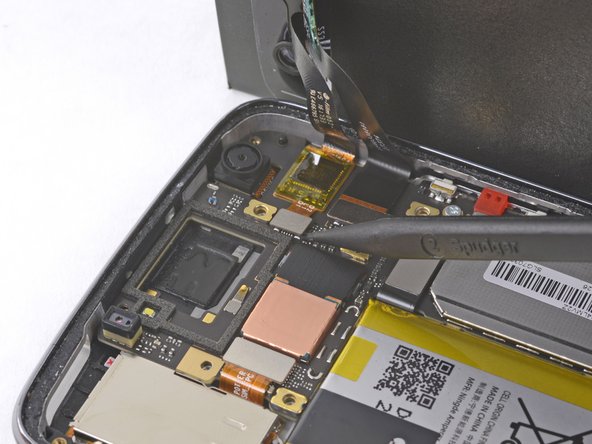
Use the point of a spudger to disconnect the battery by prying its connector straight up from the motherboard.
-
-
Этот шаг не переведен. Помогите перевести
-
Peel back the black pull tab from the top of the battery and pull straight up with firm, steady pressure to break the adhesive holding the battery in place.
-
-
Этот шаг не переведен. Помогите перевести
-
If your pull tab breaks or the adhesive is too strong to break, use an opening pick to gently pry the battery out of the case.
-
-
Этот шаг не переведен. Помогите перевести
-
Once the battery is loose, remove it from the phone.
-
Remove any remaining adhesive from the phone, and clean the entire area under the battery with isopropyl alcohol.
-
Apply a few new strips of pre-cut adhesive or Tesa tape.
-
Press the new battery firmly into place for 5-10 seconds.
-


Отменить: Я не выполнил это руководство.
46 участников успешно повторили данное руководство.

19 Комментариев
I agree with Andy. Tutorial is perfectly explained, but construction design obviously is to avoid buyers change without risk of damage in comparison like other phones like Moto G 2nd version or Nexus 4 which are not piece of cake however is not to difficult. I hate that mind of developers trying to fix on design “battery for life of device”. That is the issue. Almost the problem is the battery. No matter how much well it is, continue being the critical lifetime part. Must need replaceable for users.
I personally wish phone makers would stop doing this crud, the battery is the least of the worries and should be easily replaceable, likely folks will want to upgrade to a new phone before battery is “dead” and more likely you will have to buy a new screen because of how fragile they make these things especially the new fad of ALL GLASS design >:(…wish moto would not advertise any water proof of any sort, just had my moto G4 Play die because of a small bit of water getting on the screen, now have to buy a brand new one, there goes over $400 down the drain….got so mad I beat the crud out of it smashed it right to bits when it refused to power on at all after drying out in dry rice for a few days, but at least it had an easy to remove battery with nowhere to buy a $20 battery for less then $90 (ship and tax)
The article is great, but I wouldn’t go through such torture. And the cost to have a repair shop do it might be 40% of the price of a new phone. I agree with Andy and Zacarias. This practice of non-replaceable batteries, claiming that this design is “waterproof” and makes the phone slimmer, is all just a racket. I kept my Samsung S3 with replaceable battery for four years, and only gave it up because it couldn’t take the Android updates anymore. Now only LG sells phones with replaceable batteries, but the LG phone I tried was a piece of junk. It looks like I’ll just have to replace my Moto phone every two years now. That’s unfair.
Totally agree to comments by Claude. Real Water sealing is not being achieved by making batteries non replaceable. Now nano coating technology is there to make circuits water repellent. So water sealing is no longer an excuse for manufacturers. Hard to replace battery is just planned obsolescence.
Rineez -