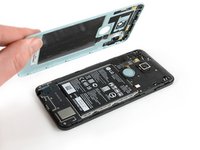
Перейти к основному содержанию

Nexus 5X Midframe Replacement

Выберете то, что вам нужно

  1. Nexus 5X Midframe Replacement, SIM Card Tray: шаг 1, изображение 1 из 3 Nexus 5X Midframe Replacement, SIM Card Tray: шаг 1, изображение 2 из 3 Nexus 5X Midframe Replacement, SIM Card Tray: шаг 1, изображение 3 из 3
    • Insert a SIM card ejection tool into the hole on the SIM card tray, located on the left edge of the phone.

    • Press in to eject the SIM card tray.

    • Remove the SIM card tray.

  2. Nexus 5X Midframe Replacement, Rear Panel: шаг 2, изображение 1 из 3 Nexus 5X Midframe Replacement, Rear Panel: шаг 2, изображение 2 из 3 Nexus 5X Midframe Replacement, Rear Panel: шаг 2, изображение 3 из 3
    • Place an opening pick in the opening of the SIM card tray slot and twist it sideways to release the first plastic clip that holds the rear panel in its place.

    • Slide the opening pick around the top edge of the phone to release the plastic clips that secure the rear panel.

  3. Nexus 5X Midframe Replacement: шаг 3, изображение 1 из 3 Nexus 5X Midframe Replacement: шаг 3, изображение 2 из 3 Nexus 5X Midframe Replacement: шаг 3, изображение 3 из 3
    • Continue to slide the opening pick around all sides of the phone to release all clips that secure the rear panel.

  4. Nexus 5X Midframe Replacement: шаг 4, изображение 1 из 2 Nexus 5X Midframe Replacement: шаг 4, изображение 2 из 2
    • Tilt the opening pick to lift the rear panel a little bit.

    • There are two more plastic clips next to the fingerprint sensor. Release them by gently pulling the rear panel.

    • Remove the rear panel.

  5. Nexus 5X Midframe Replacement, Midframe: шаг 5, изображение 1 из 1
    • Remove the ten 3.6 mm Phillips screws that secure the midframe.

  6. Nexus 5X Midframe Replacement: шаг 6, изображение 1 из 2 Nexus 5X Midframe Replacement: шаг 6, изображение 2 из 2
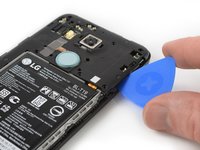
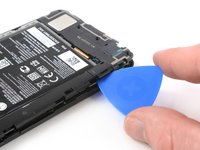
    • Insert an opening pick into the SIM card tray slot and twist the opening pick sideways to release the plastic clips.

  7. Nexus 5X Midframe Replacement: шаг 7, изображение 1 из 2 Nexus 5X Midframe Replacement: шаг 7, изображение 2 из 2
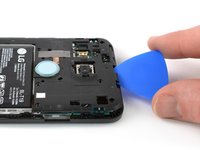
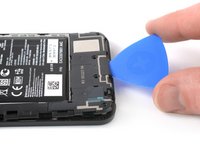
    • Continue sliding the opening pick around the upper part of the midframe to release the plastic clips.

  8. Nexus 5X Midframe Replacement: шаг 8, изображение 1 из 2 Nexus 5X Midframe Replacement: шаг 8, изображение 2 из 2
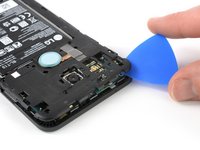
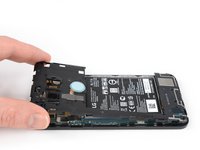
    • Use the plastic pick to pry open the plastic clips on the long edge of the midframe and on the bottom edge.

    • Make sure the clips on the long edge are released. The midframe is prone to break here if they are not disconnected properly.

  9. Nexus 5X Midframe Replacement: шаг 9, изображение 1 из 2 Nexus 5X Midframe Replacement: шаг 9, изображение 2 из 2
    • Make sure all the clips are free.

    • Carefully remove the midframe.

Заключение

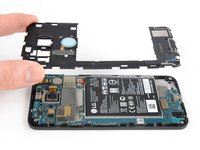
To reassemble your device, follow these instructions in reverse order. If your middle panel is damaged or broken, install the new panel instead.

Take your e-waste to an R2 or e-Stewards certified recycler.

Repair didn’t go as planned? Check out our Nexus 5X Answers community for troubleshooting help.

7 участников успешно повторили данное руководство.

Dominik Schnabelrauch

Участник с: 11/23/16

200 393 Репутация

Автор 682 руководств

Команда

iFixit Участник iFixit

Staff

135 членов

Автор 16 476 руководств

2 Комментариев

Has anyone else run into the different screws holding the midframe? I opened my son's phone today to swap out the battery and found the screws to be tri-wing. Imagine my confusion. I've been into to my wife's Nexus 5x before, and it has phillips-head screws. Weird.

Taylor Says So - Ответить

I’m trying to confirm whether or not the antenna for cellular signal resides in the loudspeaker, or the bottom section of the midframe. If I replace the bottom piece of the midframe, am I replacing the cellular antenna?

steve d - Ответить

Добавить комментарий

Просмотр статистики:

За последние 24часов: 0

За последние 7 дней: 0

За последние 30 дней: 8

За всё время: 3,839