Введение
In this guide, we will give you step-by-step instructions on how to detach the lens from the logic board so that it can be replaced or repaired.
Выберете то, что вам нужно
-
-
-
Remove the memory stick from the camera.
-
Remove the batteries from the camera.
 Спросите у FixBot
-
-
-
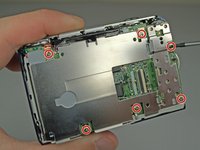
Remove all six 4.3mm silver screws along the perimeter of the camera using the Phillips #00 screwdriver.
-
There is one screw hidden under the AV cover that also needs to be removed.
-
-
-
Pry the back cover from the left side of the camera. Remove the cover gently.
-
-
-
-
-
Remove the tape on the right side of the LCD screen.
-
Gently lift the LCD screen from its base.
-
-
-
-
Lift the black latch connecting the LCD ribbon to the motherboard.
-
Gently pull the LCD ribbon out.
-
-
-
-
Pry back the front cover of the camera starting from the right side.
-
-
-
-
-
Remove the 6 Phillips #00 screws anchoring the LCD base to the motherboard.
-
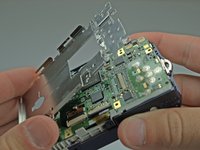
Remove the LCD base plate.
-
-
-
Lift the black latch connecting the LCD ribbon to the motherboard.
-
Gently pull the lens ribbon out.
-
-
-
Desolder the connection of the motherboard to the lens ribbon using a soldering iron and desoldering wick.
-
-
-
Lift up the black and copper covering on the left side of the camera.
-
-
Инструмент, используемый на этом этапе:Tweezers$4.99
-
Pull the wiring at the top right of the camera away from the lens with tweezers.
-
-
-
Remove the cross-hair shaped wire cap to the left of the lens.
-
-
-
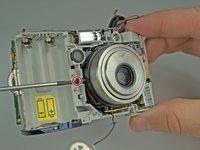
Remove the 3 screws holding the lens to the camera frame.
-
Two 3.8mm black Phillips #00 screws on the sides of the lens.
-
One 4.6mm silver Phillips #00 screw on the bottom of the lens.
-
-
-
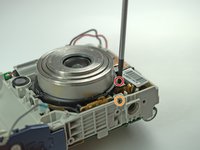
There is a screw behind flash tube holding lens. Remove it, then gently pull the lens out. Be sure that the lens's ribbon clears the motherboard.
-
-





To reassemble your device, follow these instructions in reverse order.
Отменить: Я не выполнил это руководство.
6 человек успешно провели ремонт по этому руководству.

Команда

Cal Poly, Team 9-23, Regan Fall 2010 Участник Cal Poly, Team 9-23, Regan Fall 2010
CPSU-REGAN-F10S9G23
4 членов
Автор 10 руководств
3 Комментарии к руководству
Be careful. I got painful shock from the flash capacitor even though the camera had been turned off and the batteries removed. It is the red and black wires and green tube on the left side.
Discharge it through a resistor. Trying to short it with a screwdriver made ahuge spark and left a mark on the screwdriver.
Aconteceu-me o mesmo, agora não a consigo ligar.
O meu caro Sdalimon tem alguma sugestão?
Cumprimentos.
.....okay but how do I fix it???
