Введение
If your camera is not turning on and you have tried a replacement battery, you might need to replace the motherboard. This guide will show you how to replace it.
Выберете то, что вам нужно
-
-
Locate the battery compartment on the bottom of the camera directly below the mode dial.
 Спросите у FixBot
-
-
-
Find the marked arrow on the battery compartment door and firmly push following the arrow's direction to release the latch.
-
-
-
Release the latch and allow it to completely open.
-
Insert the battery by following the diagram on the inside of the compartment door.
-
Close the compartment door and firmly press on the latch until you hear a clicking sound.
-
-
-
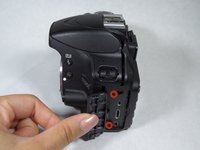
Turn the camera so the bottom faces you.
-
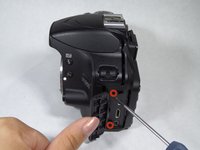
Locate the 6 screws and using the Phillips #00 screwdriver, remove them.
-
-
-
-
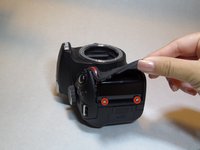
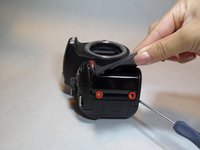
Locate the rubber grip directly below the shutter-release button.
-
Lift the rubber grip using a plastic opening tool to locate and remove the two screws underneath.
-
-
-
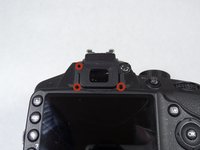
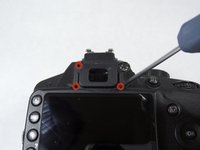
Locate and remove the 4 screws near the eye piece above the LCD screen. The 4th screw is hidden behind the +/- label which can be carefully taken off with a needle.
-
-
-
Locate the connector cover to the left of the LCD screen.
-
Unlatch the connector cover to reveal two screws.
-
Locate and remove the two screws.
-
-
-
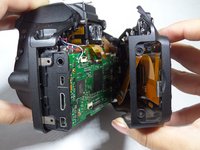
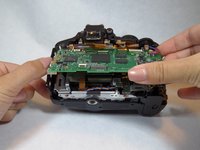
Gently pull the back portion of the camera, starting from the left of the LCD screen, then do the same on the other side of the camera.
-
-
-
Carefully flip the 5 brown plastic connectors using the plastic opening tool.
-
-
-
Unlatch the red and blue connecting cable from its connecting base.
-
-
-
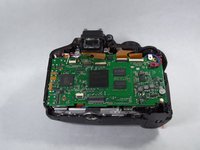
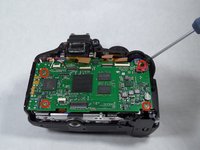
Locate and remove the 4 screws on the motherboard.
-
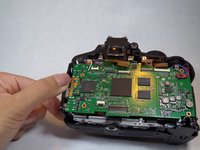
Place a finger under the motherboard to gently lift it.
-
Carefully lift the motherboard from the camera and you're set!
-


To reassemble your device, follow these instructions in reverse order. note, there are two metal interference protectors over the board that have to be un soldered as well as the 4 wires shown to the left top of the board that have to be un soldered and re soldered to the new board
Отменить: Я не выполнил это руководство.
27 человек успешно провели ремонт по этому руководству.
Команда

CSU Fullerton, Team 1-3, Bruce Fall 2014 Участник CSU Fullerton, Team 1-3, Bruce Fall 2014
CSUF-BRUCE-F14S1G3
6 членов
Автор 4 руководств
19 Комментарии к руководству
Some D3200s must be built differently than others.
To get the back off of my D3200, there are two more screws that had to come out, not mentioned in this guide, and both well-hidden.
One is in the viewfinder focus adjustment knob,. The sticker has to be pried off of this knob, exposing that screw. The other is under the rubber trim piece between the “Command Dial” and the “Multi-Selector”.
The pictures here show the viewfinder focus adjustment knob still in place with the back removed. On mine, it's part of the back, and the back doesn't come off without that knob coming off with it.
This guide doesn't say what to do about the four wires coming off the motherboard, near the upper left corner. There's no connector, and if one were going to remove and replace the motherboard, I can see no option other than to desolder and resolder them, but that would involve equipment and skills that I don't think this guide intends to assume that the reader has.
Hi
Got the motherboard off and after lots of screws and a bit of a bend on the subframe changed filter on sensor to 720 IF.put it back together and it works!!!!
However the four wires i snipped intending to solder a small length on them to join but did not bother as was fairly sure they went to speaker and mic both are very poor quality and not needed for my intended use (IR).
after you snip the wires on the motherboard and turn it over there is a large ribbon connector to flip open then you can remove the board.
I know this is and old post, but would you possibly know if the D3300 worked the same? Would I be able to replace the motherboard on that one by using this guide? My SD card slot broke, and I needed to replace it.
Also, my D3200 has some metal shielding on and around the motherboard,not shown on this guide.
I think they are all much the same (3200) Same problem here plus I am not sure how you remove the the ribbon under the motherboard,you certainly cannot remove the ribbon without removing the four wires.
time for the soldering iron me thinks!!!!!