Этот перевод был сделан машиной и пока не проверен человеком. Говорите на этом языке? Просмотрите его.

Замена вентилятора Nintendo Wii mini

Kristin Anderson и 7 другие участники
Последнее обновление 29 июл 2026 г.
Просмотров: 2,2 тыс.
Просмотр статистики:
- За последние 24 часа:
- 4
- За последние 7 дней:
- 20
- За последние 30 дней:
- 97
- За все время:
- 2 203
Комментарии: 0
Никто не оставлял комментариев к этой инструкции. Будете ли Вы первым?
Перейти к комментариям инструкцииЗавершено: 3 4
3 пользователей отметили эту инстркукцию как "завершенное". Вы будете следующим?
4 пользователей отметили эту инструкцию как "завершенное". В том числе и Вы — отличная работа!
Избранные: 3 4
3 эта инструкция понравилась многим пользователям (и они подписались на нее). Вы будете следующим?
4 эта инструкция понравилось многим пользователям (и они подписались на нее), в том числе и Вам!
Введение
Перейти к шагу 1 ↓Это руководство поможет вам заменить вентилятор в приставке Nintendo Wii mini, если он неисправен или вышел из строя. Если ваш вентилятор сломался, важно как можно скорее его заменить, чтобы предотвратить перегрев системы, который может привести к дальнейшим повреждениям. Исправная работа этого компонента также помогает продлить срок службы остальных внутренних деталей, снижая необходимость в их замене.
После успешной замены вентилятора включите систему, чтобы убедиться, что он работает и предотвращает перегрев.
Выберете то, что Вам нужно


-
-
-
Снимите две резиновые ножки на задней панели консоли, чтобы открыть доступ к скрытым винтам.
-
Выкрутите четыре винта Phillips #0 длиной 6 мм.
 Спросите у FixBot
-
-
-
Переверните Wii mini верхней стороной вверх. Затем проведите пластиковым инструментом для открывания по среднему краю консоли, чтобы ослабить верхнюю панель.
-
Аккуратно приподнимите верхнюю панель консоли и отложите её в сторону.
-
-
-
-
Инструмент, используемый на этом этапе:Tweezers$4.99
-
Поверните Wii mini задней панелью к себе.
-
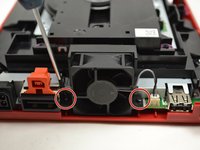
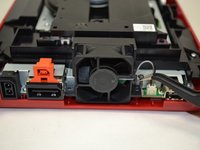
С помощью крестовой отвертки Phillips #0 открутите два винта длиной 6 мм по обе стороны от вентилятора.
-
-
-
-
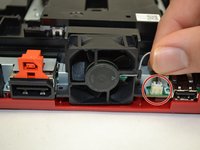
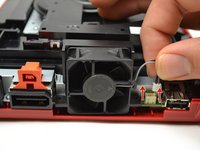
Пальцами аккуратно потяните верхнюю часть разъема с контактами строго вверх, чтобы отсоединить вентилятор от консоли.
-
Снимите вентилятор и отложите его в сторону.
-
-




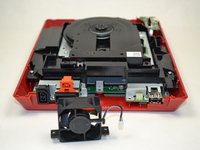
Для сборки устройства выполните эти действия в обратном порядке.
Отменить: Я не выполнил это руководство.
3 человек успешно провели ремонт по этому руководству.


