Перейти к основному содержанию

OnePlus 7T Battery Replacement

Выберете то, что вам нужно

  1. OnePlus 7T Battery Replacement, Heat the rear glass: шаг 1, изображение 1 из 1
    • Be sure to power off your phone before you begin.

    • Apply a heated iOpener to the rear glass for two minutes to loosen the adhesive beneath.

    • A hair dryer, heat gun, or hot plate may also be used, but be careful not to overheat the phone—the AMOLED display and internal battery are both susceptible to heat damage.

  2. OnePlus 7T Battery Replacement, Insert an opening pick: шаг 2, изображение 1 из 3 OnePlus 7T Battery Replacement, Insert an opening pick: шаг 2, изображение 2 из 3 OnePlus 7T Battery Replacement, Insert an opening pick: шаг 2, изображение 3 из 3
    • Apply a suction handle to the right edge of the rear glass.

    • If the back cover is cracked, the suction handle may not stick. Try lifting it with strong tape, or superglue the suction handle in place and allow it to cure so you can proceed.

    • Pull on the suction handle to create a gap between the rear glass and the frame.

    • Insert an opening pick into the gap.

  3. OnePlus 7T Battery Replacement, Slice the adhesive: шаг 3, изображение 1 из 3 OnePlus 7T Battery Replacement, Slice the adhesive: шаг 3, изображение 2 из 3 OnePlus 7T Battery Replacement, Slice the adhesive: шаг 3, изображение 3 из 3
    • Slide the opening pick along the edge to the bottom right corner.

    • Leave the opening pick in the bottom right corner to prevent the adhesive from resealing.

    • Once you have inserted an opening pick, feel free to remove the suction handle or continue to use it for a better grip during this process.

  4. OnePlus 7T Battery Replacement: шаг 4, изображение 1 из 3 OnePlus 7T Battery Replacement: шаг 4, изображение 2 из 3 OnePlus 7T Battery Replacement: шаг 4, изображение 3 из 3
    • Insert a second opening pick in the gap you just created.

    • Slide the opening pick along the edge to the top right corner.

    • If you have trouble with slicing, you can use the iOpener again to soften the adhesive.

    • Leave the opening pick in the top right corner to prevent the adhesive from resealing.

  5. OnePlus 7T Battery Replacement: шаг 5, изображение 1 из 3 OnePlus 7T Battery Replacement: шаг 5, изображение 2 из 3 OnePlus 7T Battery Replacement: шаг 5, изображение 3 из 3
    • When you slice near the camera assembly, insert only the tip of the opening pick (~4-5 mm) to avoid damaging or smearing the camera.

    • Insert a third opening pick under the top right corner of the rear glass.

    • Slide the opening pick along the edge of the phone to the top left corner to cut the adhesive.

    • Leave the opening pick in the top left corner to prevent the adhesive from resealing.

  6. OnePlus 7T Battery Replacement: шаг 6, изображение 1 из 3 OnePlus 7T Battery Replacement: шаг 6, изображение 2 из 3 OnePlus 7T Battery Replacement: шаг 6, изображение 3 из 3
    • Insert a fourth opening pick under the top left corner.

    • Slide the opening pick along the edge to the bottom left corner to cut the adhesive.

    • Leave the opening pick in the bottom left corner to prevent the adhesive from resealing.

  7. OnePlus 7T Battery Replacement: шаг 7, изображение 1 из 2 OnePlus 7T Battery Replacement: шаг 7, изображение 2 из 2
    • Insert a fifth opening pick under the bottom left corner.

    • Slide it along the the edge to the bottom right corner to cut the remaining adhesive.

  8. OnePlus 7T Battery Replacement, Remove the rear glass: шаг 8, изображение 1 из 1
    • Remove the rear glass.

    • Apply new adhesive where necessary after cleaning the relevant areas with isopropyl alcohol (>90%).

    • Secure the new back cover with pre-cut adhesive or double-sided adhesive tape. After installing the back cover, apply strong, steady pressure to your phone for several minutes to help the adhesive form a good bond—a stack of heavy books works well.

  9. OnePlus 7T Battery Replacement, Unscrew the motherboard cover: шаг 9, изображение 1 из 1
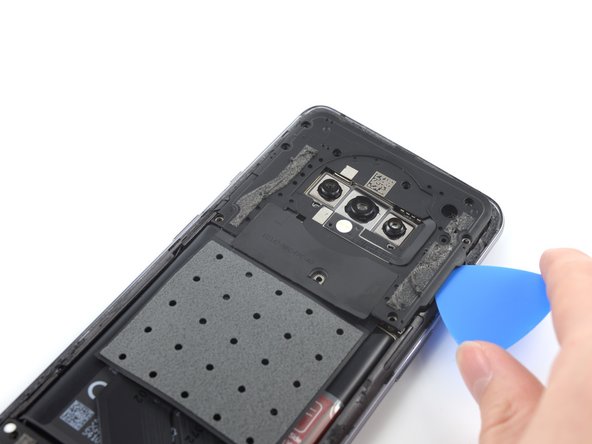
    • Use a Phillips screwdriver to remove the eleven 3.6 mm-long screws securing motherboard cover.

    • One of the screws is hidden beneath a white water damage sticker.

  10. OnePlus 7T Battery Replacement, Remove motherboard cover: шаг 10, изображение 1 из 3 OnePlus 7T Battery Replacement, Remove motherboard cover: шаг 10, изображение 2 из 3 OnePlus 7T Battery Replacement, Remove motherboard cover: шаг 10, изображение 3 из 3
    • Insert the tip of an opening pick under the right bottom of the motherboard cover.

    • Slide the opening pick along the motherboard cover to release the plastic clips that hold it in its place.

    • Remove the motherboard cover.

  11. OnePlus 7T Battery Replacement, Disconnect the battery: шаг 11, изображение 1 из 2 OnePlus 7T Battery Replacement, Disconnect the battery: шаг 11, изображение 2 из 2
    • Use a spudger to disconnect the battery by prying the connector straight up from its socket.

  12. OnePlus 7T Battery Replacement, Disconnect the flex cables: шаг 12, изображение 1 из 3 OnePlus 7T Battery Replacement, Disconnect the flex cables: шаг 12, изображение 2 из 3 OnePlus 7T Battery Replacement, Disconnect the flex cables: шаг 12, изображение 3 из 3
    • Use the flat end of a spudger to disconnect the two flex cables.

  13. OnePlus 7T Battery Replacement, Reposition the flex cables: шаг 13, изображение 1 из 3 OnePlus 7T Battery Replacement, Reposition the flex cables: шаг 13, изображение 2 из 3 OnePlus 7T Battery Replacement, Reposition the flex cables: шаг 13, изображение 3 из 3
    • Bend the two flex cables toward the bottom of the phone and out of the way of the battery.

    • Avoid folding or sharply bending the cables as you reposition them. Doing so could damage the cables.

  14. OnePlus 7T Battery Replacement, Remove the adhesive tape: шаг 14, изображение 1 из 2 OnePlus 7T Battery Replacement, Remove the adhesive tape: шаг 14, изображение 2 из 2
    • Use a spudger to carefully remove the adhesive tape on the left edge from the battery.

  15. OnePlus 7T Battery Replacement, Remove the battery: шаг 15, изображение 1 из 3 OnePlus 7T Battery Replacement, Remove the battery: шаг 15, изображение 2 из 3 OnePlus 7T Battery Replacement, Remove the battery: шаг 15, изображение 3 из 3
    • Peel back the red pull tab.

    • Pull up on the red pull tab to lift the battery out of its recess and swing it up to an upright position.

    • If you're having trouble removing the battery, you can apply an iOpener to loosen the adhesive underneath the battery.

  16. OnePlus 7T Battery Replacement, Remove the battery: шаг 16, изображение 1 из 1
    • Remove the battery.

    • Do not reinstall a damaged or deformed battery, as doing so is a potential safety hazard.

    • Secure the new battery with pre-cut adhesive or double-sided adhesive tape. In order to position it correctly, apply the new adhesive into the device at the places where the old adhesive was located, not directly onto the battery. Press the new battery firmly into place.

    • During reassembly, temporarily reconnect the battery to the motherboard to help align it correctly. Disconnect the battery after it's seated.

Заключение

If possible, turn on your device and test your repair before installing new adhesive and resealing.

To reassemble your device, follow these instructions in reverse order. Apply new adhesive where necessary after cleaning the relevant areas with isopropyl alcohol (>90%).

For optimal performance, calibrate your newly installed battery after completing this guide.

Take your e-waste to an R2 or e-Stewards certified recycler.

Repair didn’t go as planned? Try some basic troubleshooting, or ask our Answers Community for help.

8 участников успешно повторили данное руководство.

Manuel Haeussermann

Участник с: 07/13/22

15 547 Репутация

Автор 71 руководств

Команда

iFixit Участник iFixit

Staff

135 членов

Автор 17 198 руководств

Один комментарий

Recently replaced oneplus7T battery & carefully followed instructions for battery calibration & have to say I'm very underwhelmed by the performance thus far. My use is about as it's always been & just doesn't last nearly as long as the OEM that came with the phone. As compared to the old one removed it's only marginally improved.

MZ TRAVELLER - Ответить

Добавить комментарий

Просмотр статистики:

За последние 24часов: 24

За последние 7 дней: 165

За последние 30 дней: 681

За всё время: 13,642