Перейти к основному содержанию
Присоединяйся к сообществу ремонтников - Создай аккаунт

Packard Bell 4X4 Desktop Optical Drive Replacement

Выберете то, что вам нужно

    1. Packard Bell 4X4 Desktop Optical Drive Replacement, Top Cover: шаг 1, изображение 1 из 1
      • Using a Phillips screwdriver, remove the three Phillips head screws (circled in red) from the back of the computer.

      Спросите у FixBot

      Добавить комментарий

    2. Packard Bell 4X4 Desktop Optical Drive Replacement: шаг 2, изображение 1 из 1
      • With both hands on each side of the case, slide the top cover toward you. Lift it off the computer.

      Спросите у FixBot

      Добавить комментарий

    3. Packard Bell 4X4 Desktop Optical Drive Replacement: шаг 3, изображение 1 из 1
      • The top cover is removed.

      Спросите у FixBot

      Добавить комментарий

    1. Packard Bell 4X4 Desktop Optical Drive Replacement, Drive Cage: шаг 4, изображение 1 из 1
      • Remove the two Philips head screws with your Philips screwdriver. You may have to lubricate these screws as they can be very difficult to remove.

      Спросите у FixBot

      Добавить комментарий

    2. Packard Bell 4X4 Desktop Optical Drive Replacement: шаг 5, изображение 1 из 1
      • Remove the 1 Philips head screw from the left hand side of the case if there is one. Again, you may need to lubricate this screw.

      Спросите у FixBot

      Добавить комментарий

    3. Packard Bell 4X4 Desktop Optical Drive Replacement: шаг 6, изображение 1 из 1
      • Once the screws are removed, disconnect all cables from the optical drive, hard drive and floppy drive.

      Спросите у FixBot

      Добавить комментарий

    4. Packard Bell 4X4 Desktop Optical Drive Replacement: шаг 7, изображение 1 из 1
      • Slide the drive cage back. An easy way to do this is the push on the optical drive from the front.

      Спросите у FixBot

      Добавить комментарий

    5. Packard Bell 4X4 Desktop Optical Drive Replacement: шаг 8, изображение 1 из 1
      • Lift the drive cage up and out of the computer.

      Спросите у FixBot

      Добавить комментарий

    1. Packard Bell 4X4 Desktop Optical Drive Replacement, Optical Drive: шаг 9, изображение 1 из 1
      • Remove the 1 Philips head screw with your Phillips screwdriver. There should not be a screw in the right hole.

      Спросите у FixBot

      Добавить комментарий

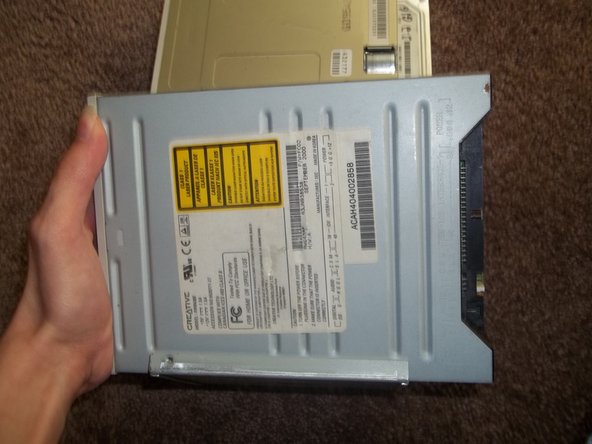
    2. Packard Bell 4X4 Desktop Optical Drive Replacement: шаг 10, изображение 1 из 2 Packard Bell 4X4 Desktop Optical Drive Replacement: шаг 10, изображение 2 из 2
      • Slide the optical drive forward and lift it up from the right side, the side closest to the floppy drive.

      Спросите у FixBot

      Добавить комментарий

    3. Packard Bell 4X4 Desktop Optical Drive Replacement: шаг 11, изображение 1 из 1
      • Remove the 2 Philips head screws with your Philips screwdriver. Put these screws onto your new optical drive.

      Спросите у FixBot

      Добавить комментарий

Заключение

To reassemble your device, follow these instructions in reverse order.

Отменить: Я не выполнил это руководство.

Еще один человек закончил это руководство.

Brandon S

Участник с: 09/04/10

490 Репутация

Автор 3 руководств

Команда

Packard Bell Planet Участник Packard Bell Planet

Community

1 член

Автор 9 руководств

0 Комментарии к руководству

Добавить комментарий

Статистика просмотров:

За последние 24 часов: 1

За последние 7 дней: 6

За последние 30 дней: 41

За всё время: 1,490