Введение
We finally put down our PS5 long enough for a proper teardown. You know we always stand ready to complain on your behalf when devices are tough to repair—and boy oh boy, do we mean it this time. We’d really like this thing to work again when we’re done. We’re not going to hold back, though—let’s take this thing down to the studs. Here we go.
For more even more teardowns and repair content, be sure to follow iFixit’s YouTube channel, our Instagram, and our Twitter, and subscribe to our newsletter to be the first to know about our latest gadget investigations.
Выберете то, что вам нужно
Видео обзор
-
-
We've played a bit of Spider-Man, caught up on sleep, and now it's time to dismantle this PS5. The last fully-fledged, whole-number PlayStation launch was way back in November, 2013, so we're pretty excited. Here's what our gently-used system is packing:
-
AMD custom 8-core / 16-thread 3.5 GHz Zen 2 CPU
-
AMD custom RDNA 2 GPU (2230 MHz with 36 compute units)
-
16 GB GDDR6 RAM
-
825 GB of SSD storage (plus an m.2 SSD expansion slot)
-
HDMI 2.1 connectivity with support for 8K video at 60 Hz, or 4K at 120 Hz
-
We flip a coin to decide, and quickly lose it in the disc drive slot. Guess it'll be that one, then.
-
-
-
You may have heard the PS5 is big—but thankfully, it still fits in Creative Electron's X-ray cabinet. Check out the huge fan, and all the heat pipes overlapping like a freeway interchange.
-
This thing absolutely towers over its predecessor—not to mention its competition.
-
To keep this curvy guy stable, Sony includes a thoughtfully designed stand. With just a bit of fiddling, it allows the PS5 to either pose vertically or lie gracefully on its side.
-
Around back, the PS5 shows off its ports: two USB-A 3.0, LAN, HDMI 2.1, and two-pin power. Add those to the duo of USB ports on the front (one Type A, one Type C), and you've got a reasonably well-connected console.
-
-
-
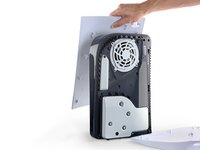
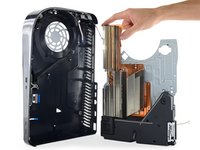
As alien as this console looks, the opening procedure is actually quite human-friendly. Both white panels pop off with a gentle lift-and-slide motion—allowing immediate access to the M.2 SSD expansion slot, the fan, and ... vacuumable dust ports.
-
When it comes to easy maintenance of your console's cooling hardware, you could say we're pretty big fans.
-
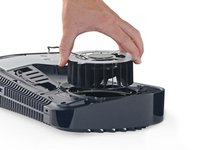
But to go any farther, we need a T8 Torx Security driver. (Why on earth does your PS5's fan need security screws?)
-
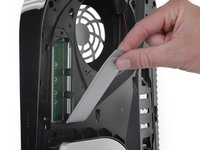
Thankfully, the M.2 storage expansion bay is very accessible. Remove one Phillips screw and a metal shield, and you're ready for upgrades. That's pretty thoughtful of Sony, especially since the built-in storage is worryingly limited.
-
-
-
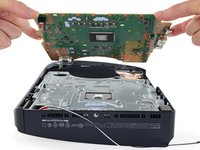
More security screws line the path forward. One of them even lives under a tamper-evident sticker—thankfully not a "Warranty Void" sticker, which would be illegal. (As always, you get to tinker and keep your warranty so long as you don't damage anything.)
-
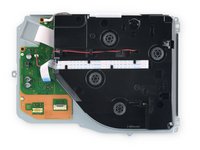
As we remove the first half of the black plastic shell, we're greeted by the optical drive.
-
The slender optical drive doesn't put up much of a fight coming out—which would be good for potential replacements, until you actually try a replacement.
-
There might be a workaround if you're willing to disassemble the drive and keep the original circuit board. We'll update if we get a chance to test that.
-
-
-
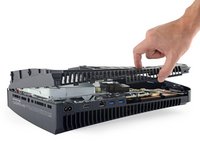
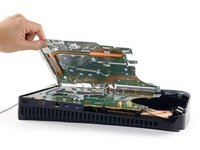
Did somebody tell Sony that we love screws? Because this steel plate is secured with a ton of screws. Um, thanks!
-
Underneath: a heat pipe for cooling a row of VRMs, connected to a baby fin stack. Looks like we're seeing the back of the main board here—all the really serious cooling hardware is mounted down below.
-
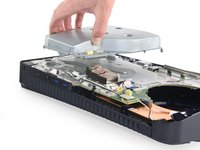
We may be approaching a point of no return, but let's un-mount the hardware and flip the board out.
-
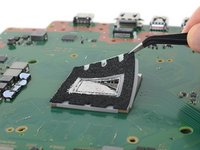
Yep, that shiny stuff covering the processor is none other than
mimetic polyalloyliquid metal, the king of high-performance thermal interface material. -
But with that thermal conductivity comes some unwanted electrical conductivity—so you don't want it sloshing around in the wrong place.
-
Sony filed a patent for an insulated, foam-cushioned pouch that keeps their liquid metal confined to the surface of the chip ... as long as you don't do what we're doing here.
-
-
-
Before we point out the big chips you've probably already heard about, here are some interesting features of this giant PCB:
-
Bothhand USA GST5009 LF 1000 Base-T Magnetics Module
-
Murata Piezo Buzzer
-
3v battery backup (likely used for keeping the device's time and date)
-
Sony J20H100 Wi-Fi Module
-
Power input prong that slots directly into the power supply
-
M.2 SSD expansion slot—likely to be very useful, as soon as Sony actually enables it.
-
Wi-Fi module antenna connector
-
-
-
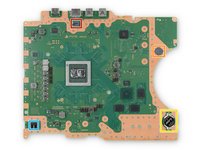
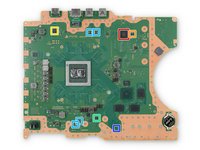
Now for the main event. Here's a look at the silicon that powers the PS5:
-
Sony Interactive Entertainment Inc./AMD CXD90060GG 8-Core CPU w/ GPU
-
Sony Interactive Entertainment Inc. CXD90062GG SSD Controller
-
SK Hynix H5AN4G8NBJR-UHC DDR4 SDRAM Memory - 512 MB
-
6x (three per side) Kioxia/Toshiba Memory TH58LJT0T24BA4M BiCS flash memory (likely)
-
Micron MT61K512M32KPA-14:B 2 GB GDDR6 SGRAM
-
-
-
-
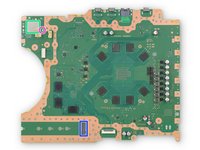
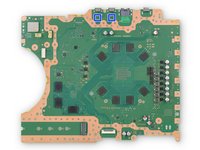
Additional chips aid in transferring data to and from the devices you connect to the PlayStation:
-
Sony Interactive Entertainment Inc. CXD90061GG I/O controller (likely)
-
Winbond W25Q16JV 16 Mb serial flash memory
-
Panasonic MN864739 HDMI redriver (likely)
-
Texas Instruments TUSB1044 10 Gbps USB Type-C bi-directional linear redriver
-
Texas Instruments TPS2001D 2 A USB power switch
-
These tiny chips help protect the device from harmful electrostatic discharge.
-
-
-
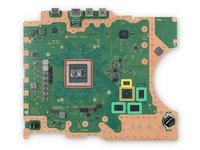
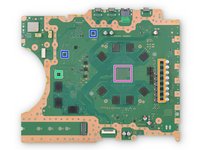
What's the point of all of this silicon without a way to deliver the right amount of power to each chip? Here are the equally-important power chips:
-
Infineon XDPE14286A 16 Phase PWM Controller (likely)
-
ON Semiconductor NCP252160 Power Module
-
Richtek RT5126 Power Management (likely)
-
Richtek RT5127 Power Management (likely)
-
Texas Instruments TPS53219A Synchronous Buck Controller
-
Texas Instruments TLV62090 3A Step Down Converter
-
The capacitors marked in purple do the final voltage filtering before power reaches the main processor, in order to keep the voltage completely stable. This is especially important if you want to run fast!
-
-
-
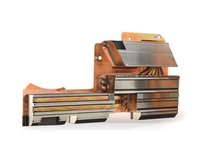
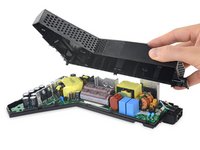
Underneath metal shield number two: a massive heatsink and funky-looking power supply.
-
Since heat rises naturally, it makes sense that this heatsink is designed to move heat upward through all those heat pipes we saw earlier in the X-ray. All the while, the heat radiating through the silver fin stacks is blown away by the fan.
-
Compared to the Xbox Series X's heatsink, the PS5's definitely has some more surface area to spread that hot hot heat. The PS5 doesn’t use a vapor chamber like the Series X, but Sony claims their combination of copper heat pipes and heatsinks is just as effective.
-
Here's a closeup of the specs, for those of you who asked—the PSU itself is made by Delta.
-
-
-
The PlayStation 5 is a huge leap forward in console gaming technology, just like its Microsoft rival. It may have taken us a few weeks, but we've learned a lot in our time with the PS5.
-
Its relatively modular and repair-friendly design is slightly overshadowed by some software locks and annoying (if not all that rare) Torx security screws.
-
That said, a tool-less first disassembly step, easy fan access, and off-the-shelf storage expansion are always huge wins in our book.
-
Where does the PS5 land on the repairability scale? Keep scrolling to find out.
-
-
-
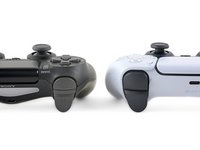
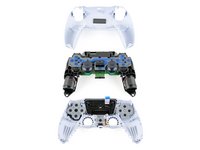
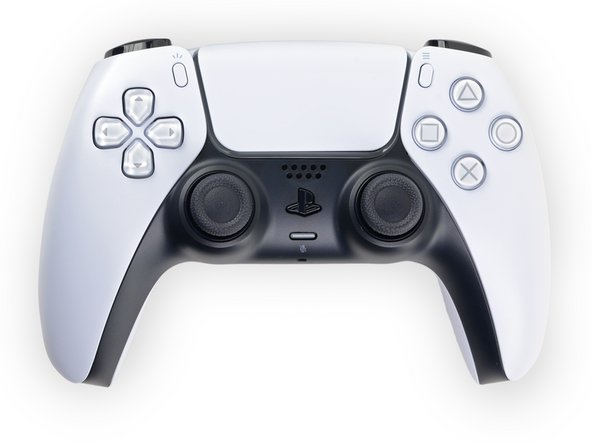
While we were waiting for our PS5 to arrive, we got busy on the DualSense controller. There's enough new stuff packed in to make this a meal on its own:
-
Space-age adaptive triggers, a top-of-the-line haptic system, larger trackpad, USB-C charging, a very nifty grip pattern, and so much more.
-
The "Shock" has been dropped from the name, but its shock to the gaming industry will no doubt remain substantial.
-
-
-
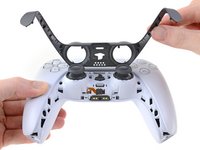
The new design is so sleek that there are exactly zero visible screws. Looks like Sony is making us work for it...
-
We aren't fazed though—where there's a seam, there's a way! The black trim cover around the joysticks unclips with ease, revealing two screws near the tips of the handles.
-
Surely there are a couple more screws somewhere.
-
Aha! Two more screws are hidden under the L1 and R1 buttons, which come up with a little clip-prying (and potential flying).
-
-
-
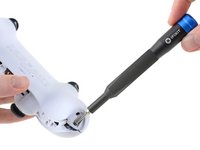
Liftoff! Four Phillips screws and some clips are the only things standing between customers and an open DualSense controller. Not bad.
-
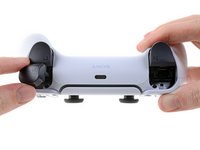
Just like the DualShock 4 and DualShock 3 before it, the DualSense battery has a tough plastic shield and is not glued in place.
-
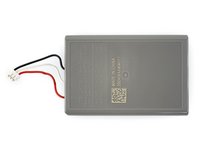
This grey monolith clocks in at 5.7 Wh. That's a sizable increase from the DualShock 4's 3.7 Wh pack, and there's a good reason for that extra juice: something has to power all this crazy new tech.
-
-
-
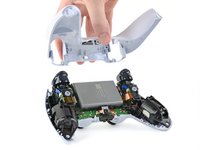
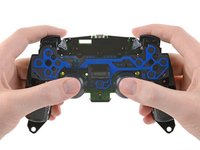
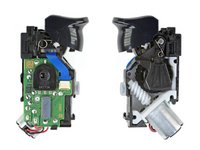
Next up, out come the guts: button sensors, motherboard, haptic drivers, and adaptive triggers, all mounted to a black midframe.
-
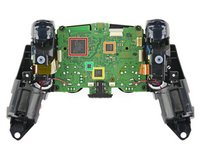
Both adaptive trigger assemblies connect with cables, but the haptic drivers, USB-C port, and joysticks are all held down by soldered connections.
-
On the backside lives the main circuit board. And where there's a circuit board, there are chips:
-
SIE CXD9006GG — Likely a custom Sony chip doing all the grunt work
-
Dialog DA9087 PMIC
-
Realtek ALC5524 audio codec
-
Nuvoton NAU8225 3.0 W Class-D Audio Amplifier
-
-
-
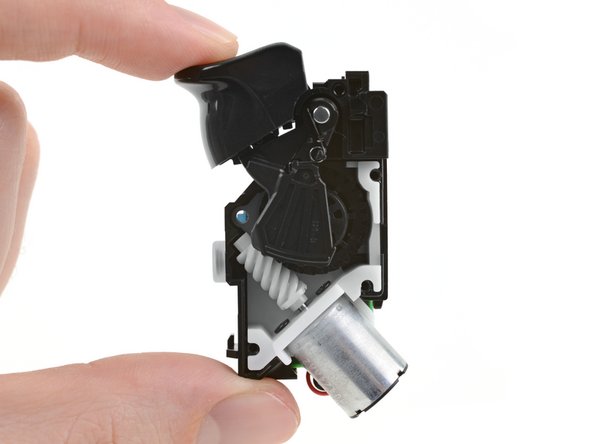
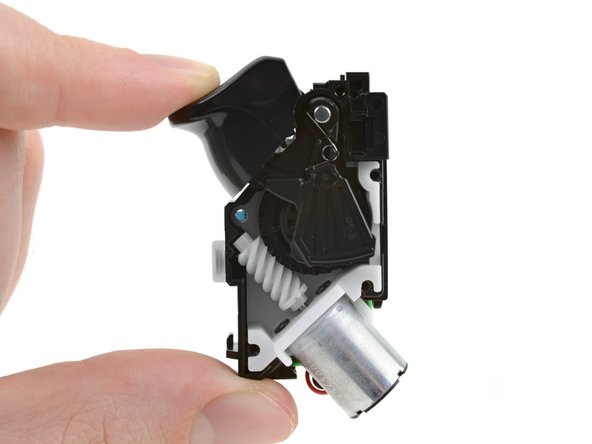
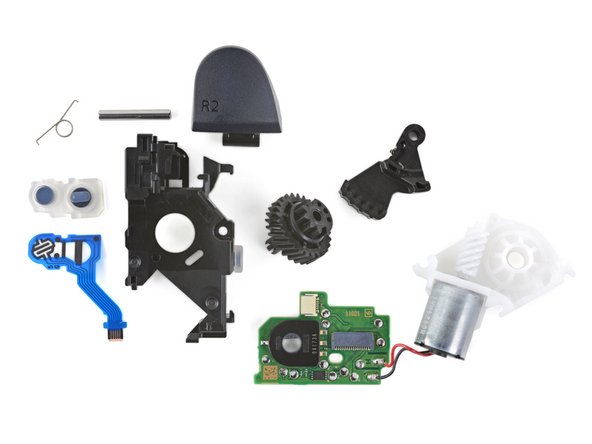
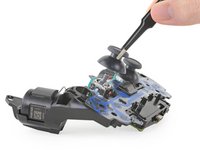
Let's dig into this classified alien tec—er, variable resistance trigger.
-
The trigger works normally without any of the mechanics active, making contact with a button on the blue ribbon cable. But if game developers choose to, they can program the controller to precisely adjust how difficult the trigger is to pull.
-
The silver motor spins the white worm gear, which drives the black lever arm up and provides resistance to the trigger’s lever action, adding another level of feedback to the controller.
-
-
-
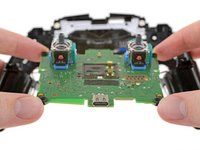
Let's take a quick deep dive on these triggers:
-
First up, the button sensors—R1 on the left and R2 on the right. R2 seems to use a "two-stage" sensor to differentiate partial and full trigger pulls, while R1 is a plain-Jane digital switch.
-
Next, the plastic frame, metal pin, and spring. These pieces perform the non-adaptive R2 trigger action, without the rest of the fancy parts.
-
The gear system works together as demonstrated in the previous step: the white worm gear (from the green bullet below) spins the circular gear, which drives the arm up to resist R2's lever action.
-
The white gear housing holds all the gear components together. The silver motor sticking out the bottom drives the worm gear. Its leads are soldered to the trigger module's circuit board (up next).
-
Finally, a circuit board to bring it all together! There are two ribbon cable connections: one to the buttons, and one to the motherboard. The black encoder measures the rotation of the circular gear from the yellow bullet.
-
-
-
With all the easily replaceable parts out, we're down to the soldered-on bits.
-
First off are the two Foster-branded voice coil actuators driving the haptics system.
-
And next: the two joysticks. These look basically identical to the Alps-brand sticks from the DualShock 4.
-
Compared to these, a Joy-Con joystick replacement is a breeze. PlayStation joysticks are certainly less prone to drift than the notoriously drifty Joy-Cons, but soldering them on is a big miss.
-
And finally, the USB-C port. Another high-wear component that we'd much prefer to see easily replaced.
-
-
-
The DualSense controller turned out to be among the PS5's biggest upgrades.
-
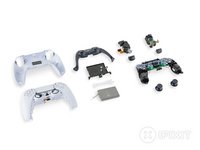
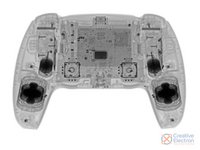
As a final treat, here's an X-ray look at all the DualSense we just dismantled, thanks again to our friends over at Creative Electron.
-
We also owe a huge thanks to iFixit contributor Chunglin Chin, who did the detective work needed to ID all those chips in the motherboard steps. Great job!
-
That's a wrap on this teardown! Time to put everything back together and see if we can salvage enough liquid metal for a gaming session.
-
Only one more thing remains, and that's the score.
-
- Outer covers can be replaced without tools.
- Many components are modular and disassembly is straightforward.
- Vacuum-able dust ports makes de-dusting maintenance easier.
- Main storage is integrated to the motherboard, but expansion should be easy (once enabled by Sony) with off-the-shelf M.2 SSDs.
- The optical drive is a cinch to replace, but cannot be easily swapped thanks to software locks.
- Sealed-in liquid metal TIM could be challenging to replace during service.
- Use of security screws throughout creates an unnecessary hindrance to repairs.


Заключительные мысли
Уровень ремонтопригодности


(10 легче всего ремонтировать)

45 Комментариев
I’m really interested in the PS5’s cooling. Sony definitely made a big deal about the liquid metal thermal interface in one of their videos. I think they put a black sponge around the die to keep excess liquid metal from spilling everywhere though. Definitely worth taking a look at.
ifixit teardowns perfect & professional
It’s pretty interesting that the vibration traducers are made by Foster. They are primarily a manufacturer of speakers and headphones. I wonder if they make anything for Sony’s other consumer products divisions. It makes sense anyway, since they’re basically just speakers without cones.