Перейти к основному содержанию
Присоединяйся к сообществу ремонтников - Создай аккаунт

Power Mac G5 Top Left Cooling Fan Unit Replacement

  1. Power Mac G5 Top Left Cooling Fan Unit Replacement, Side Panel: шаг 1, изображение 1 из 1
    • To avoid electrocution, shut down the computer. Do not open the computer or attempt to install any items inside it while the computer is on.

    • To avoid being burned, wait at least 10 minutes to allow the computer's internal components to cool.

    Спросите у FixBot
  2. Power Mac G5 Top Left Cooling Fan Unit Replacement: шаг 2, изображение 1 из 1
    • Remove all the cables, including the power cables before opening the unit.

    Спросите у FixBot
  3. Power Mac G5 Top Left Cooling Fan Unit Replacement: шаг 3, изображение 1 из 2 Power Mac G5 Top Left Cooling Fan Unit Replacement: шаг 3, изображение 2 из 2
    • Lift the tab to unlock the side panel.

    • The panel should fall out. If the panel does not fall out by itself pull a little from the edges.

    Спросите у FixBot
  4. Power Mac G5 Top Left Cooling Fan Unit Replacement: шаг 4, изображение 1 из 3 Power Mac G5 Top Left Cooling Fan Unit Replacement: шаг 4, изображение 2 из 3 Power Mac G5 Top Left Cooling Fan Unit Replacement: шаг 4, изображение 3 из 3
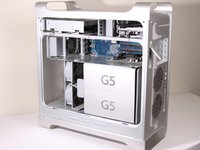
    • Remove the air deflector (the clear plastic cover) by pulling on the handle.

    Спросите у FixBot
  5. Power Mac G5 Top Left Cooling Fan Unit Replacement, Top Left Cooling Fan Unit: шаг 5, изображение 1 из 1
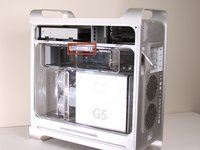
    • Locate the top left cooling fan unit.

    Спросите у FixBot
  6. Power Mac G5 Top Left Cooling Fan Unit Replacement: шаг 6, изображение 1 из 1
    • Pull the fan straight out from its slot. You will need to remove two cables from the motherboard.

    • It may be easier to reach the cables if you remove the PCI guide (next to the fan unit) first.

    Спросите у FixBot
  7. Power Mac G5 Top Left Cooling Fan Unit Replacement: шаг 7, изображение 1 из 1
    • After pulling out the fan unit, the area should look like this.

    Спросите у FixBot
Заключение

To reassemble your device, follow these instructions in reverse order.

20 человек успешно провели ремонт по этому руководству.

Salvador Aguilar

Участник с: 01/21/10

2 550 Репутация

Автор 3 руководств

Команда

Cal Poly, Team 5-8, Forte Winter 2010 Участник Cal Poly, Team 5-8, Forte Winter 2010

CPSU-FORTE-W10S5G8

7 членов

Автор 30 руководств

1 Комментарий к руководству

Actually you do need to remove the plastic air deflector, as the fan in question is behind it.

Tim downing - Ответить Поделиться

Добавить комментарий

Статистика просмотров:

За последние 24 часов: 4

За последние 7 дней: 27

За последние 30 дней: 112

За всё время: 19,880