Перейти к основному содержанию
Присоединяйся к сообществу ремонтников - Создай аккаунт

PowerBook G3 Lombard Hard Drive Replacement

Выберете то, что вам нужно

  1. PowerBook G3 Lombard Hard Drive Replacement, Keyboard: шаг 1, изображение 1 из 1
    • Turn the computer so that the ports are facing you.

    • If the keyboard is locked, open the port cover and turn the keyboard locking screw until the keyboard is unlocked.

    Спросите у FixBot

    Добавить комментарий

  2. PowerBook G3 Lombard Hard Drive Replacement: шаг 2, изображение 1 из 1
    • Pull the keyboard release tabs toward you and lift up on the keyboard until it pops free.

    • Make sure you have removed the laptop battery and CD/DVD module from the expansion bays before proceeding.

    Спросите у FixBot

    Добавить комментарий

  3. PowerBook G3 Lombard Hard Drive Replacement: шаг 3, изображение 1 из 1
    • Lift the keyboard out by pulling it up and away from you. Rest the keyboard, face down, on top of the trackpad.

    • In order to replace the keyboard, you must first remove the modem.

    Спросите у FixBot

    Добавить комментарий

  4. PowerBook G3 Lombard Hard Drive Replacement, Heat Shield: шаг 4, изображение 1 из 1
    • Remove the three silver Phillips screws that attach the heat shield to the internal metal framework.

    Спросите у FixBot

    Добавить комментарий

  5. PowerBook G3 Lombard Hard Drive Replacement: шаг 5, изображение 1 из 1
    • Lift the heat shield up and pull it toward you.

    Спросите у FixBot

    Добавить комментарий

  6. PowerBook G3 Lombard Hard Drive Replacement: шаг 6, изображение 1 из 1
    • Your laptop should look approximately like this.

    Спросите у FixBot

    Добавить комментарий

  7. PowerBook G3 Lombard Hard Drive Replacement, Modem: шаг 7, изображение 1 из 1
    • Remove the two silver Phillips screws from the modem.

    Спросите у FixBot

    Добавить комментарий

  8. PowerBook G3 Lombard Hard Drive Replacement: шаг 8, изображение 1 из 1
    • Use a spudger, the tips of your fingers, or a flat non-metal tool to get under the modem's edge and pry it up from its socket as shown in the picture.

    Спросите у FixBot

    Добавить комментарий

  9. PowerBook G3 Lombard Hard Drive Replacement: шаг 9, изображение 1 из 1
    • Disconnect the cable from the right side of the modem.

    Спросите у FixBot

    Добавить комментарий

  10. PowerBook G3 Lombard Hard Drive Replacement: шаг 10, изображение 1 из 1
    • Your laptop should look approximately like this.

    Спросите у FixBot

    Добавить комментарий

  11. PowerBook G3 Lombard Hard Drive Replacement, Processor: шаг 11, изображение 1 из 1
    • Use a spudger, the tips of your fingers, or a flat non-metal tool to pry up the processor's right side.

    Спросите у FixBot

    Добавить комментарий

  12. PowerBook G3 Lombard Hard Drive Replacement: шаг 12, изображение 1 из 1
    • Disconnect the keyboard cable from the logic board by pulling directly up on the clear plastic loop.

    • This step is out of sequence with the keyboard because in order to remove the keyboard you must first remove the modem.

    Спросите у FixBot

    Добавить комментарий

  13. PowerBook G3 Lombard Hard Drive Replacement: шаг 13, изображение 1 из 1
    • Your laptop should look approximately like this.

    Спросите у FixBot

    Добавить комментарий

  14. PowerBook G3 Lombard Hard Drive Replacement, Hard Drive: шаг 14, изображение 1 из 1
    • Grasp the orange cable at the left end of the hard drive and disconnect it from the logic board.

    • Try to grasp the cable on the plastic connector rather than on the flexible cable section.

    Спросите у FixBot

    Добавить комментарий

  15. PowerBook G3 Lombard Hard Drive Replacement: шаг 15, изображение 1 из 1
    • Grasp the plastic tab and pull the hard drive up and to the left, making sure that the metal bracket doesn't catch on the black plastic casing.

    Спросите у FixBot

    Добавить комментарий

  16. PowerBook G3 Lombard Hard Drive Replacement, Hard Drive: шаг 16, изображение 1 из 1
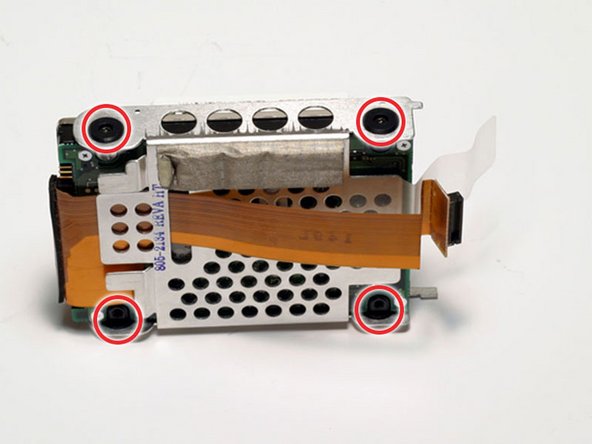
    • Remove the four black Torx screws located at the four corners of the hard drive bracket.

    Спросите у FixBot

    Добавить комментарий

  17. PowerBook G3 Lombard Hard Drive Replacement: шаг 17, изображение 1 из 1
    • Pull the connector cable out from the hard drive, applying even pressure while gently rocking up and down.

    • Be very careful to apply even pressure when removing the cable. If you torque too hard to either side, you may damage or destroy the hard drive's connector pins, rendering your data inaccessible.

    Спросите у FixBot

    Добавить комментарий

Заключение

To reassemble your device, follow these instructions in reverse order.

Отменить: Я не выполнил это руководство.

10 человек успешно провели ремонт по этому руководству.

Прикрепленные документы

iRobot

Участник с: 09/24/09

1 Репутация

Автор 636 руководств

0 Комментарии к руководству

Добавить комментарий

Статистика просмотров:

За последние 24 часов: 1

За последние 7 дней: 14

За последние 30 дней: 53

За всё время: 13,008