Перейти к основному содержанию

Razer Blade 15 Advanced Model (Early 2020) Heatsink Replacement

Выберете то, что вам нужно

  1. Razer Blade 15 Advanced Model (Early 2020) Heatsink Replacement, Prepare your laptop for disassembly: шаг 1, изображение 1 из 2 Razer Blade 15 Advanced Model (Early 2020) Heatsink Replacement, Prepare your laptop for disassembly: шаг 1, изображение 2 из 2
    • Allow your laptop's battery to drain below 25% before starting this repair—a charged battery may catch fire if damaged.

    • Unplug all cables, fully shut down your laptop, and close the lid.

  2. Razer Blade 15 Advanced Model (Early 2020) Heatsink Replacement, Unfasten the back cover: шаг 2, изображение 1 из 2 Razer Blade 15 Advanced Model (Early 2020) Heatsink Replacement, Unfasten the back cover: шаг 2, изображение 2 из 2
    • Use a T5 Torx driver to remove the ten 3.8 mm‑long screws securing the back cover.

  3. Razer Blade 15 Advanced Model (Early 2020) Heatsink Replacement, Insert an opening pick: шаг 3, изображение 1 из 3 Razer Blade 15 Advanced Model (Early 2020) Heatsink Replacement, Insert an opening pick: шаг 3, изображение 2 из 3 Razer Blade 15 Advanced Model (Early 2020) Heatsink Replacement, Insert an opening pick: шаг 3, изображение 3 из 3
    • Depending on the age and condition of your laptop, the back cover may come off sooner than this guide instructs. If it feels loose, remove it at any time.

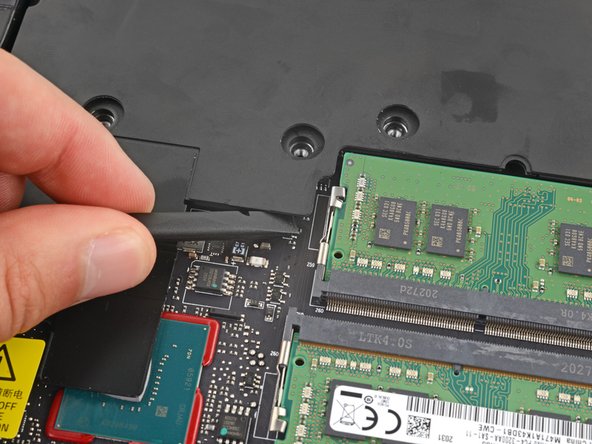
    • Apply a suction handle to the middle of the back cover's right edge, between the lower rubber foot and the middle screws.

    • Pull up on the suction handle to create a small gap between the back cover and the frame.

    • Insert an opening pick into the gap.

  4. Razer Blade 15 Advanced Model (Early 2020) Heatsink Replacement, Angle the opening pick: шаг 4, изображение 1 из 3 Razer Blade 15 Advanced Model (Early 2020) Heatsink Replacement, Angle the opening pick: шаг 4, изображение 2 из 3 Razer Blade 15 Advanced Model (Early 2020) Heatsink Replacement, Angle the opening pick: шаг 4, изображение 3 из 3
    • Angle your opening pick upward, away from the frame. Keep it angled upward as long as it's between the back cover and the frame.

  5. Razer Blade 15 Advanced Model (Early 2020) Heatsink Replacement, Free the bottom right corner: шаг 5, изображение 1 из 3 Razer Blade 15 Advanced Model (Early 2020) Heatsink Replacement, Free the bottom right corner: шаг 5, изображение 2 из 3 Razer Blade 15 Advanced Model (Early 2020) Heatsink Replacement, Free the bottom right corner: шаг 5, изображение 3 из 3
    • Slide your opening pick around the bottom right corner of the back cover to free it from the frame.

  6. Razer Blade 15 Advanced Model (Early 2020) Heatsink Replacement, Free the front edge: шаг 6, изображение 1 из 3 Razer Blade 15 Advanced Model (Early 2020) Heatsink Replacement, Free the front edge: шаг 6, изображение 2 из 3 Razer Blade 15 Advanced Model (Early 2020) Heatsink Replacement, Free the front edge: шаг 6, изображение 3 из 3
    • Slide your opening pick along the front edge and around the front left corner of the back cover to free it from the frame completely.

  7. Razer Blade 15 Advanced Model (Early 2020) Heatsink Replacement, Remove the back cover: шаг 7, изображение 1 из 3 Razer Blade 15 Advanced Model (Early 2020) Heatsink Replacement, Remove the back cover: шаг 7, изображение 2 из 3 Razer Blade 15 Advanced Model (Early 2020) Heatsink Replacement, Remove the back cover: шаг 7, изображение 3 из 3
    • Remove the back cover.

    • Lay the back cover down on its rubber feet to avoid damaging the thermal pads.

  8. Razer Blade 15 Advanced Model (Early 2020) Heatsink Replacement, Disconnect the battery: шаг 8, изображение 1 из 3 Razer Blade 15 Advanced Model (Early 2020) Heatsink Replacement, Disconnect the battery: шаг 8, изображение 2 из 3 Razer Blade 15 Advanced Model (Early 2020) Heatsink Replacement, Disconnect the battery: шаг 8, изображение 3 из 3
    • Insert the point of a spudger under the middle of the battery connector's long edge.

    • Lift and disconnect the battery press connector from its socket on the motherboard.

    • This will require some force. Don't pry against any resistors or chips.

    • To re-attach press connectors like this one, carefully align and press down on one side until it clicks into place, then repeat on the other side. Don't press down in the middle. If the connector is misaligned, the pins can bend and cause permanent damage.

  9. Razer Blade 15 Advanced Model (Early 2020) Heatsink Replacement, Disconnect the display cables: шаг 9, изображение 1 из 3 Razer Blade 15 Advanced Model (Early 2020) Heatsink Replacement, Disconnect the display cables: шаг 9, изображение 2 из 3 Razer Blade 15 Advanced Model (Early 2020) Heatsink Replacement, Disconnect the display cables: шаг 9, изображение 3 из 3
    • Insert the point of a spudger under the metal locking clip that snaps around the perimeter of the primary display cable’s socket.

    • Swing the clip up and over the socket.

    • Gently pull the display cable straight out of its socket.

  10. Razer Blade 15 Advanced Model (Early 2020) Heatsink Replacement: шаг 10, изображение 1 из 1
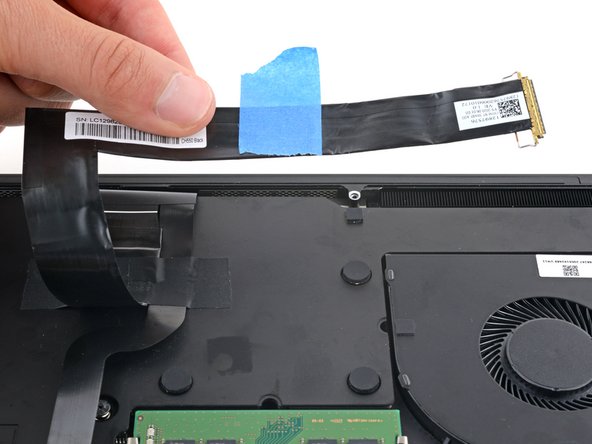
    • Use a piece of tape to hold the primary display cable out of the way for better access to the other display cable.

    • Don't crease the cable or position it at an extreme angle, as this can damage it.

  11. Razer Blade 15 Advanced Model (Early 2020) Heatsink Replacement: шаг 11, изображение 1 из 3 Razer Blade 15 Advanced Model (Early 2020) Heatsink Replacement: шаг 11, изображение 2 из 3 Razer Blade 15 Advanced Model (Early 2020) Heatsink Replacement: шаг 11, изображение 3 из 3
    • Use the tip of a spudger or a clean fingernail to flip up the small, hinged locking flap on the secondary display cable's ZIF connector.

    • Gently pull the cable straight out of its socket.

  12. Razer Blade 15 Advanced Model (Early 2020) Heatsink Replacement, Heat the display cable: шаг 12, изображение 1 из 2 Razer Blade 15 Advanced Model (Early 2020) Heatsink Replacement, Heat the display cable: шаг 12, изображение 2 из 2
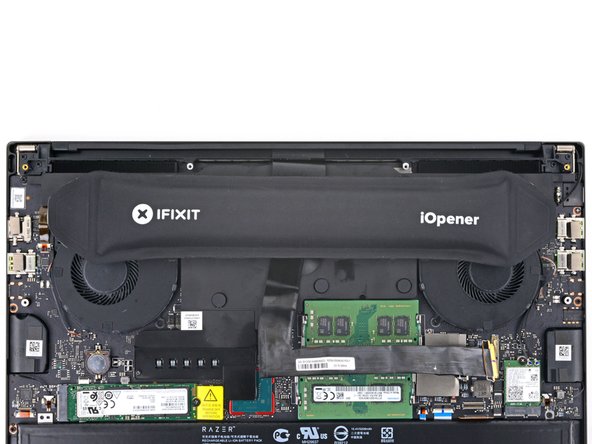
    • Note: Adhesive secures the secondary display cable to the top of the RAM sockets.

    • Heat an iOpener and apply it to the secondary display cable for two minutes.

    • You can also use a hair dryer. Follow this guide for more instructions.

  13. Razer Blade 15 Advanced Model (Early 2020) Heatsink Replacement, Peel up the display cable: шаг 13, изображение 1 из 2 Razer Blade 15 Advanced Model (Early 2020) Heatsink Replacement, Peel up the display cable: шаг 13, изображение 2 из 2
    • Peel the secondary display cable from the top of the RAM sockets.

  14. Razer Blade 15 Advanced Model (Early 2020) Heatsink Replacement: шаг 14, изображение 1 из 2 Razer Blade 15 Advanced Model (Early 2020) Heatsink Replacement: шаг 14, изображение 2 из 2
    • Peel up the primary display cable that you taped down earlier.

  15. Razer Blade 15 Advanced Model (Early 2020) Heatsink Replacement, Heat the fabric tape: шаг 15, изображение 1 из 2 Razer Blade 15 Advanced Model (Early 2020) Heatsink Replacement, Heat the fabric tape: шаг 15, изображение 2 из 2
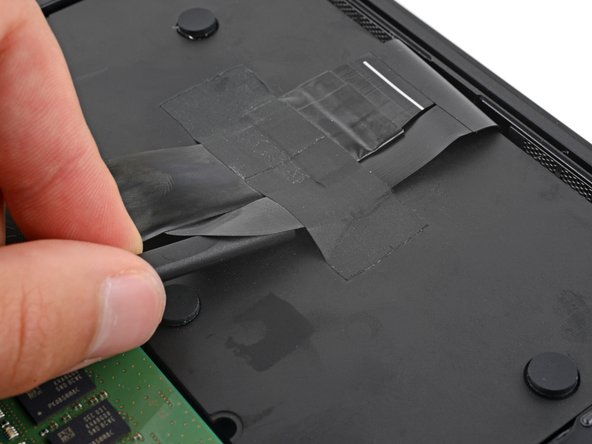
    • Note: Fabric tape secures the display cables to the heatsink.

    • Apply a heated iOpener to the fabric tape for two minutes.

    • You can also use a hair dryer. Follow this guide for more instructions.

  16. Razer Blade 15 Advanced Model (Early 2020) Heatsink Replacement, Detach the display cables: шаг 16, изображение 1 из 3 Razer Blade 15 Advanced Model (Early 2020) Heatsink Replacement, Detach the display cables: шаг 16, изображение 2 из 3 Razer Blade 15 Advanced Model (Early 2020) Heatsink Replacement, Detach the display cables: шаг 16, изображение 3 из 3
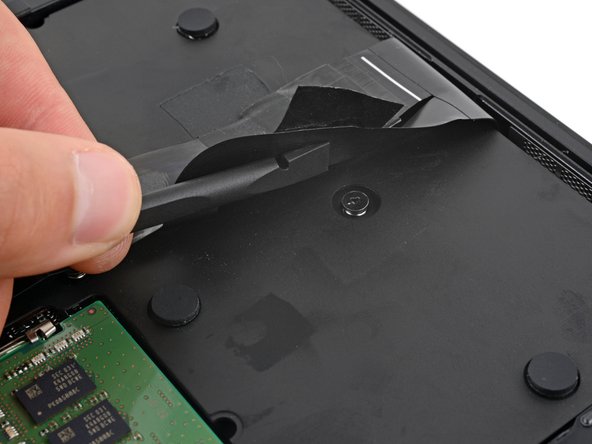
    • Slide the flat end of a spudger under one side of the display cables and gently lift to detach them from the heatsink.

  17. Razer Blade 15 Advanced Model (Early 2020) Heatsink Replacement: шаг 17, изображение 1 из 1
    • Lift the other side of the display cables to fully detach them from the heatsink.

  18. Razer Blade 15 Advanced Model (Early 2020) Heatsink Replacement, Reposition the display cables: шаг 18, изображение 1 из 2 Razer Blade 15 Advanced Model (Early 2020) Heatsink Replacement, Reposition the display cables: шаг 18, изображение 2 из 2
    • Gently lay the display cables over the top edge of the laptop.

  19. Razer Blade 15 Advanced Model (Early 2020) Heatsink Replacement, Remove the screw covers: шаг 19, изображение 1 из 3 Razer Blade 15 Advanced Model (Early 2020) Heatsink Replacement, Remove the screw covers: шаг 19, изображение 2 из 3 Razer Blade 15 Advanced Model (Early 2020) Heatsink Replacement, Remove the screw covers: шаг 19, изображение 3 из 3
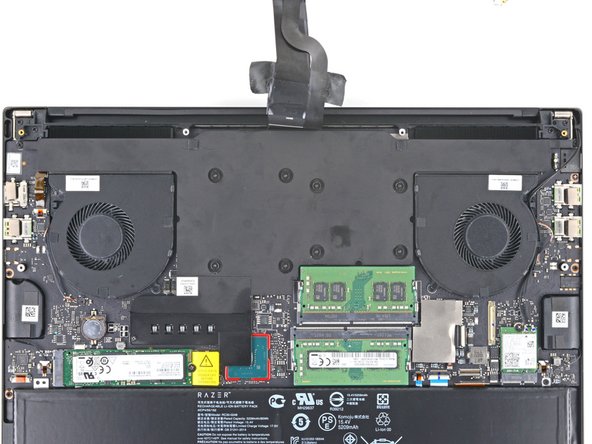
    • Note: Some heatsink screws may have foam covers on them.

    • Use a pair of tweezers or your fingers to remove the covers.

  20. Razer Blade 15 Advanced Model (Early 2020) Heatsink Replacement, Unfasten the heatsink: шаг 20, изображение 1 из 2 Razer Blade 15 Advanced Model (Early 2020) Heatsink Replacement, Unfasten the heatsink: шаг 20, изображение 2 из 2
    • Use a Phillips screwdriver to remove the 11 screws securing the heatsink:

    • Eight 6.7 mm‑long screws

    • One 4.6 mm‑long screw

    • One 5.7 mm‑long screw

    • One 4 mm‑long screw

    • This screw may be covered by a sticker. Pierce through it with your screwdriver or use tweezers to remove it.

  21. Razer Blade 15 Advanced Model (Early 2020) Heatsink Replacement, Thermal paste information: шаг 21, изображение 1 из 2 Razer Blade 15 Advanced Model (Early 2020) Heatsink Replacement, Thermal paste information: шаг 21, изображение 2 из 2
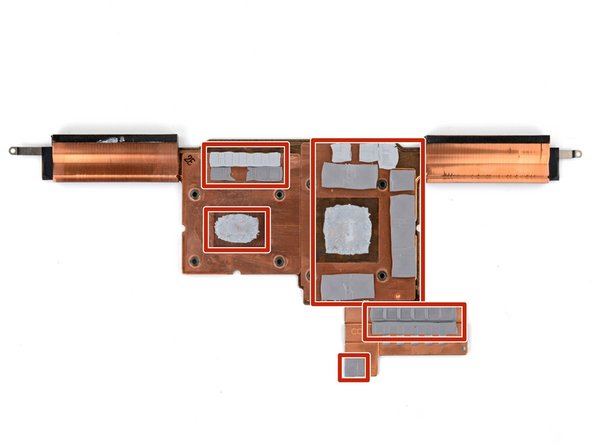
    • Note: Large globs of thermal paste and multiple thermal pads bond the heatsink very strongly to the motherboard.

  22. Razer Blade 15 Advanced Model (Early 2020) Heatsink Replacement, Separate the heatsink: шаг 22, изображение 1 из 3 Razer Blade 15 Advanced Model (Early 2020) Heatsink Replacement, Separate the heatsink: шаг 22, изображение 2 из 3 Razer Blade 15 Advanced Model (Early 2020) Heatsink Replacement, Separate the heatsink: шаг 22, изображение 3 из 3
    • Use strong, steady pressure to release the heatsink from the motherboard in the next two steps.

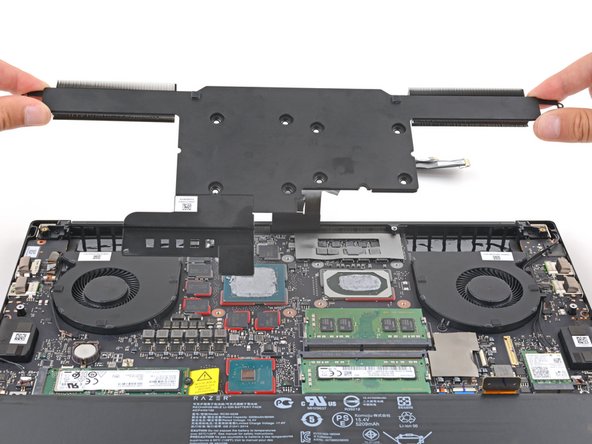
    • Insert the flat end of a spudger between the top edge of the heatsink and frame.

    • Pry the heatsink up at different points along the top edge to release it from the motherboard.

    • If the heatsink won't budge at all, use a hair dryer to warm the heatsink and soften the thermal pads.

  23. Razer Blade 15 Advanced Model (Early 2020) Heatsink Replacement: шаг 23, изображение 1 из 2 Razer Blade 15 Advanced Model (Early 2020) Heatsink Replacement: шаг 23, изображение 2 из 2
    • Use the flat end of a spudger to lift (not pry) the heatsink at different points along its edges until the heatsink completely detaches from the motherboard.

    • Be careful not to scrape off any surface-mounted components when putting the spudger under the heatsink.

  24. Razer Blade 15 Advanced Model (Early 2020) Heatsink Replacement, Remove the heatsink: шаг 24, изображение 1 из 2 Razer Blade 15 Advanced Model (Early 2020) Heatsink Replacement, Remove the heatsink: шаг 24, изображение 2 из 2
    • Remove the heatsink.

  25. Razer Blade 15 Advanced Model (Early 2020) Heatsink Replacement, Reassembly information: шаг 25, изображение 1 из 2 Razer Blade 15 Advanced Model (Early 2020) Heatsink Replacement, Reassembly information: шаг 25, изображение 2 из 2
    • Before installing a new heatsink, follow this guide to clean the CPU, GPU, and heatsink and reapply thermal paste.

Заключение

To reassemble your device, follow these instructions in reverse order.

Take your e-waste to an R2 or e-Stewards certified recycler.

Repair didn’t go as planned? Try some basic troubleshooting, or ask our Answers community for help.

Еще один человек закончил это руководство.

Spencer Day

Участник с: 09/14/22

53 745 Репутация

Автор 394 руководств

Команда

iFixit Участник iFixit

Staff

135 членов

Автор 17 198 руководств

0 Комментариев

Добавить комментарий

Просмотр статистики:

За последние 24часов: 4

За последние 7 дней: 27

За последние 30 дней: 116

За всё время: 1,280