Перейти к основному содержанию

Replace Elastic Band on Clothing

Выберете то, что вам нужно

  1. Replace Elastic Band on Clothing, Replace Elastic Band on Clothing: шаг 1, изображение 1 из 3 Replace Elastic Band on Clothing, Replace Elastic Band on Clothing: шаг 1, изображение 2 из 3 Replace Elastic Band on Clothing, Replace Elastic Band on Clothing: шаг 1, изображение 3 из 3
    • Measure the new rubber band to the appropriate length. To do this, put the rubber band around the waist or waist and stretch slightly.

    • The rubber band must be adjusted so that the garment later has enough tension to not slip.

    • Then add 1-5 cm seam allowance and cut.

  2. Replace Elastic Band on Clothing: шаг 2, изображение 1 из 3 Replace Elastic Band on Clothing: шаг 2, изображение 2 из 3 Replace Elastic Band on Clothing: шаг 2, изображение 3 из 3
    • Uncover the old rubber band. To do this, carefully cut the seam in an inconspicuous area on the inside of the waistband with the scissors or the seam splitter so that the fabric is not damaged.

    • For some garments, there is already an opening for an additional cord, then you can simply use the existing opening.

    • Grasp the old rubber band with the point of the scissors or with your fingers and pull it out a little bit.

    • Now cut the old rubber band.

  3. Replace Elastic Band on Clothing: шаг 3, изображение 1 из 2 Replace Elastic Band on Clothing: шаг 3, изображение 2 из 2
    • Tie the new rubber band to the old rubber band.

    • Only knot so tightly that the knot can be loosened again later.

  4. Replace Elastic Band on Clothing: шаг 4, изображение 1 из 2 Replace Elastic Band on Clothing: шаг 4, изображение 2 из 2
    • Now pull on the other end of the old rubber band, so that the new rubber band is pulled in piece by piece.

    • Do not pull so far that the end of the new rubber band is pulled through! The best way to secure the end of the new rubber band with the darning needle for safety is to prevent the rubber band from twisting during retraction.

  5. Replace Elastic Band on Clothing: шаг 5, изображение 1 из 3 Replace Elastic Band on Clothing: шаг 5, изображение 2 из 3 Replace Elastic Band on Clothing: шаг 5, изображение 3 из 3
    • As soon as the knot becomes visible at the beginning of the new rubber band, the knot can be loosened and the old rubber band can be used for textile recycling or for tying tomatoes :-)

    • Now put the two ends of the new elastic band together so that they overlap 1-5 centimeters according to the seam allowance.

  6. Replace Elastic Band on Clothing: шаг 6, изображение 1 из 3 Replace Elastic Band on Clothing: шаг 6, изображение 2 из 3 Replace Elastic Band on Clothing: шаг 6, изображение 3 из 3
    • Cut off a piece of thread.

    • The color of the thread can be chosen freely, as you will not see this seam later.

    • Thread one end of the thread through the suture needle tube.

    • Make a simple knot at the longer end.

  7. Replace Elastic Band on Clothing: шаг 7, изображение 1 из 3 Replace Elastic Band on Clothing: шаг 7, изображение 2 из 3 Replace Elastic Band on Clothing: шаг 7, изображение 3 из 3
    • Pierce the needle from the back about 2mm from the top edge through both ends of the rubber band.

    • Pull through the needle until the thread is tight and the knot is caught at the back of the rubber band. Sew along the edge until the end of the seam allowance is reached.

  8. Replace Elastic Band on Clothing: шаг 8, изображение 1 из 2 Replace Elastic Band on Clothing: шаг 8, изображение 2 из 2
    • Pierce the thread on the other edge and do the same here

  9. Replace Elastic Band on Clothing: шаг 9, изображение 1 из 2 Replace Elastic Band on Clothing: шаг 9, изображение 2 из 2
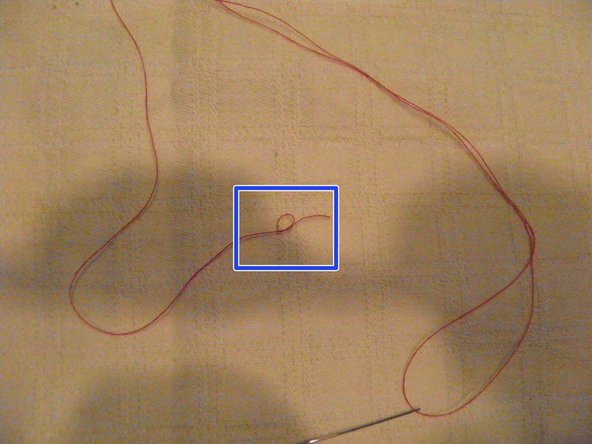
    • If both edges are sewn together, do not completely pull through the thread at the last stitch, but catch the forming loop with your finger.

    • Do not pull the thread tight yet.

    • Insert the needle into the loop and pull it through.

    • Now pull the thread tight so that the loop closes and a knot is formed.

    • Cut off the protruding thread and stow the needle and the remaining thread safely for the next time ;-)

  10. Replace Elastic Band on Clothing: шаг 10, изображение 1 из 3 Replace Elastic Band on Clothing: шаг 10, изображение 2 из 3 Replace Elastic Band on Clothing: шаг 10, изображение 3 из 3
    • Now stretch the waistband so far that the elastic band gradually disappears into the waistband due to the tension.

    • If you like, you can now sew up the opening that you might have had to tie in the beginning with a few stitches, we leave this unobtrusive opening open for a possible later replacement of the rubber band.

Заключение

FINISHED! And so quickly your waistband has the necessary elasticity!

3 участников успешно повторили данное руководство.

Особая благодарность этим переводчикам:

de en

100%

Эти переводчики помогают нам починить мир! Хотите внести свой вклад?
Начните переводить ›

Sandra Hiller

Участник с: 10/17/16

15 895 Репутация

Автор 5 руководств

Команда

iFixit Участник iFixit

Staff

139 членов

Автор 17 553 руководств

0 Комментариев

Добавить комментарий

Просмотр статистики:

За последние 24часов: 3

За последние 7 дней: 31

За последние 30 дней: 139

За всё время: 15,145