Перейти к основному содержанию
Присоединяйся к сообществу ремонтников - Создай аккаунт

Samsung Captivate Camera Assembly Replacement

Выберете то, что вам нужно

    1. Samsung Captivate Camera Assembly Replacement, Battery: шаг 1, изображение 1 из 1
      • Remove the back cover by pressing on the bottom section of the phone and sliding the bottom piece downward.

      • Lift up the back cover.

      Спросите у FixBot

      Добавить комментарий

    2. Samsung Captivate Camera Assembly Replacement: шаг 2, изображение 1 из 1
      • Place your finger on the bottom of the battery and lift to remove.

      Спросите у FixBot

      Добавить комментарий

    3. Samsung Captivate Camera Assembly Replacement: шаг 3, изображение 1 из 1
      • Replace the old battery with the new one.

      Спросите у FixBot

      Добавить комментарий

    1. Samsung Captivate Camera Assembly Replacement, Rear Case: шаг 4, изображение 1 из 1
      • Insert the spudger underneath the bottom section of the phone.

      • Gently lift and push the spudger to slide the bottom section down to reveal two hidden screws.

      Спросите у FixBot

      Добавить комментарий

    2. Samsung Captivate Camera Assembly Replacement: шаг 5, изображение 1 из 1
      • Remove the six 4.5mm #000 Phillips screws.

      Спросите у FixBot

      Добавить комментарий

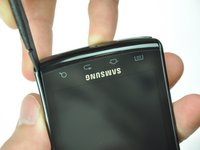
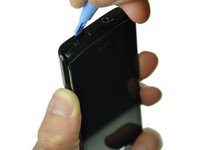
    3. Samsung Captivate Camera Assembly Replacement: шаг 6, изображение 1 из 3 Samsung Captivate Camera Assembly Replacement: шаг 6, изображение 2 из 3 Samsung Captivate Camera Assembly Replacement: шаг 6, изображение 3 из 3
      • Starting at a bottom corner, use the spudger to separate the rear case from the front display.

      • Move the spudger towards the top on both sides. The plastic opening tool is easier to use for this step.

      • Be careful when detaching the top. Free each side, stopping short of the center of the cover. Apply backward pressure on both corners with a finger applying pressure on the center, and slide the whole back cover toward the bottom of the device. Note: forcing the cover can result in cracked plastic.

      Спросите у FixBot

      Добавить комментарий

    4. Samsung Captivate Camera Assembly Replacement: шаг 7, изображение 1 из 1
      • Separate the rear case from the phone.

      Спросите у FixBot

      Добавить комментарий

    1. Samsung Captivate Camera Assembly Replacement, Camera Assembly: шаг 8, изображение 1 из 1
      • Use the spudger tool to pry up the chip labeled "NEC." This releases the chip.

      Спросите у FixBot

      Добавить комментарий

    2. Samsung Captivate Camera Assembly Replacement: шаг 9, изображение 1 из 1
      • Gently lift the camera assembly out of the plastic housing.

      Спросите у FixBot

      Добавить комментарий

Заключение

To reassemble your device, follow these instructions in reverse order.

Отменить: Я не выполнил это руководство.

3 человек успешно провели ремонт по этому руководству.

Drew Bentz

Участник с: 09/22/11

565 Репутация

Автор 5 руководств

Команда

Cal Poly, Team 20-25, Maness Fall 2011 Участник Cal Poly, Team 20-25, Maness Fall 2011

CPSU-MANESS-F11S20G25

3 членов

Автор 81 руководств

2 Комментарии к руководству

Is this for the front facing camera

tracy mann - Ответить Поделиться

No, this is for the rear facing camera. The Samsung Captivate does not have a front facing camera.

Will Budney - Ответить Поделиться

Добавить комментарий

Статистика просмотров:

За последние 24 часов: 1

За последние 7 дней: 7

За последние 30 дней: 37

За всё время: 2,818