Введение
This guide shows how to remove everything from the display assembly.
Выберете то, что вам нужно
-
-
Insert a fingernail or plastic opening tool in the gap between the rear case and the base of the phone.
 Спросите у FixBot
-
-
-
Slide your fingernail or plastic opening tool along the edge of the rear case.
-
Lift the case gently from the base.
-
-
-
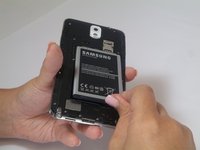
Insert a fingernail or plastic opening tool into the small gap between the battery and the phone base.
-
Lift the battery out of its recess.
-
-
-
Place your fingernail in the groove of the stylus pen.
-
Pull the stylus pen away from the phone.
-
-
-
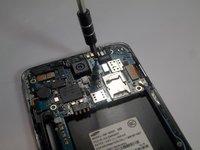
Remove the twelve 4mm Phillips #00 screws from the back chassis.
-
-
-
-
Insert the plastic opening tool into the Stylus Pen placement holder.
-
Lift the plastic opening tool so that the midframe separates from the base.
-
-
Инструмент, используемый на этом этапе:Tweezers$4.99
-
Use tweezers to remove both antenna clips.
-
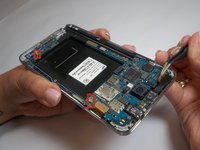
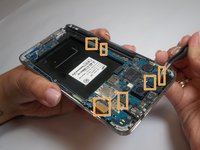
Use a spudger to disconnect six cable connectors.
-
-
-
Insert the spudger into the headphone jack.
-
-
-
Lift the spudger to separate the jack assembly from the motherboard.
-
Pull to remove.
-
-
-
Remove the metal bracket located in the top left hand corner.
-
-
Инструмент, используемый на этом этапе:Tweezers$4.99
-
Remove the vibrating motor by pulling up on it carefully with the tweezers.
-
-
-
Lift USB port from the front assembly using the tweezers.
-


To reassemble your device, follow these instructions in reverse order.
Отменить: Я не выполнил это руководство.
147 человек успешно провели ремонт по этому руководству.
Команда

USF Tampa, Team 2-2, Blackwell Fall 2014 Участник USF Tampa, Team 2-2, Blackwell Fall 2014
USFT-BLACKWELL-F14S2G2
4 членов
Автор 39 руководств
10 Комментарии к руководству
είναι απόλυτα κατανοητό.
Can you just replace the digitizer or is the digitizer glue down to good to the display where it might damage the LCD display when trying to replace the digitizer?
to safely remove the LCD display from the front touch screen glass w/o damaging the LCD screen I advise you to invest in and familiarize yourself with an LCD Separator machine and all the accessories that go along with it. Also, search for the machine and watch the videos..
Can you just replace the digitizer or is the digitizer glue down to good to the display where it might damage the LCD display when trying to replace the digitizer?
Can you just replace the digitizer or is the digitizer glue down to good to the display where it might damage the LCD display when trying to replace touch