Введение
Use this guide to replace the back cover of your Galaxy Note8.
If your battery is swollen, do not heat your phone. If needed, you can use a dropper or syringe to inject isopropyl alcohol (90+%) around the edges of the back cover to weaken the adhesive. Swollen batteries can be very dangerous, so wear eye protection and exercise due caution, or take it to a professional if you're not sure how to proceed.
Opening the phone will damage the waterproof sealing. If you do not replace the adhesive seals, your phone will function normally, but will loose water-protection.
You will probably need replacement adhesive to reattach the back cover.
Выберете то, что вам нужно
-
-
Switch off your phone.
-
Prepare an iOpener for softening the adhesive on the back of the Note8.
-
Apply the iOpener on the back of the Note8 along the side with the power button.
-
-
-
Use a suction handle to lift the back cover and create an opening pick to get in the gap.
-
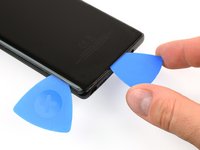
Start at the middle of the side and cut the adhesive while pulling up with the suction handle.
-
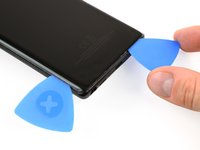
Move the pick towards the bottom corner and leave it there to keep the adhesive from resealing to the case.
-
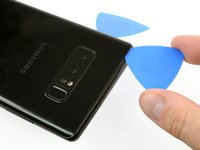
Use another pick and move it to the top corner.
-
-
-
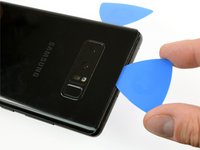
Again take another opening pick and carefully move it around the corner and along the top edge.
-
Reheat with an iOpener if necessary.
-
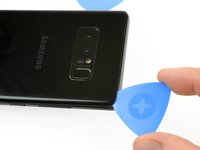
Leave the pick at the top right corner to keep the adhesive from resealing.
-
-
-
-
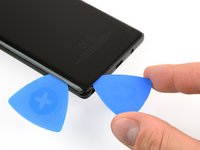
Rotate the device and start to separate the adhesive at the bottom with another opening pick.
-
Leave the pick at the bottom right corner to keep the adhesive from resealing.
-
-
-
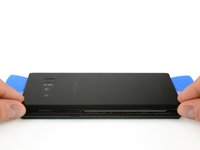
When the adhesive has been separated on all three sides properly you will be able to slowly lift the back cover.
-
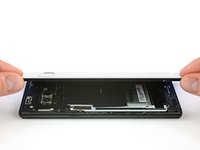
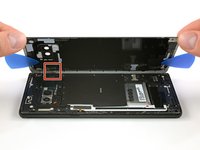
Pay attention to the fingerprint sensor connector when flipping the back cover open. You might need to disconnect it as described in the next step.
-
-
Инструмент, используемый на этом этапе:Tweezers$4.99
-
Use a pair of tweezers to disconnect the fingerprint sensor.
-


If possible, turn on your phone and test the new part before installing new adhesive and resealing the phone.
Secure the new back cover with pre-cut adhesive or double-sided adhesive tape.
To reassemble your device, follow these instructions in reverse order.
After installing the rear cover, apply strong, steady pressure to your phone for several minutes to help the adhesive form a good bond, such as by placing it under a stack of heavy books.
Отменить: Я не выполнил это руководство.
43 человек успешно провели ремонт по этому руководству.

Команда

Tobias Isakeit - Repairability Engineer Участник Tobias Isakeit - Repairability Engineer
Business
1 член
Автор 1 145 руководств
3 Комментарии к руководству
the separate adhesive was unneeded the replacement back cover came with adhesive
So close!!!!’ I sliced the fingerprint sensor cable off, that area of the back glass was so smashed. Hopefully I can get a replacement to me by Saturday