Введение
Follow this guide to remove and replace the motherboard for the Galaxy S10. This includes the USB-C charging port, which is now soldered to the board.
Выберете то, что вам нужно
-
-
Insert a SIM card eject tool, SIM eject bit, or a straightened paperclip into the hole on the SIM tray, located at the top edge of the phone next to the plastic antenna band.
-
Press firmly to eject the tray.
-
Remove the SIM card tray.
-
-
-
Unplug and power off your phone before you begin.
-
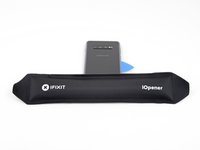
Heat an iOpener and apply it to the back cover's right edge for two minutes.
-
As you wait, take a look at the image of the removed back cover and take note of where the adhesive is located.
I think we should mention that the glass needs to be barely too hot to touch to determine when it's hot enough that a pick can be slid underneath.
Or we can mention a thermometer temperature, but most diy people probably don't have a thermometer to check.
A lot of people seem to have issues using the iopener to unglue phone parts like back glass (can Google it), likely because the glue didn't get hot enough, so mentioning the desired touch temperature can be helpful for DIYers to ensure that their glue is sufficiently weakened and they can begin working off the part.
(Just being hot isn't enough for glue to weaken, as you can probably attest to if you've ever had your phone get really hot but the back cover never came loose)
-
-
-
Rest the heated right edge of the phone on something that is about 0.5 inches (13 mm) thick. This angles the phone for the opening tool.
-
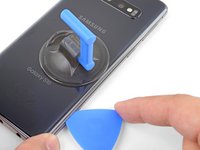
Brace the left edge of the phone with your fingers so that the phone won't slide. Pull on the suction cup with firm pressure.
-
Press the edge of an opening tool into the seam between the back cover and the frame.
-
With the opening tool in place in the seam, slide it back and forth along the seam to loosen the back cover.
Might be hard with the suction cup on a cracked back. I'd rather break it off and buy a new back (it's super cheap, around 10$ online).
Guenter -
Yes! Apply a layer of packing tape to the cracked back cover first, and the suction cup will adhere to the smooth tape surface.
I will open the one that I am taking out of the computer now and then I will follow where it is
Am besten 2 mal gut erwährmen. Danach geht das öfnen top.
-
-
-
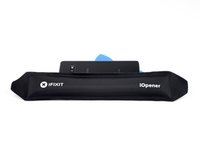
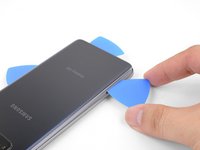
Heat an iOpener and apply it to the same edge of the phone for two minutes.
-
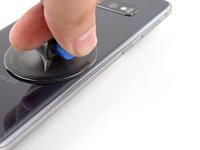
Apply a suction cup to the back of the phone, as close to the center of the right edge as possible (where the adhesive is narrowest).
-
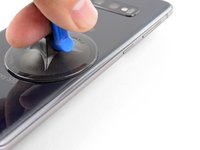
Pull on the suction cup with strong, steady force to create a gap between the back cover and the frame.
-
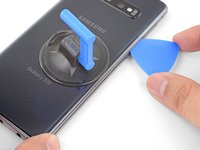
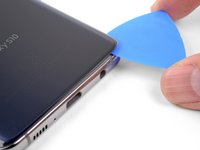
Insert the point of an opening pick into the gap.
-
If you are having trouble creating a gap, the adhesive isn't weakened enough. Make sure you have heated the edge until just barely too hot to touch try this step again.
-
You can try applying a few drops of high concentration (over 90%) isopropyl alcohol into the seam to help loosen the adhesive.
I had trouble lifting up to create a gap. What I did is watch Jerry rig everything's teardown and he said the back glass must be barely too hot to touch in order for the adhesive to weaken.
So I heated the iOpener till it was too hot to touch, but not so long that it would burst. Put on right edge for a few minutes. Then I lift with the suction cup, using my middle finger and thumb to grip the sides of the phone and my pointer finger to pull up on the suction cup .
I cleaned the glass with an alcohol wipe beforehand to make the suction cup stick better, though I'm sure any cleaning method that removes fingerprints will help.
I couldn't make as big a gap as shown in the picture, but I was able to stick my metal jimmy tool carefully into the crack between the glass and the metal frame and it was just enough to slide the tool a little. And I was very careful since it's a metal tool. After that I could stick the plastic pick in and slice the adhesive and then that gets you started removing the back cover. Reheat often to weaken and slice adhesive. STOP and reheat if it even gets a little harder to slice. DON'T risk cracking the glass.
I think we should add that they should treat the back glass as gently as a raw eggshell. That's because I thought I wasn't applying excessive force and caused the glass to crack, but I didn't understand what counts as "excessive force." (A bit vague)
What excessive force actually means is as soon as you feel any resistance at all when slicing glue with the pick, stop and apply more heat before continuing. The glass can crack very very easily, when pressure is applied in only a small section.
See for me it was weird, the glass was weirdly weak. I just put the iOpener in the microwave and put it on there until it was almost too hot to touch and went around, the gap was like 0.5cm already, so I just went around and it came all off in like 10 seconds, I was kind of happy how easy it was, but sadly I went around too fast and now there's a line crack at the top left of my back glass, it's not sharp so it doesn't bother me.
-
-
-
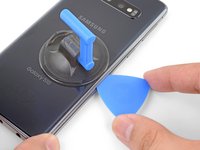
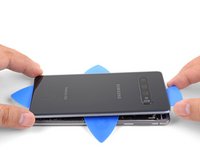
Slide the opening pick along the edge of the phone, slicing through the adhesive.
-
Leave a pick in the seam to prevent the adhesive from re-sealing.
-
-
-
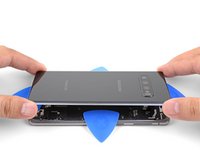
Apply a heated iOpener to the bottom edge of the phone for two minutes.
-
Insert an opening pick into the right edge near the bottom right corner.
-
Carefully slide the pick around the corner. Continue cutting along the bottom edge and around the bottom left corner.
-
Leave an opening pick in the seam to prevent the adhesive from re-sealing.
-
-
-
-
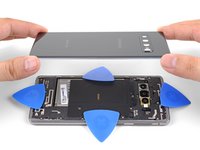
Once you have sliced around the phone, twist an opening pick in one of the edges to help separate the back cover from the frame.
-
Lift the back cover slowly. Use opening picks to slice any remaining adhesive.
-
Remove the back cover.
-
-
-
Remove the eight 4 mm Phillips screws securing the top midframe to the phone.
-
-
-
The midframe is still held in place by a few plastic clips around the edge.
-
Insert the point of a spudger into the notch on the right edge of the midframe, near the volume up button.
-
Pry up to loosen the midframe from the phone.
Bei mir war die Kerbe durch den Klebstoff komplett verdeckt. Am bestern den Kleber vorher entfernen. Dann geht es einfacher.
-
-
-
Lift the midframe from the top corners and remove it from the phone.
-
To reinstall the top midframe:
-
Align the midframe's top edge to the phone and lay the frame down on the phone.
-
Use fingers to apply pressure along the midframe perimeter to snap the midframe clips back into place. The edges should sit flush against the phone edge.
-
-
-
Insert the flat end of a spudger underneath the battery connector, which is attached to the motherboard below the rear-facing camera.
-
Pry upwards to disconnect the connector from its socket.
-
Gently push the battery's flex cable away from the motherboard socket to prevent accidental contact.
Between this step and the next (Step 12, Battery), the lower mainframe is removed in the images but there is no instruction to do so. I was able to remove the battery (1 min of heating with iOpener, plus 8 total drops [2 in each corner] of 90% IPA) without removing this lower mainframe.
-
-
-
Remove the seven 4 mm Phillips screws securing the lower midframe.
-
-
-
Insert the point of a spudger underneath the top right corner of the lower midframe.
-
Pry up to release the midframe from the phone.
-
-
-
Grasp the loosened end of the midframe with your fingers and lift upwards slowly.
-
Wiggle the midframe slightly to help release the remaining edge clips.
-
Remove the lower midframe. The loudspeaker is built into the lower midframe.
-
-
-
Use the flat end of a spudger to pry up and disconnect the display connector from its motherboard socket, located near the bottom right corner of the phone.
-
-
-
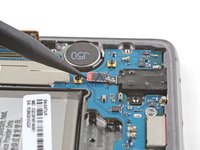
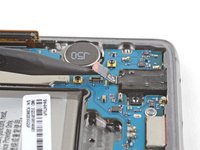
Use the point of a spudger to pry up and disconnect the headphone jack's connector from its motherboard socket.
It's a good idea to take out the headphone jack at this point.
It eases the process of taking out the motherboard.
When reinstalling a new motherboard, the advantage of pushing in the jack AFTER sitting the motherboard is even greater -
-
-
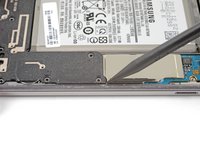
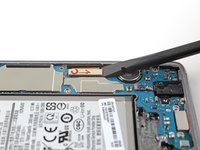
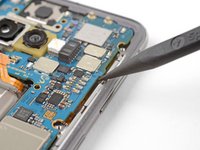
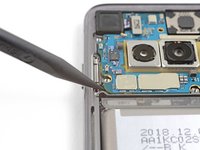
Insert the point of a spudger underneath the right edge of the motherboard, near the volume down button.
-
Pry up gently to loosen the motherboard from its recess.
-
-
-
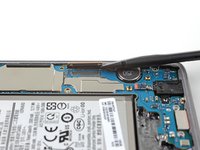
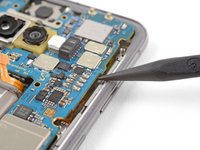
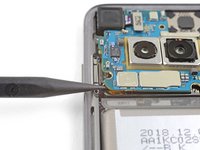
Insert the point of a spudger under bottom left corner of the motherboard.
-
Pry up gently to loosen the motherboard from its recess.
-
-
-
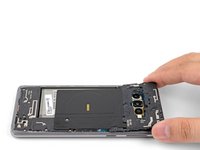
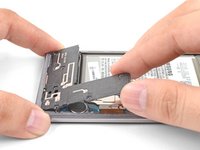
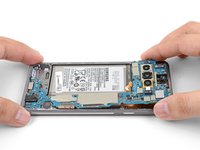
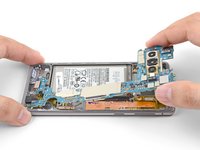
Using your fingers, grasp the motherboard by the top corners.
-
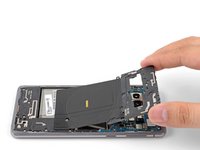
Swing the motherboard slightly out of its recess. Be careful not to snag any cables along the way.
-
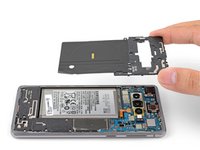
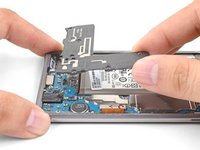
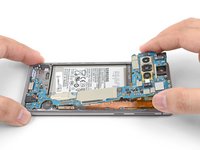
Pull the motherboard towards the top edge of the phone while wiggling the board slightly. This will loosen the charging port from its socket.
-
Once the charging port is freed from its socket, remove the motherboard.
-
Align the motherboard's charging port with the bottom edge of the phone.
-
Gently push the motherboard against the bottom edge of the phone until the charging port is completely seated.
-
Lower the motherboard and press into place. Be careful not to trap any cables underneath the motherboard. The board should sit flush against the frame.
It's a better idea to take out the headphone jack before taking out the motherboard and reattaching the jack after you sit the new motherboard in
Trust me...
where can you get replacement motherboard?
-


To reassemble your device, follow these instructions in reverse order.
After you've completed the repair, follow this guide to test your repair.
Take your e-waste to an R2 or e-Stewards certified recycler.
To reassemble your device, follow these instructions in reverse order.
After you've completed the repair, follow this guide to test your repair.
Take your e-waste to an R2 or e-Stewards certified recycler.
Отменить: Я не выполнил это руководство.
15 человек успешно провели ремонт по этому руководству.


16 Комментариев
Hallo ich hab seit kurzem ein galaxy s10 und habe versehentlich statt dem eigentlichen Sim-slot in das untere Mikrofon neben den Lautsprechern “gestochen”. Ist dort direkt das Mikrofon dahinter oder ist dieses seitlich von dem Loch angebracht?
Hi Dominique,
The microphone hole is angled. You did not damage your microphone.
I have the same problem, with the S10 open, I mixed up the microphone slot and the SIM card, I definitely did not damage the microphone?
Correct. You cannot damage the microphone by pressing anything into the hole. For more details, see here.
where can i get the board to buy?
Hi!, it seems that they’re sold out in most of the sites, you could try to buy a broken Samsung Galaxy S10+ with the motherboard fine, so you can replace it to yours.
I hope the repairings go well. If you have any more question let us know!
So I did the same, pushed a needle into the bottom mic hole thinking it was the sim eject tray.
If it is safe for the microphone, what did I hit? Did I ruin the waterproof seal? Any way to fix this?
Thank you!
Don’t worry! You cannot damage the microphone or the waterproof seal by pressing anything into the hole. For more details, see here.
Samsung s10 shut off during charging, has a black screen and won’t turn on; could this be a main board issue? The phone was not even used for a full two weeks after purchased.
Hi Arthur,
thanks for your post! I find it very useful.
Currently Im planning to exchange the motherboard of my Samsung Galaxy S10 SM-G973U1 for the motherboard of a samsung galaxy s10 SM-G973F. Is possible to do this?
I would like to do so because the SM-G973U1 only allows to insert one sim card.
Many thanks!
Best,
Jared
Hi Moisés!
I haven't worked with the G973F international model, so I don't know if there are any physical incompatibilities. If it fits, it should theoretically work. Please drop an update when you're done!
Hello,
I was told that I have a dead power IC and ordered a replacement motherboard online for my S10+ G975U. My goal is to not lose any data. Is it possible to swap the NAND storage with the one that has my data on it? Also, was it an overkill to order the whole motherboard (they didn't tell me which IC is dead in particular)?
where can i get a motherboard for my s10
There is nothing here about one's data on the phone. How to save before switching motherboard, I have a 128 GB Verizon Galaxy S10. First I had a problem with the USB charger. The plastic around it completely turned to dust. So, I could not charge it save for the wireless charger. So I bought a USB charging port from here. Needless to say I heated up the board and the microphone slid off. The camera lens and back both broke so I bought the after market back cover and the Lens insert cover. In one of the attempts I think when attempting the non SMD USB charging port I nicked the battery and a fire started (yes we are winning now). I bought the battery. You guys did not have the back cover so I tried the S10+ and found it was oh just a bit long (I hope people are giggling by now me big Lamo!) Basically I now have the motherboard takes care of USB and microphone but my data!? Do I move 128 GB of pdfs, videos, and photos via 32 GB external? I know not all 128 is the personal stuff but games with my hi score ouch!
Mais dans quel compartiment faut-il mettre la carte sim ? Le petit ou le grand ? Je ne sais pas si “Nano” c’est le plus petit format. Merci.
Bernard LEROY - Ответить
Bonjour Bernard,
La carte SIM doit aller dans le petit compartiment.
Arthur Shi -
Be very careful to ensure that the SIM card does not fall out of the carrier while you are sliding it into the phone.
If it does fall out of the carrier while being inserted, you will find it nearly impossible to retrieve without damaging the phone circuitry.
You've been warned.
Patsy Hetzel - Ответить