Введение
Use this guide to replace a cracked or broken display on your Samsung Galaxy S8.
Note: This guide instructs you to replace only the display while leaving the original frame, motherboard, and battery in place. However, some replacement screens for this phone come pre-installed in a new frame (a.k.a. chassis), which requires a very different procedure—transplanting your phone's internals and installing a new battery. Make sure you have the correct part before starting this guide.
This guide involves removing the rear glass cover, you will need replacement adhesive to reattach the back cover to the phone. If your replacement screen does not come with adhesive, you will need to use tape to secure it as well.
If the frame is damaged or bent, it's important to replace it, or else the new screen may not mount correctly and can suffer damage from uneven pressure.
The process of separating the display from the frame usually destroys the display, so don't follow this guide unless you intend to replace the display.
Выберете то, что вам нужно
Видеообзор
-
-
Place the iOpener in the center of the microwave.
 Спросите у FixBot
-
-
-
Heat the iOpener for thirty seconds.
-
Throughout the repair procedure, as the iOpener cools, reheat it in the microwave for an additional thirty seconds at a time.
-
-
-
Remove the iOpener from the microwave, holding it by one of the two flat ends to avoid the hot center.
-
-
-
Fill a pot or pan with enough water to fully submerge an iOpener.
-
Heat the water to a boil. Turn off the heat.
-
Place an iOpener into the hot water for 2-3 minutes. Make sure the iOpener is fully submerged in the water.
-
Use tongs to extract the heated iOpener from the hot water.
-
Thoroughly dry the iOpener with a towel.
-
Your iOpener is ready for use! If you need to reheat the iOpener, heat the water to a boil, turn off the heat, and place the iOpener in the water for 2-3 minutes.
-
-
-
Heat an iOpener and apply it to a long edge of the S8 for about 2 minutes.
-
-
-
In the following steps you will be cutting through the adhesive around the edge of the rear glass panel.
-
The adhesive on the rear case is laid out as seen in the first image.
-
The prying pattern as seen from the outside of the phone is as follows:
-
Thick portions of adhesive
-
Thin areas of adhesive
-
Avoid prying here, to protect the fingerprint sensor.
-
-
-
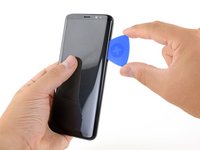
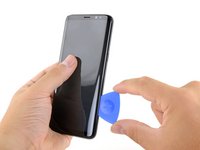
Once the back panel is warm to the touch, apply a suction cup as close to the heated edge of the phone as you can while avoiding the curved edge.
-
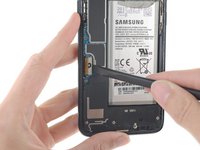
Lift on the suction cup, and insert an opening pick under the rear glass.
-
-
-
Once you have the tool firmly inserted into the glass, reheat and reapply the iOpener to soften the adhesive.
-
-
-
-
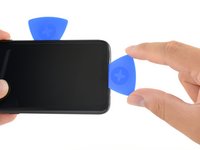
Slide the opening pick down the side of the phone, separating the adhesive.
-
-
-
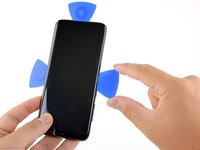
Repeat the previous heating and cutting procedure for the remaining three sides of the phone.
-
Leave an opening pick on each side as you continue to the next to prevent the adhesive from resealing.
-
-
-
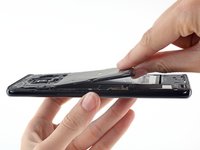
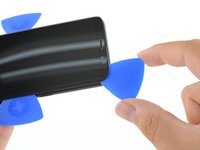
Use the opening picks to slice through any remaining adhesive and open the phone slightly.
-
Remove the glass from the phone.
-
-
Инструмент, используемый на этом этапе:Tweezers$4.99
-
Use tweezers to peel away any remaining adhesive from the phone's chassis. Then clean the adhesion areas with high concentration isopropyl alcohol (at least 90%) and a lint-free cloth to prep the surface for the new adhesive.
-
Peel the adhesive backing off of the new rear glass, carefully line up one edge of the glass against the phone chassis, and firmly press the glass onto the phone.
-
-
-
Remove eleven 3.7 mm screws using a Phillips #000 screwdriver.
-
-
-
Use the flat end of a spudger to disconnect the battery connector.
-
-
-
Use the flat end of a spudger to disconnect the display and digitizer connector.
-
-
-
Heat an iOpener and apply it to one of the long edges of the S8 for about 2 minutes.
-
-
-
Once the screen is warm to the touch, apply a suction cup as close to the heated edge of the phone as you can while avoiding the curved edge.
-
If the phone's screen is cracked, the suction cup may not stick. Try lifting it with strong tape, or superglue the suction cup in place and allow it to cure so you can proceed.
-
Lift on the suction cup and insert an opening pick under the display assembly.
-
-
-
Once you have the tool firmly inserted into the glass, reheat and reapply the iOpener to soften the adhesive.
-
-
-
Slide the opening pick down the side of the phone, separating the adhesive.
-
-
-
Repeat the previous heating and cutting procedure for the remaining three sides of the phone.
-
Leave an opening pick on each side as you continue to the next to prevent the adhesive from resealing.
-
-
-
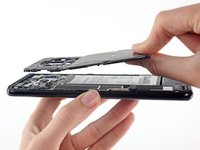
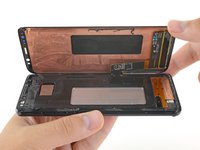
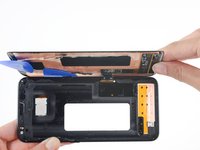
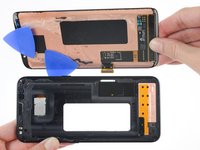
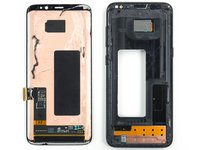
Carefully lift the screen assembly away from the midframe, gently pulling the display connector through the hole in the midframe.
-
Remove the screen assembly.
-
-
-
After removing all traces of glue and glass from the frame, clean the adhesion areas with 90% (or higher) isopropyl alcohol and a lint-free cloth or coffee filter. Swipe in one direction only, not back and forth.
-


After reapplying adhesive, follow these instructions in reverse order to reassemble your device.
After you've completed the repair, follow this guide to test your repair.
Отменить: Я не выполнил это руководство.
237 человек успешно провели ремонт по этому руководству.

36 Комментарии к руководству
Did my first repair two days ago. If you've done any other samsung repairs such as S7 or S7E, this will be cake for you to do. If you have big fingers like I do, the most challenging thing will be the fingerprint scanner flex on the back glass, connecting and reconnecting.
I go about this repair a bit differently if I want to salvage the lcd. I remove the battery motherboard and sensors , and start through the opening in the frame under the battery. I drip isopropyl alcohol along the perimeter of the battery opening applying heat and work a playing card in between the LCD and the frame, loosening adhesive as I go.
I like the way you think.
Thank you. My utterly novice self ordered only the glass, thinking it would be moderately easy for a layman. I didn't realize the LCD was nearly permanently stuck to it, and don't have $190 to replace it. I'll try your way. Thanks!
Great guide, very accurate. Be very careful along the right side of the device, as it is very, very easy to shear the connector flex in half. To avoid any chance of damage, I remove the board and front camera/sensor flex. It's an easy job, and saves a massive headache if any parts are damaged. Overall quite a familiar phone to work on, if you've ever done any S6's and upwards.