Перейти к основному содержанию

Samsung Galaxy Watch3 Display Replacement

Выберете то, что вам нужно

  1. Samsung Galaxy Watch3 Display Replacement, Unfasten the back cover screws: шаг 1, изображение 1 из 1
    • Before starting repairs, take your watch off the charger and power it down.

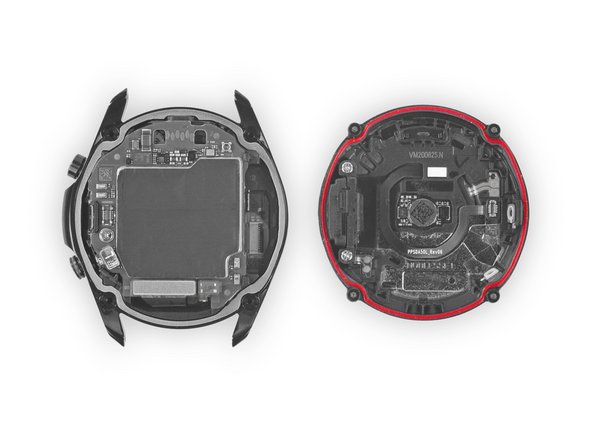
    • Use a Tri-point Y00 driver to unfasten the four screws on the back of the watch.

    • Don’t worry about removing the screws, they will stay in place in the back cover.

  2. Samsung Galaxy Watch3 Display Replacement, Wedge open the back cover: шаг 2, изображение 1 из 2 Samsung Galaxy Watch3 Display Replacement, Wedge open the back cover: шаг 2, изображение 2 из 2
    • Insert an opening tool between the back cover and the metal housing.

    • Twist the opening tool to create a wider gap.

    • Don't fully remove the back cover just yet. The sensor flex cable is still connected to the motherboard.

  3. Samsung Galaxy Watch3 Display Replacement, Disconnect the sensor flex cable: шаг 3, изображение 1 из 3 Samsung Galaxy Watch3 Display Replacement, Disconnect the sensor flex cable: шаг 3, изображение 2 из 3 Samsung Galaxy Watch3 Display Replacement, Disconnect the sensor flex cable: шаг 3, изображение 3 из 3
    • Lay the watch face down.

    • Carefully lift the back cover up from the edge with the buttons to access the sensor connector.

    • Use the flat end of a spudger to pry up and disconnect the sensor flex cable from the motherboard.

  4. Samsung Galaxy Watch3 Display Replacement, Remove the back cover: шаг 4, изображение 1 из 2 Samsung Galaxy Watch3 Display Replacement, Remove the back cover: шаг 4, изображение 2 из 2
    • Remove the back cover.

    • Make sure the rubber gasket (marked red) is undamaged. If damaged replace it with a new one during reassembly to maintain proper water resistance.

  5. Samsung Galaxy Watch3 Display Replacement, Unplug the display connector: шаг 5, изображение 1 из 2 Samsung Galaxy Watch3 Display Replacement, Unplug the display connector: шаг 5, изображение 2 из 2
    • Use the flat end of a spudger to pry up and disconnect the display flex cable from the motherboard.

  6. Samsung Galaxy Watch3 Display Replacement, Loosen the core assembly: шаг 6, изображение 1 из 2 Samsung Galaxy Watch3 Display Replacement, Loosen the core assembly: шаг 6, изображение 2 из 2
    • The core's plastic frame fits tightly within the watch's metal housing.

    • Place the corner of the flat end of a spudger in the small opening of the barometric sensor, on the opposite side of the display connector.

    • Twist and tilt the spudger to lever the core assembly out of the metal housing.

  7. Samsung Galaxy Watch3 Display Replacement, Remove the core assembly: шаг 7, изображение 1 из 3 Samsung Galaxy Watch3 Display Replacement, Remove the core assembly: шаг 7, изображение 2 из 3 Samsung Galaxy Watch3 Display Replacement, Remove the core assembly: шаг 7, изображение 3 из 3
    • Carefully thread the display flex cable through the gap on the core's plastic frame.

    • Remove the core assembly.

  8. Samsung Galaxy Watch3 Display Replacement, Push out the display: шаг 8, изображение 1 из 2 Samsung Galaxy Watch3 Display Replacement, Push out the display: шаг 8, изображение 2 из 2
    • If your display is cracked, keep glass shards contained by applying a strip of tape over the glass."

    • Use your finger to steadily push the display down through the watch's metal housing to loosen the adhesive.

    • Lightly heating the display with a hair dryer or iOpener can help soften the adhesive.

    • Remove the display.

Заключение

If possible, turn on your device and test your repair before reassembly.

To reassemble your device, follow these instructions in reverse order.

Repair didn’t go as planned? Try some basic troubleshooting, or ask our Answers community for help.

Take your e-waste to an R2 or e-Stewards certified recycler.

3 участников успешно повторили данное руководство.

Tobias Isakeit

Участник с: 03/31/14

117 802 Репутация

Автор 188 руководств

Команда

Tobias Isakeit - Repairability Engineer Участник Tobias Isakeit - Repairability Engineer

Business

1 член

Автор 1 083 руководств

Один комментарий

Any idea how to remove the rotating bezel?

Azhar Suhaimi - Ответить

Добавить комментарий

Просмотр статистики:

За последние 24часов: 2

За последние 7 дней: 20

За последние 30 дней: 146

За всё время: 8,384