Перейти к основному содержанию

Sonos Playbase Subwoofer Replacement

Выберете то, что вам нужно

  1. Sonos Playbase Subwoofer Replacement, Bottom Panel: шаг 1, изображение 1 из 3 Sonos Playbase Subwoofer Replacement, Bottom Panel: шаг 1, изображение 2 из 3 Sonos Playbase Subwoofer Replacement, Bottom Panel: шаг 1, изображение 3 из 3
    Инструмент, используемый на этом этапе:
    Pro Tech Toolkit
    $74.95
    Купить
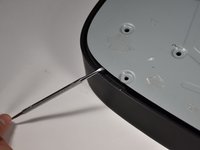
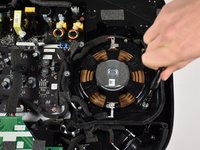
    • Turn the Playbase upside down so that the "Sonos Playbase" imprint is face up.

    • Remove the bottom panel with an Opening Tool by inserting underneath and prying upwards.

    • Melt the adhesive with an iOpener for ease of opening

    • Use a Metal Spudger if the plastic spudgers do not work.

    • Take care to avoid damaging the plastic or the device if using a metal spudger.

  2. Sonos Playbase Subwoofer Replacement: шаг 2, изображение 1 из 2 Sonos Playbase Subwoofer Replacement: шаг 2, изображение 2 из 2
    Инструмент, используемый на этом этапе:
    Pro Tech Toolkit
    $74.95
    Купить
    • Remove the fourteen 11mm T-10 screws by turning counter-clockwise.

    • Remove the seven 44mm T-20 screws by turning counter-clockwise.

    • Remove the twenty-two 34mm T-20 screws by turning counter-clockwise.

    • Record where each screw belongs for easier reassembly.

  3. Sonos Playbase Subwoofer Replacement: шаг 3, изображение 1 из 2 Sonos Playbase Subwoofer Replacement: шаг 3, изображение 2 из 2
    Инструмент, используемый на этом этапе:
    Pro Tech Toolkit
    $74.95
    Купить
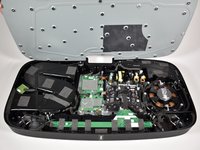
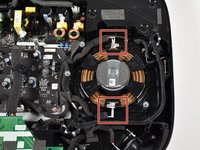
    • Remove the metal plate with a Opening Tool by inserting underneath and prying upwards.

    • Use a metal spudger if plastic openers do not work.

    • Take care to avoid damaging the plastic or the device if using a metal spudger.

  4. Sonos Playbase Subwoofer Replacement, Subwoofer: шаг 4, изображение 1 из 2 Sonos Playbase Subwoofer Replacement, Subwoofer: шаг 4, изображение 2 из 2
    Инструмент, используемый на этом этапе:
    Pro Tech Toolkit
    $74.95
    Купить
    • Remove the three 18mm T-20 length screws by turning counter-clockwise and pulling up.

    • Remove the three 38mm T-55 length screws by turning counter-clockwise and pulling up.

  5. Sonos Playbase Subwoofer Replacement: шаг 5, изображение 1 из 2 Sonos Playbase Subwoofer Replacement: шаг 5, изображение 2 из 2
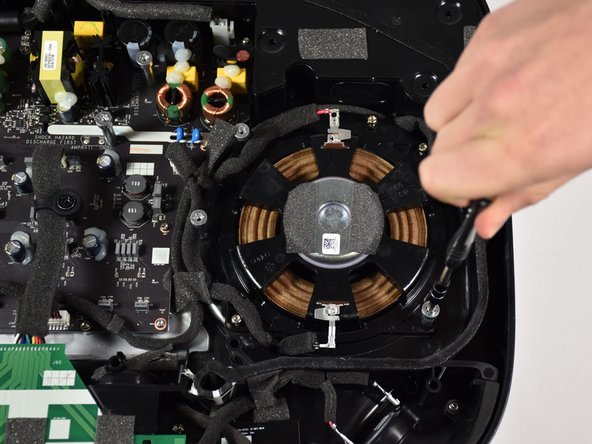
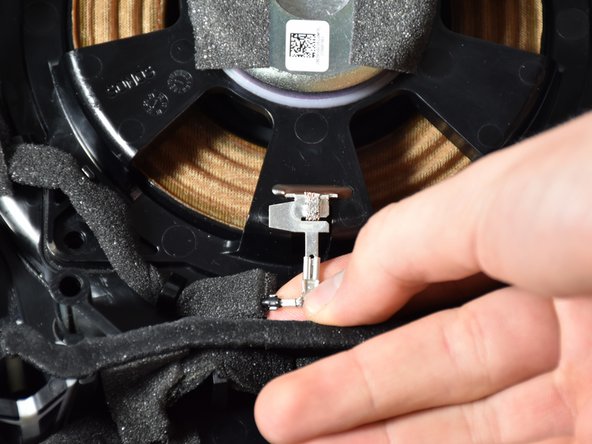
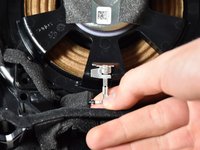
    • Unclip the red and black wiring from the subwoofer by pulling them away from the subwoofer.

  6. Sonos Playbase Subwoofer Replacement: шаг 6, изображение 1 из 1
    • Remove the subwoofer by gently lifting it up.

Заключение

To reassemble your device, follow these instructions in reverse order.

Еще один человек закончил это руководство.

Clayton Lipping

Участник с: 10/08/18

165 Репутация

1 руководство автора

Команда

Cal Poly, Team S17-G2, White Fall 2018 Участник Cal Poly, Team S17-G2, White Fall 2018

CPSU-WHITE-F18S17G2

4 членов

Автор 8 руководств

0 Комментариев

Добавить комментарий

Просмотр статистики:

За последние 24часов: 0

За последние 7 дней: 6

За последние 30 дней: 20

За всё время: 2,169