Перейти к основному содержанию

Sontek IQ Flow Sensor Deployment

Выберете то, что вам нужно

  1. Sontek IQ Flow Sensor Deployment, Assembling the Sensor: шаг 1, изображение 1 из 3 Sontek IQ Flow Sensor Deployment, Assembling the Sensor: шаг 1, изображение 2 из 3 Sontek IQ Flow Sensor Deployment, Assembling the Sensor: шаг 1, изображение 3 из 3
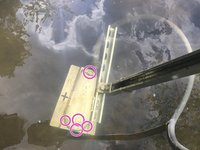
    • Attach aluminum strut channels to the sontek sensor using strut channel nuts, washers, and 3/8" bolts

    • Both strut channels are not necessary for deployment. Only one strut channel is needed to connect sensor to the pole in the river.

    • Feed the conduit over the sontek connection cable to protect it when in the river. It will not make a physical connection to the sensor

    • Screw the water tight sontek connection cable into the connection port.

    • Screw the other end of the conduit into the base of the node box with the excess sontek wire pulled through.

  2. Sontek IQ Flow Sensor Deployment, Assembling the Node Box: шаг 2, изображение 1 из 3 Sontek IQ Flow Sensor Deployment, Assembling the Node Box: шаг 2, изображение 2 из 3 Sontek IQ Flow Sensor Deployment, Assembling the Node Box: шаг 2, изображение 3 из 3
    • Wrap the Sontek connection wire to fit securely within the node box and without putting significant pressure on the standoffs

    • Insert the battery into the node box securely.

    • Connect the battery to the board just as in depth sensors and confirm that the sensor begins transmitting data to grafana.

    • The sensor starts as a "depth sensor" so only the battery voltage , data packets, and rsrp will be sent. It will take >10 minutes before flow and stage are taken and sent.

    • Place the board into the node box and secure it to the standoffs using screws. In the square node box it will only connect to 2 standoffs at a time.

  3. Sontek IQ Flow Sensor Deployment, Setting the Strut Channel: шаг 3, изображение 1 из 3 Sontek IQ Flow Sensor Deployment, Setting the Strut Channel: шаг 3, изображение 2 из 3 Sontek IQ Flow Sensor Deployment, Setting the Strut Channel: шаг 3, изображение 3 из 3
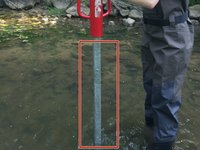
    • Place the Steel strut channel in the stream bed so that it is next to where the sensor will be placed and the open side of the channel faces the sensor position.

    • Remove rocks from the area if the bed is rocky.

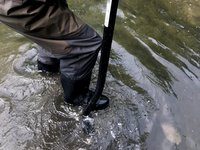
    • Use the post pounder to push the steel strut channel into the river bed 2 feet.

    • Can mark 2 feet on the steel channel before pounding into the ground to know when it is deep enough.

    • Alternatively, for streams with extremely high discharge, a 2 ft aluminum strut channel can be pounded into the center of the stream while the steel strut channel is placed at the edge of the stream bed.

  4. Sontek IQ Flow Sensor Deployment, Attaching the Strut Channels: шаг 4, изображение 1 из 1
    • Using the strut channel connector, attach the aluminum channel with the node cantilever to the steel strut channel with the 1/2" bolts, washers, and sprung screw nuts.

    • Fasten using the impact driver with the 1/2" socket adaptor or a wrench.

    • 2 bolts should fasten to the aluminum strut channel, and 2 bolts should fasten to the steel strut channel.

  5. Sontek IQ Flow Sensor Deployment, Attaching the Node Box: шаг 5, изображение 1 из 3 Sontek IQ Flow Sensor Deployment, Attaching the Node Box: шаг 5, изображение 2 из 3 Sontek IQ Flow Sensor Deployment, Attaching the Node Box: шаг 5, изображение 3 из 3
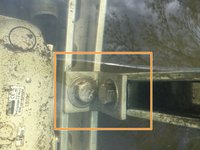
    • Secure the node box to the strut channel with two 5/16" bolts and strut channel nuts.

    • Fasten with a 5/16" wrench.

    • Ensure that the node box is perpendicular to the strut channel after tightening.

    • Further secure the node box to the strut channel by wrapping the node box with multiple bungee cords and attaching the end of the cords to the struct channel.

  6. Sontek IQ Flow Sensor Deployment, Securing the Sensor: шаг 6, изображение 1 из 2 Sontek IQ Flow Sensor Deployment, Securing the Sensor: шаг 6, изображение 2 из 2
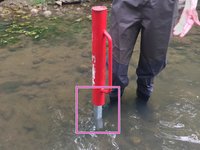
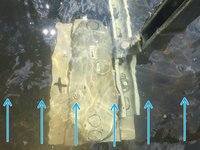
    • Place the Sontek IQ sensor in the water facing the direction of flow.

    • There is an arrow on the sensor itself showing which way water should flow.

    • Secure the sensor to the steel strut with 1/2" bolts, washers, and strut nuts. Fasten with a 1/2" wrench.

    • Regardless if attaching the Sontek sensor to the short aluminum strut channel or the tall steel strut channel, secure in the same fashion.

  7. Sontek IQ Flow Sensor Deployment, Finishing: шаг 7, изображение 1 из 2 Sontek IQ Flow Sensor Deployment, Finishing: шаг 7, изображение 2 из 2
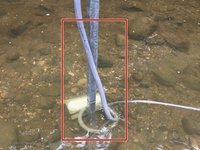
    • Ensure the conduit connected the node box and sensor has no kinks and is secure.

    • Wrap the conduit multiple times around the strut channel pole to prevent slack lying in the water.

    • Remove settled dirt from the sensor as it will impact measurements.

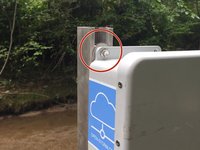
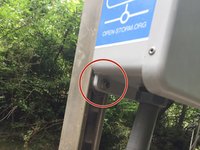
    • Attach a lock to the node box.

    • If using the 2 strut channel set-up as referenced earlier, secure the conduit to the short strut channel to which the sensor is connected, snake it through the riverbed (secured with rocks) to the tall strut channel, and wrap the remainder of the conduit around the tall strut channel.

Заключение

You’re done! The Sontek IQ sensor should now be reporting on grafana!

Еще один человек закончил это руководство.

Gina Kittleson

Участник с: 05/19/21

493 Репутация

Автор 3 руководств

Команда

Open-Storm Участник Open-Storm

Community

14 членов

Автор 24 руководств

0 Комментариев

Добавить комментарий

Просмотр статистики:

За последние 24часов: 0

За последние 7 дней: 3

За последние 30 дней: 5

За всё время: 122