Введение
By removing the DVD drive you will be able to install a new one. You will also be able to access other components of the device that may need to be installed, including the DVD reader and button circuit board.
Выберете то, что вам нужно
-
-
Remove the five #1 Phillips screws (black, 3/16") attaching the cover to the DVD player.
-
One 3/16" screw on the right side of the DVD player.
-
One 3/16" screw on the left side of the DVD player (directly opposite of other screw).
-
Three 3/16" screws on the back of the DVD player.
 Спросите у FixBot
-
-
-
Slide the cover away from the front of the DVD player until it is off.
-
-
-
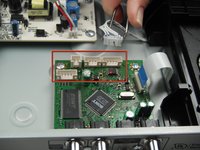
Remove the blue tape from the processing board by gently pulling upward.
-
-
-
Инструмент, используемый на этом этапе:Tweezers$4.99
-
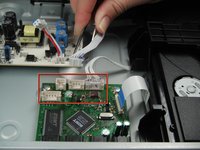
Use the tweezers to remove the four sets of wires connected to the processing board. Start with the cord located in front of the row of three cords.
-
-
-
Unscrew the two #1 Phillips screws (silver, 3/16") located on the two edge corners of the processing board.
-
-
-
Orient the DVD player so that you are facing the video and audio jacks.
-
Unscrew the two #1 Phillips screws (silver, 3/16") located on the outside of the DVD player
-
-
-
Orient the DVD player so the front of the DVD player is opposite of you.
-
Remove the two #1 Phillips screws (silver, 3/16") that attach the DVD drive to the bottom of the DVD player.
-
-
-
Remove the DVD drive by pulling it backward and upward while ensuring that it is free of any braces.
-


To reassemble your device, follow these instructions in reverse order.

Команда

Cal Poly, Team 5-17, Forte Winter 2013 Участник Cal Poly, Team 5-17, Forte Winter 2013
CPSU-FORTE-W13S5G17
5 членов
Автор 6 руководств