Перейти к основному содержанию
Присоединяйся к сообществу ремонтников - Создай аккаунт

Sony Ericsson W810I Camera Replacement

Выберете то, что вам нужно

  1. Sony Ericsson W810I Camera Replacement, Battery: шаг 1, изображение 1 из 1
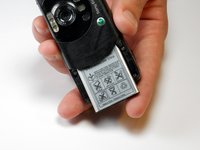
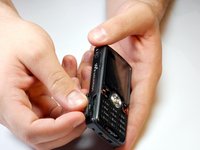
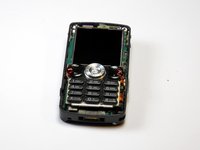
    • Place your Sony Ericsson W810I screen side down with the battery cover facing up as shown.

    Спросите у FixBot

    Добавить комментарий

  2. Sony Ericsson W810I Camera Replacement: шаг 2, изображение 1 из 1
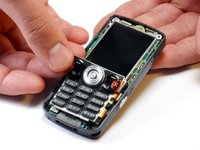
    • Remove the battery cover by applying downward pressure on the Singular Symbol and then shifting the pressure towards the bottom edge of the phone.

    Спросите у FixBot

    Добавить комментарий

  3. Sony Ericsson W810I Camera Replacement: шаг 3, изображение 1 из 2 Sony Ericsson W810I Camera Replacement: шаг 3, изображение 2 из 2
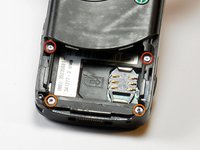
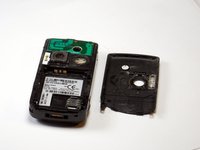
    • Lift the bottom of the battery away from the phone with your thumb and rotate until the opening in the bottom of the case is oriented downward. The battery should slide out.

    Спросите у FixBot

    Добавить комментарий

  4. Sony Ericsson W810I Camera Replacement, Case: шаг 4, изображение 1 из 3 Sony Ericsson W810I Camera Replacement, Case: шаг 4, изображение 2 из 3 Sony Ericsson W810I Camera Replacement, Case: шаг 4, изображение 3 из 3
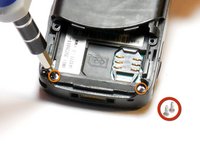
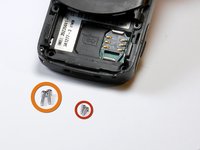
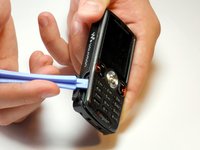
    • Remove the two 3.9mm screws with a Phillips size #00 screwdriver.

    • Remove the two 6.35mm screws with a Torx T6 screwdriver.

    Спросите у FixBot

    Добавить комментарий

  5. Sony Ericsson W810I Camera Replacement: шаг 5, изображение 1 из 3 Sony Ericsson W810I Camera Replacement: шаг 5, изображение 2 из 3 Sony Ericsson W810I Camera Replacement: шаг 5, изображение 3 из 3
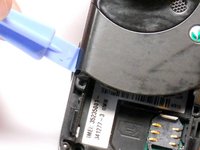
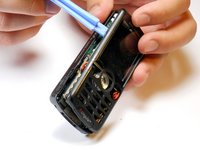
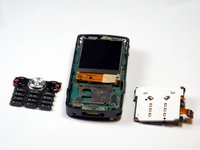
    • Run a plastic opening tool along the edge of the back casing while prying it apart to remove it.

    Спросите у FixBot

    Добавить комментарий

  6. Sony Ericsson W810I Camera Replacement: шаг 6, изображение 1 из 3 Sony Ericsson W810I Camera Replacement: шаг 6, изображение 2 из 3 Sony Ericsson W810I Camera Replacement: шаг 6, изображение 3 из 3
    • Turn the phone over and open the memory stick compartment.

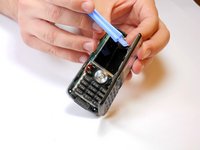
    • Stick a plastic opening tools into the opening and twist it to gain some leverage. This should begin separating the front casing from the interior plastic support frame.

    Спросите у FixBot

    Добавить комментарий

  7. Sony Ericsson W810I Camera Replacement: шаг 7, изображение 1 из 3 Sony Ericsson W810I Camera Replacement: шаг 7, изображение 2 из 3 Sony Ericsson W810I Camera Replacement: шаг 7, изображение 3 из 3
    • Run the plastic opening tool upwards along that side, removing the housing.

    Спросите у FixBot

    Добавить комментарий

  8. Sony Ericsson W810I Camera Replacement, Key Pad: шаг 8, изображение 1 из 3 Sony Ericsson W810I Camera Replacement, Key Pad: шаг 8, изображение 2 из 3 Sony Ericsson W810I Camera Replacement, Key Pad: шаг 8, изображение 3 из 3
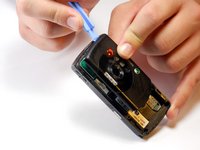
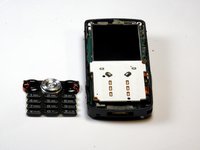
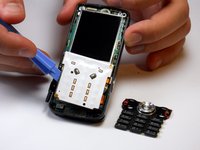
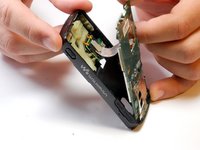
    • Peel the rubber keys away from their backing. Do not slide them off.

    • Set them aside.

    Спросите у FixBot

    Добавить комментарий

  9. Sony Ericsson W810I Camera Replacement: шаг 9, изображение 1 из 3 Sony Ericsson W810I Camera Replacement: шаг 9, изображение 2 из 3 Sony Ericsson W810I Camera Replacement: шаг 9, изображение 3 из 3
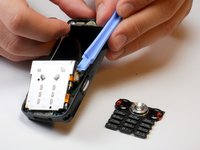
    • Insert a plastic opening tool under the left side of the keypad backing and start to lift.

    • Lift slowly, as you can damage the ribbon cable underneath if you pull the keypad backing away too forcefully.

    Спросите у FixBot

    Добавить комментарий

  10. Sony Ericsson W810I Camera Replacement: шаг 10, изображение 1 из 3 Sony Ericsson W810I Camera Replacement: шаг 10, изображение 2 из 3 Sony Ericsson W810I Camera Replacement: шаг 10, изображение 3 из 3
    • Insert the plastic opening tool under the ribbon cable attachment and give a small push upwards to dislodge it.

    Спросите у FixBot

    Добавить комментарий

  11. Sony Ericsson W810I Camera Replacement, LCD Screen: шаг 11, изображение 1 из 3 Sony Ericsson W810I Camera Replacement, LCD Screen: шаг 11, изображение 2 из 3 Sony Ericsson W810I Camera Replacement, LCD Screen: шаг 11, изображение 3 из 3
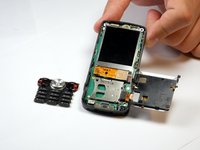
    • Remove the indicated 6.35mm screws with a Torx T6 screwdriver.

    Спросите у FixBot

    Добавить комментарий

  12. Sony Ericsson W810I Camera Replacement: шаг 12, изображение 1 из 3 Sony Ericsson W810I Camera Replacement: шаг 12, изображение 2 из 3 Sony Ericsson W810I Camera Replacement: шаг 12, изображение 3 из 3
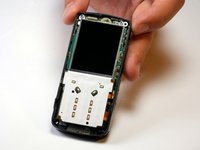
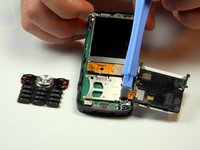
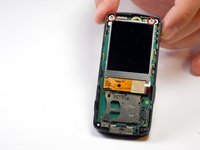
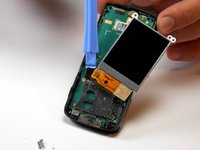
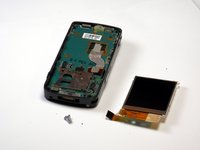
    • Pull LCD screen gently out and the to side. Do not attempt to pull it completely away from the board below it.

    • Push up on the underside of the cable at the point of attachment with a plastic opening tool to detach it. The screen can now be separated.

    Спросите у FixBot

    Добавить комментарий

  13. Sony Ericsson W810I Camera Replacement, Motherboard: шаг 13, изображение 1 из 3 Sony Ericsson W810I Camera Replacement, Motherboard: шаг 13, изображение 2 из 3 Sony Ericsson W810I Camera Replacement, Motherboard: шаг 13, изображение 3 из 3
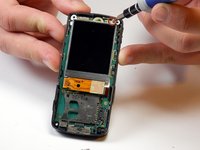
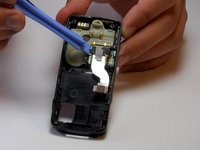
    • Using a plastic opening device, push against the underside of the brown portion of the the ribbon cable to unplug it.

    Спросите у FixBot

    Добавить комментарий

  14. Sony Ericsson W810I Camera Replacement: шаг 14, изображение 1 из 1
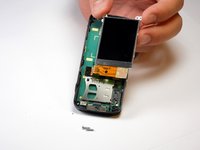
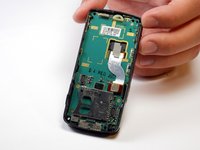
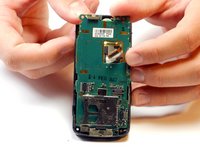
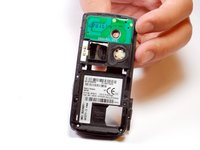
    • Using a plastic opening device, separate the top of the motherboard from the rest of the plastic casing.

    Спросите у FixBot

    Добавить комментарий

  15. Sony Ericsson W810I Camera Replacement: шаг 15, изображение 1 из 3 Sony Ericsson W810I Camera Replacement: шаг 15, изображение 2 из 3 Sony Ericsson W810I Camera Replacement: шаг 15, изображение 3 из 3
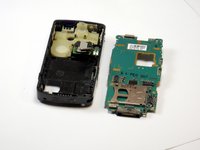
    • Pull forwards slightly on the motherboard so that it starts to fall out of the casing.

    • Thread the ribbon cable through the hole in the motherboard so that it does not become caught.

    Спросите у FixBot

    Добавить комментарий

  16. Sony Ericsson W810I Camera Replacement, Camera: шаг 16, изображение 1 из 2 Sony Ericsson W810I Camera Replacement, Camera: шаг 16, изображение 2 из 2
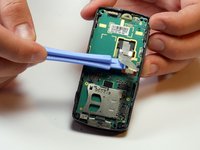
    • Push against the underside of the ribbon cable at the point of attachment with a plastic opening tool until it detaches.

    Спросите у FixBot

    Добавить комментарий

  17. Sony Ericsson W810I Camera Replacement: шаг 17, изображение 1 из 1
    • Pull the ribbon cable to the side.

    Спросите у FixBot

    Добавить комментарий

  18. Sony Ericsson W810I Camera Replacement: шаг 18, изображение 1 из 2 Sony Ericsson W810I Camera Replacement: шаг 18, изображение 2 из 2
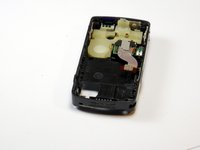
    • Flip over the phone so that the side previously facing you is now facing away.

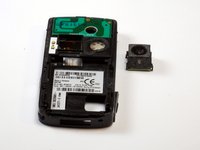
    • Push gently on the camera module from the side currently facing you. The module should fall away from the plastic mount.

    • Insert the new camera module into the now empty space.

    Спросите у FixBot

    Добавить комментарий

Заключение

To reassemble your device, follow these instructions in reverse order.

Отменить: Я не выполнил это руководство.

Еще один человек закончил это руководство.

Lucy Bowen

Участник с: 09/01/11

473 Репутация

Автор 7 руководств

Команда

Cuesta, Team 1-7, Zipperian Fall 2011 Участник Cuesta, Team 1-7, Zipperian Fall 2011

CUESTA-ZIPPERIAN-F11S1G7

1 член

Автор 14 руководств

0 Комментарии к руководству

Добавить комментарий

Статистика просмотров:

За последние 24 часов: 1

За последние 7 дней: 10

За последние 30 дней: 45

За всё время: 4,320