Введение
What helped me a lot was the teardown of the Sony MDR-1000X by dinoofsg Sony MDR-1000X Noise Cancelling Headphone Teardown
The Headphones seem to built very similar.
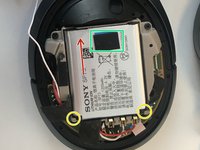
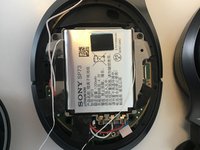
The Replacement part is the Sony SP-73 Battery also meant for the MDR-1000X.
Выберете то, что вам нужно
-
-
The Battery is on the right side where the charging port is.
-
The Earpads are held in place by 6 notches. You need to get next to them under the plastic ring that goes around the pad. Best would be with a plastic spudger but you could do it with anything flat and thin. Once you have popped one notch you can probably pull the whole thing off. If not just pop the rest with the same method.
-
Be sure to remember which way the earpad was in, as they only fit in one direction.
-
Now you need to get behind the inserted foam to the marked 4 screws(orange). You can remove the foam entirely like me. Its held on with a few small dots of glue. Or you can probably also just lift the foam and get to the screws that way
 Спросите у FixBot
-
-
-
Carefully pull the shell off, as there are still cables connecting the two. The microphone(green) will probably hold the shell a bit back on the upper side, but just pull carefully. The microphone ist just lightly sticking to the white pad so you can just pull it off carefully. This will also make reassembly easier later on.
-
(Optional) Next you want to disconnect the ribbon cable connecting the touch pad. Its held on with small connector where you need to flip the small black plastic bracket upwards. Then you can pull it out. (Note: you can skip this step but be careful around the wires not to tug them.)
-
In the third picture you can hopefully see how the bracket is flipped up.
-
-
-
-
Now that everything is free you can remove the battery. Its held in place by a glue strip on the back so you need to be careful when pulling it out
-
I found it easiest pushing dental floss under the battery on the upper side and then carefully pulling lengthwise to cut the glue. This way you reduce the risk of bending the battery when trying to pry it out.
-
When pulling the battery out, pull it out on the side marked with the red arrow, as the other side is held in place with notches(yellow)
-
Remove the marked(green) foam Pad to put on the new battery.
-
-
-
Put the microphone in the Hole shown by the Red arrow. The cable goes the path marked in orange.
-
Put the Ribbon Cable from the touch pad in again. Don't forget to push down the small black plastic bracket.
-
Now you can just put the outer shell back on. Hold it in place and get the screws back in, from the other side
-
If you have removed the foam just put it back in. It holds perfectly without glue for me but if you want to be sure you could put a few drops in.
-
The Earpads can just be pressed into place by hand. They only go in one direction so if you can't click all notches back in, try it the other way around.
-


To reassemble your device, follow these instructions in reverse order.
Отменить: Я не выполнил это руководство.
31 человек успешно провели ремонт по этому руководству.

12 Комментарии к руководству
Great guide. Easy to follow
Thanks for you description on how to change the SONY Headset battery.
thanks. do you know where to get the akku? I only find 1050mAh
I also only found the 1050mAh kind as a replacement. You can use that without problems. Still an improvement over the capacity of an old original battery in my opinion.
I got a replacement SP-73 lookalike from Cellonic. Cost me €12. Guide worked like a charm.