Перейти к основному содержанию
Присоединяйся к сообществу ремонтников - Создай аккаунт

Stapler Spring Replacement

Выберете то, что вам нужно

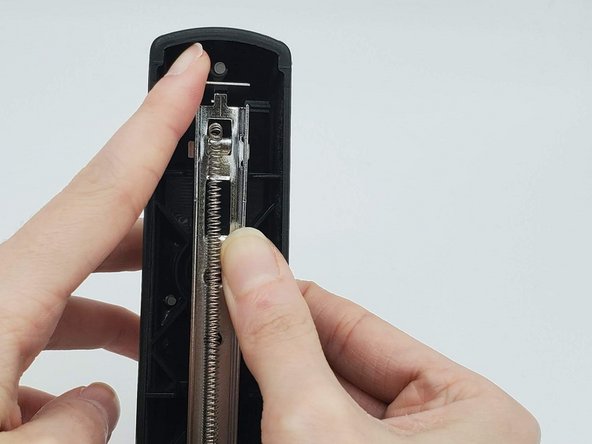
  1. Stapler Spring Replacement, Spring: шаг 1, изображение 1 из 2 Stapler Spring Replacement, Spring: шаг 1, изображение 2 из 2
    • Open the stapler by gripping the handle to access the spring.

    Спросите у FixBot

    Добавить комментарий

  2. Stapler Spring Replacement: шаг 2, изображение 1 из 1
    Инструмент, используемый на этом этапе:
    Tweezers
    $4.99
    • Pry open the hook found on the pusher using the tweezers.

    • Hold the handle firmly to prevent the stapler from snapping back.

    Спросите у FixBot

    Добавить комментарий

  3. Stapler Spring Replacement: шаг 3, изображение 1 из 1
    • Unhook the end of the spring from the pusher.

    • Pinch the spring firmly between your fingers to keep it from snapping back.

    Спросите у FixBot

    Добавить комментарий

  4. Stapler Spring Replacement: шаг 4, изображение 1 из 2 Stapler Spring Replacement: шаг 4, изображение 2 из 2
    • Unhook the other end of the spring from the inside of the handle.

    • The spring should be unthreaded from the holes on the handle's metal part.

    Спросите у FixBot

    Добавить комментарий

  5. Stapler Spring Replacement: шаг 5, изображение 1 из 2 Stapler Spring Replacement: шаг 5, изображение 2 из 2
    • Press down on the metal part inside the handle with your thumbs until it will not go down anymore.

    Спросите у FixBot

    Добавить комментарий

  6. Stapler Spring Replacement: шаг 6, изображение 1 из 2 Stapler Spring Replacement: шаг 6, изображение 2 из 2
    • Push the hammer, the rectangular piece, up and away from the metal part.

    Спросите у FixBot

    Добавить комментарий

  7. Stapler Spring Replacement: шаг 7, изображение 1 из 1
    • Release the metal part inside the handle so it comes away from the hammer.

    • Keep hold of the metal part to keep it from snapping closed.

    Спросите у FixBot

    Добавить комментарий

  8. Stapler Spring Replacement: шаг 8, изображение 1 из 1
    • Hook one end of the new spring onto the pusher's hook.

    Спросите у FixBot

    Добавить комментарий

  9. Stapler Spring Replacement: шаг 9, изображение 1 из 1
    • Clamp the pusher's hook closed using your thumb.

    Спросите у FixBot

    Добавить комментарий

  10. Stapler Spring Replacement: шаг 10, изображение 1 из 1
    • Thread the other end of the new spring through the top rectangular hole toward the back.

    Спросите у FixBot

    Добавить комментарий

  11. Stapler Spring Replacement: шаг 11, изображение 1 из 1
    • Thread the new spring through the bottom hole, bringing the end of spring toward you.

    • The spring should create a loop when done threading.

    Спросите у FixBot

    Добавить комментарий

  12. Stapler Spring Replacement: шаг 12, изображение 1 из 2 Stapler Spring Replacement: шаг 12, изображение 2 из 2
    • Hook the new spring to the hook on the inside of the handle's metal part.

    Спросите у FixBot

    Добавить комментарий

  13. Stapler Spring Replacement: шаг 13, изображение 1 из 2 Stapler Spring Replacement: шаг 13, изображение 2 из 2
    • Press the metal part down with your thumbs until it aligns with the hammer's hole.

    Спросите у FixBot

    Добавить комментарий

  14. Stapler Spring Replacement: шаг 14, изображение 1 из 2 Stapler Spring Replacement: шаг 14, изображение 2 из 2
    • Reattach the hammer back onto the metal part.

    Спросите у FixBot

    Добавить комментарий

  15. Stapler Spring Replacement: шаг 15, изображение 1 из 2 Stapler Spring Replacement: шаг 15, изображение 2 из 2
    • Close the handle until it clicks back into place.

    • Be careful not to staple your fingers when closing the stapler.

    Спросите у FixBot

    Добавить комментарий

Заключение

To reassemble your device, follow these instructions in reverse order.

Отменить: Я не выполнил это руководство.

12 человек успешно провели ремонт по этому руководству.

Lauren McCabe

Участник с: 01/16/20

349 Репутация

1 руководство автора

Команда

University of North Texas, Team S1-G13, Raign Spring 2020 Участник University of North Texas, Team S1-G13, Raign Spring 2020

UNT-RAIGN-S20S1G13

2 членов

Автор 7 руководств

14 Комментарии к руководству

Just what I needed. Thank you! Super clear

Daniela Labra - Ответить Поделиться

Can I replace the black rubber piece that goes on my swingling desk top stapler 70 sheet it came off and my dog chewed it up.

Edith Corkell - Ответить Поделиться

fron this sale ski o donde venden los repuestos de esta engrapadora en Venezuela gran caracas

Romulo - Ответить Поделиться

Where do I obtain a replacement spring for this stapler?

John Drake - Ответить Поделиться

Добавить комментарий

Статистика просмотров:

За последние 24 часов: 183

За последние 7 дней: 1,054

За последние 30 дней: 5,299

За всё время: 307,924