Перейти к основному содержанию

Super Nintendo Motherboard Replacement

Выберете то, что вам нужно

  1. Super Nintendo Motherboard Replacement, Outer Case: шаг 1, изображение 1 из 1
    • Remove the six screws located on the underside of the system using the Gamebit 4.5mm screwdriver.

  2. Super Nintendo Motherboard Replacement: шаг 2, изображение 1 из 3 Super Nintendo Motherboard Replacement: шаг 2, изображение 2 из 3 Super Nintendo Motherboard Replacement: шаг 2, изображение 3 из 3
    • Carefully flip the unit back over.

    • Locate the seam. Lift and separate the upper half of the case from the lower half of the case.

  3. Super Nintendo Motherboard Replacement, Power Switch: шаг 3, изображение 1 из 1
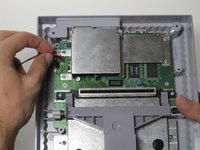
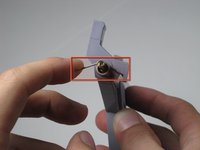
    • Remove the two 11.7 mm Phillips #2 screws connecting the power switch to the motherboard.

  4. Super Nintendo Motherboard Replacement: шаг 4, изображение 1 из 2 Super Nintendo Motherboard Replacement: шаг 4, изображение 2 из 2
    • The power switch is connected to the motherboard near the top left of the console.

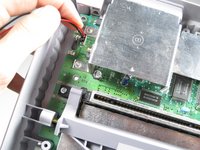
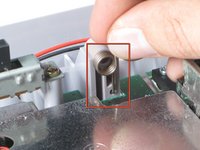
    • Carefully pull the connector from its socket on the motherboard. You may need to wiggle it out as you pull.

    • Do not detach the connector by pulling on the wires. This could damage the wires or the socket.

  5. Super Nintendo Motherboard Replacement, Eject Button: шаг 5, изображение 1 из 2 Super Nintendo Motherboard Replacement, Eject Button: шаг 5, изображение 2 из 2
    • Lift the right side of the eject lever out of the housing.

  6. Super Nintendo Motherboard Replacement: шаг 6, изображение 1 из 3 Super Nintendo Motherboard Replacement: шаг 6, изображение 2 из 3 Super Nintendo Motherboard Replacement: шаг 6, изображение 3 из 3
    • Pull the metal bar out through the right side of the eject lever.

    • Make sure to keep track of the spring located on the left side of the lever as it may shoot off when removing the metal bar.

    • When reassembling, the procedure becomes more difficult due to the spring (marked red). We recommend that one person hold the spring in place (picture 3) while another person slides the metal bar back into the left housing, and slide the eject lever onto the metal bar.

  7. Super Nintendo Motherboard Replacement, Controller Port: шаг 7, изображение 1 из 1
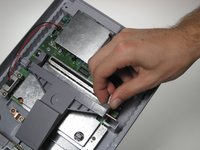
    • Lift the controller ports out of the housing, this should be done without much force. Take note of the location of the ribbon cable connection.

  8. Super Nintendo Motherboard Replacement: шаг 8, изображение 1 из 2 Super Nintendo Motherboard Replacement: шаг 8, изображение 2 из 2
    • Carefully remove the ribbon cable from its port.

  9. Super Nintendo Motherboard Replacement, Motherboard: шаг 9, изображение 1 из 1
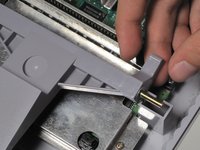
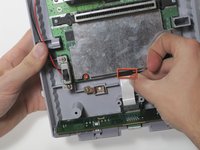
    • Remove the two Phillips two 11.6mm screws that connect the front shield to the motherboard.

  10. Super Nintendo Motherboard Replacement: шаг 10, изображение 1 из 1
    • Lift the front shield straight up to remove it from the motherboard.

  11. Super Nintendo Motherboard Replacement: шаг 11, изображение 1 из 1
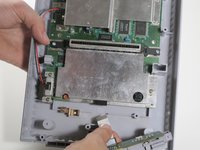
    • Remove the two silver 15.6 mm Phillips #2 screws on either side of the 62 pin connector.

  12. Super Nintendo Motherboard Replacement: шаг 12, изображение 1 из 1
    • Remove the 11.8 mm Phillips #2 screw near the rear of the SNES.

  13. Super Nintendo Motherboard Replacement: шаг 13, изображение 1 из 1
    • Lift the motherboard straight up to remove it.

Заключение

To reassemble your device, follow these instructions in reverse order.

44 участников успешно повторили данное руководство.

Melina

Участник с: 10/12/10

953 Репутация

1 руководство автора

Команда

Cal Poly, Team 4-47, Amido Fall 2010 Участник Cal Poly, Team 4-47, Amido Fall 2010

CPSU-AMIDO-F10S4G47

4 членов

Автор 25 руководств

4 Комментариев

There are several versions of the Super Nintendo. Steps for my version are a bit different.

joshenders - Ответить

This seems to be a newer super nintendo. If you have one of the older ones, there will be a bit more screws but still basically the same steps.

Anonymous Idea -

There are two versions of the Super Nintendo- the one pictured here, and one with a sound chip board behind the game cartridge reader. These two models have different shells that are not interchangeable (important to know if you're looking to buy a replacement housing for your SNES)

Gena FM -

It’s possible they may be referring to the European/Japanese version of the Super Nintendo/Super Famicom. Either that, or it’s one of the weird, misshapen “reskins”.

Rupin Soland - Ответить

Добавить комментарий

Просмотр статистики:

За последние 24часов: 12

За последние 7 дней: 97

За последние 30 дней: 423

За всё время: 71,191