Введение
This guide will show you how to remove the power switch connected to the motherboard. Steps can be followed in reverse to install a new power switch.
Выберете то, что вам нужно
-
-
Remove the six screws located on the underside of the system using the Gamebit 4.5mm screwdriver.
 Спросите у FixBot
-
-
-
Carefully flip the unit back over.
-
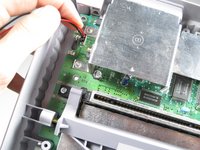
Locate the seam. Lift and separate the upper half of the case from the lower half of the case.
-
-
-
-
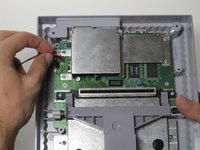
Remove the two 11.7 mm Phillips #2 screws connecting the power switch to the motherboard.
-
-
-
Carefully pull the connector from its socket on the motherboard. You may need to wiggle it out as you pull.
-


To reassemble your device, follow these instructions in reverse order.
Отменить: Я не выполнил это руководство.
16 человек успешно провели ремонт по этому руководству.
Команда

Cal Poly, Team 4-47, Amido Fall 2010 Участник Cal Poly, Team 4-47, Amido Fall 2010
CPSU-AMIDO-F10S4G47
4 членов
Автор 25 руководств
2 Комментарии к руководству
Any tips on how to tell if it's the power switch that needs replacing vs something else?
Look at it for any signs of physical damage, if you don't see any noticeable issues that you can fix then you can try cutting the two wires stripping off the ends of them, and very carefully touching the wires together while its plugged in. BE EXTREMELY CAREFUL WHILE DOING THIS DO NOT TOUCH THE EXPOSED WIRE. If you notice it turn on, immediately stop touching the wires together and unplug the console. This means that the switch itself is broken. If it doesn't turn on, stop touching the wire together and unplug the console. This means that it's likely a power cable issue.