Введение
For this guide you will remove the back cover and battery cover in order to replace the battery.
Выберете то, что вам нужно
-
-
Remove the calculator's protective cover.
-
Place the calculator face down.
 Спросите у FixBot
-
-
-
Using a Phillips #1 screwdriver, remove the six 6mm screws from the back of the case and place them to the side.
-
Start from the notches on the top edge and use your fingers or a prying tool to carefully pry the back cover from the calculator.
-
-
-
-
Use a Phillips #00 screwdriver to remove the two 7.5 mm screws holding the battery cover to the case.
-
Use your finger to move the battery cover to the side.
-
-
-
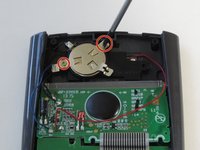
Use the flat side of a spudger to remove the battery by lifting the bottom edge.
-


To reassemble your device, follow these instructions in reverse order.
Отменить: Я не выполнил это руководство.
11 человек успешно провели ремонт по этому руководству.
Команда

Cal Poly, Team 11-52, Amido Spring 2014 Участник Cal Poly, Team 11-52, Amido Spring 2014
CPSU-AMIDO-S14S11G52
4 членов
Автор 15 руководств
5 Комментарии к руководству
Interesting that the cr2032 battery is not rechargeable, so is the solar panel real? Or does it bypass the battery and use the solar panel in lighted situations?
The guide should specify that the CR2032 needs to be rechargeable. They are readily available at a popular online shopping website. I was skeptical that the solar was real too, because of the frosted plastic placed over it. Based on the pictures in this teardown, and another video showing a red LED in the solar circuit, I conclude that the solar charging circuit is real.
The manual doesn't specify a rechargeable battery. It just says a CR2032 Lithium battery. Unless all such batteries are rechargeable? I guess I'll find out since I just replaced the battery in mine and it's an Energizer CR2032, but it doesn't appear to say rechargeable anywhere on the packaging or the battery itself. I guess if it kills my calculator, it had a good run....
EDIT: The original battery that I took out of the calculator doesn't say rechargeable on it either.
good guide, I'd just like to add that in my case I needed to press the "Reset" button for my calculator to start up again
yeah but I have done that 3 times and now my calculator is officially announced dead....