Введение
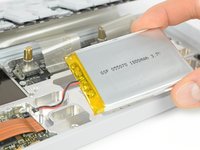
If you cannot take your OP-1 for a walk any more, the batterie needs to be replaced.
In this case it's a 1800 mAh li-polymer battery at 3.7V (that is 6660 mWh).
Выберете то, что вам нужно
-
-
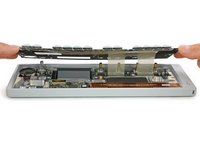
Open the back panel by using a Jimmy on the side of the panel. Be careful not to damage the OP-1 coating.
-
Lift the back panel and remove it. The Connector Board is revealed.
-
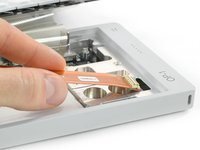
Disconnect the flex connector by lifting it up with a spudger.
 Спросите у FixBot
-
-
-
The four longer keys from the fingerboard are to be handled from the left side to get them off.
-
The eight smaller keys need to be levered from the bottom up.
-
-
-
-
The scissor mechanism of the eight small keys are obstructing the underlying screws.
-
By using again an opening tool or opening pick these can be snapped off easily.
-
-
-
Loosen those 12 screws with a Phillips #00 screwdriver.
-
Then just pull off the four rotary knobs and the volume knob.
-
Now it is possible to slightly lift the keyboard and set it back.
-
-
-
Carefully pull out the connector cable from the connector board and bend it out of the way.
-
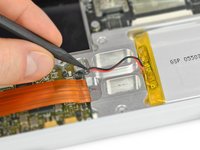
Disconnect the battery with a spudger. The connector needs to be lifted up and not being pulled to the side.
-
Now you can pry out the battery which is glued in with double sided adhesive tape.
-


To reassemble your device, follow these instructions in reverse order.
Отменить: Я не выполнил это руководство.
16 человек успешно провели ремонт по этому руководству.

Команда

Tobias Isakeit - Repairability Engineer Участник Tobias Isakeit - Repairability Engineer
Business
1 член
Автор 1 151 руководств
43 Комментарии к руководству
This is great. What type of battery is the replacement?? thanks!
Hi, thanks for the question. I added another picture and put some information in the introduction.
hey, thanks for this! is the battery plug simple JST or do I need to get something specific?
Yes, a simple JST plug (probably type ACH)
Thanks for posting these instructions! I'm having trouble finding a battery that matches the one in the picture (unless I want to buy 1000 of them from Alibaba). Would this work?
http://www.ebay.com/itm/3-7V-1800mAh-Rec...
Dimensions are:
thick:3mm
wide:60mm
length:70mm