Перейти к основному содержанию
Присоединяйся к сообществу ремонтников - Создай аккаунт

Wen 2307 Fan Replacement

Выберете то, что вам нужно

    1. Wen 2307 Fan Replacement, Front Panel: шаг 1, изображение 1 из 1
      • Unscrew the locking sleeve.

      Спросите у FixBot

      Добавить комментарий

    2. Wen 2307 Fan Replacement: шаг 2, изображение 1 из 1
      • Remove the hanging clip.

      Спросите у FixBot

      Добавить комментарий

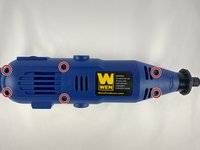
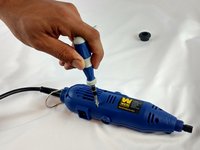
    3. Wen 2307 Fan Replacement: шаг 3, изображение 1 из 2 Wen 2307 Fan Replacement: шаг 3, изображение 2 из 2
      • Unscrew the six 8mm PH2 screws.

      Спросите у FixBot

      Добавить комментарий

    4. Wen 2307 Fan Replacement: шаг 4, изображение 1 из 1
      • While pressing the spindle lock button, unscrew the collet nut and remove it along with the brass collet.

      Спросите у FixBot

      Добавить комментарий

    5. Wen 2307 Fan Replacement: шаг 5, изображение 1 из 1
      • To remove the front panel, pry the device apart while holding the device with the other hand.

      • The front panel should come out easily.

      Спросите у FixBot

      Добавить комментарий

    1. Wen 2307 Fan Replacement, Speed Adjustment Assembly: шаг 6, изображение 1 из 1
      • Remove the connected wiring from the circuit board.

      Спросите у FixBot

      Добавить комментарий

    2. Wen 2307 Fan Replacement: шаг 7, изображение 1 из 1
      • Remove the single 4mm screw retaining the circuit board.

      Спросите у FixBot

      Добавить комментарий

    3. Wen 2307 Fan Replacement: шаг 8, изображение 1 из 1
      • Gently pry the circuit board from the back piece.

      Спросите у FixBot

      Добавить комментарий

    1. Wen 2307 Fan Replacement, Motor: шаг 9, изображение 1 из 1
      • Gently pull motor assembly out of the panel.

      Спросите у FixBot

      Добавить комментарий

    2. Wen 2307 Fan Replacement: шаг 10, изображение 1 из 1
      • Motor separates into two pieces.

      Спросите у FixBot

      Добавить комментарий

    1. Wen 2307 Fan Replacement, Fan: шаг 11, изображение 1 из 1
      • The fan assembly is attached to the rotor beam, it can be disassembled to change the fan by simply pulling off the pieces.

      Спросите у FixBot

      Добавить комментарий

Заключение

To reassemble your device, follow these instructions in reverse order.

Отменить: Я не выполнил это руководство.

2 человек успешно провели ремонт по этому руководству.

Joshua Bowery

Участник с: 02/08/16

570 Репутация

Автор 3 руководств

Команда

USF Tampa, Team 12-1, Eyestone Spring 2016 Участник USF Tampa, Team 12-1, Eyestone Spring 2016

USFT-EYESTONE-S16S12G1

4 членов

Автор 6 руководств

1 Комментарий к руководству

Donde puedo conseguir ese motor completo?

#silencio$ - Ответить Поделиться

Добавить комментарий

Статистика просмотров:

За последние 24 часов: 2

За последние 7 дней: 10

За последние 30 дней: 42

За всё время: 1,031