Введение
Is the camera on your Yuneec Breeze 4K Drone not recording? Consider using this guide to replace the camera in your drone.
Выберете то, что вам нужно
-
-
-
Before you begin start by putting on a ESD wrist strap to prevent ESD damage and remove the battery.
-
Once the battery is taken out, flip over the drone so that the cameras are now facing up.
 Спросите у FixBot
-
-
-
Using small pliers grip the connector of the wire and pull it out slowly.
-
-
-
Remove the four white rubber dampeners located in each corner of the frame that hold the it in place.
-
-
-
Unplug the two vertical plugs located in the rear of the M7 board.
-
-
-
Slightly lift the M7 board to remove the two plugs located under the rear of the board.
-
-
-
-
Once all plugs on top of the M7 board are disconnected, carefully lift the M7 board onto its side and remove all plugs on the bottom.
-
-
-
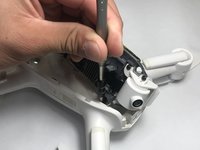
Tilt the M7 board onto its side. Using the Phillips #00 screwdriver remove the two black screws connected to the large black two pronged input.
-
-
-
Flip over the entire frame along with the M7 board and the A9 board.
-
-
-
There will be 4 screws that hold the A9 board together. Using a H1.5 Alan bit unscrew those bolts to take the A9 board apart.
-
-
-
Pull apart the frame from the other board. The camera will be connected by a plug and it should pull out easily.
-
-
-
Unscrew the four screws that are holding the camera to the frame.
-
-


To reassemble your device, follow these instructions in reverse order.
Отменить: Я не выполнил это руководство.
3 человек успешно провели ремонт по этому руководству.

Команда

UW Stout, Team S6-G5, Ogden Fall 2018 Участник UW Stout, Team S6-G5, Ogden Fall 2018
UWSTOUT-OGDEN-F18S6G5
4 членов
Автор 4 руководств
1 Комментарий к руководству
Excellent! I don’t think that the process could of have been any more clear than this.