Перейти к основному содержанию
Присоединяйся к сообществу ремонтников - Создай аккаунт

iPhone 3G Display Replacement

Выберете то, что вам нужно

  1. iPhone 3G Display Replacement, Broken Glass: шаг 1, изображение 1 из 3 iPhone 3G Display Replacement, Broken Glass: шаг 1, изображение 2 из 3 iPhone 3G Display Replacement, Broken Glass: шаг 1, изображение 3 из 3
    • If your display glass is cracked, keep further breakage contained and prevent bodily harm during your repair by taping the glass.

    • Lay overlapping strips of clear packing tape over the iPhone's display until the whole face is covered.

    • This will keep glass shards contained and provide structural integrity when prying and lifting the display.

    • Wear safety glasses to protect your eyes from any glass shaken free during the repair.

    Спросите у FixBot
  2. iPhone 3G Display Replacement, Display: шаг 2, изображение 1 из 1
    • Remove the two Phillips #00 screws from the dock-connector end of the iPhone.

    • Make sure to keep all the screws organized as you are taking the phone apart. They are different sizes.

    Спросите у FixBot
  3. iPhone 3G Display Replacement: шаг 3, изображение 1 из 1
    • Remove the metal handle from the suction cup. It's easier and safer to grip the suction cup's base instead of the metal handle.

    • Be very careful when opening the iPhone so that the cables under the display are not severed.

    • There is a rubber gasket between the silver front bezel and black display assembly. A bit of force is required in this step to separate the iPhone's display assembly.

    • Use a small suction cup near the Home button to gently pull up the lower portion of the iPhone's display assembly.

    • If the display assembly is too damaged to allow the suction cup to adhere, tape with a strong adhesive such as duct tape may be used.

    Спросите у FixBot
  4. iPhone 3G Display Replacement: шаг 4, изображение 1 из 1
    • The display assembly is still connected to the iPhone by several cables, so don't try to remove it entirely just yet.

    • Rotate the display assembly up until it is at an angle of approximately 45 degrees.

    Спросите у FixBot
  5. iPhone 3G Display Replacement: шаг 5, изображение 1 из 1
    • Continue to hold the display assembly with one hand, and use your other hand and a spudger to disconnect the black ribbon cable labeled "1."

    • Ribbon cable "1" is connected with a plug style connector. The block at the end of the cable is the plug which is simply pushed into a socket on the circuit board. No other locking mechanism is used.

    Спросите у FixBot
  6. iPhone 3G Display Replacement: шаг 6, изображение 1 из 1
    • Rotate the display assembly up until it is roughly vertical. This will allow easier access for disconnecting the remaining cables.

    • Use a spudger to disconnect the black ribbon cable labeled "2."

    Спросите у FixBot
  7. iPhone 3G Display Replacement: шаг 7, изображение 1 из 2 iPhone 3G Display Replacement: шаг 7, изображение 2 из 2
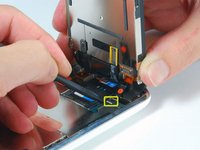
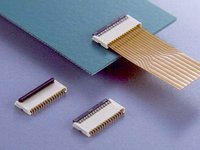
    • Ribbon cable "3" is held in place by a FPC style connector. You must unlock this connector before sliding the ribbon cable out. The locking mechanism is on the opposite side of where the cable is inserted - it swivels upwards 90 degrees. Use a plastic spudger to lift the locking mechanism.

    • The FPC locking latch is very delicate and is typically a different color than the body of the connector. (see the detail image of FPC connector open and closed)

    • Slide the ribbon cable out of the connector, and remove the display assembly from the iPhone.

    • It's impossible to properly reinsert a ribbon into an FPC connector unless the lock is disengaged. Make sure the locking latch is open when attaching/detaching the cable.

    Спросите у FixBot
  8. iPhone 3G Display Replacement: шаг 8, изображение 1 из 1
    • Remove the single Phillips #00 screw from the corner of the display assembly.

    Спросите у FixBot
  9. iPhone 3G Display Replacement: шаг 9, изображение 1 из 1
    • Remove the two Phillips #00 screws from the right side of the display assembly.

    Спросите у FixBot
  10. iPhone 3G Display Replacement: шаг 10, изображение 1 из 1
    • Turn the display around, and if there is a thin strip of black tape on the edge of the display assembly, carefully peel it up.

    • Keeping the tape from sticking to itself can be tricky. We recommend placing the tape on a wax-coated piece of paper (any sticker backing will do).

    Спросите у FixBot
  11. iPhone 3G Display Replacement: шаг 11, изображение 1 из 1
    • Remove the three Phillips #00 screws from the left side of the display assembly.

    Спросите у FixBot
  12. iPhone 3G Display Replacement: шаг 12, изображение 1 из 1
    • Turn the display assembly over and again carefully insert a metal spudger between the two metal rails along the edge of the display assembly. Gently rotate the spudger to lift the LCD up from the glass.

    Спросите у FixBot
  13. iPhone 3G Display Replacement: шаг 13, изображение 1 из 1
    • Separate the LCD and glass by sliding the LCD panel away from the ribbon cables on the glass.

    Спросите у FixBot
Заключение

To reassemble your device, follow these instructions in reverse order.

380 человек успешно провели ремонт по этому руководству.

iRobot

Участник с: 09/24/09

1 Репутация

Автор 636 руководств

9 Комментарии к руководству

does this void the warranty?

loganm - Ответить Поделиться

I did all this and my screen is completely white, from memory i can unlock it and when i connect to my pc i can hear that it connects i just can't see anything. please help i'm freaking out!

Tiffunny - Ответить Поделиться

Цитата от loganm:

does this void the warranty?

Duh!

Pepper - Ответить Поделиться

Hi there, Just been reading these a lot and I think that people should not use a metal spudger inside the phone as this will potentially short out the phone inside as it is still connected to the battery pack. I also recommend that people observe some basic ESD precautions. Like earthing yourselves etc.

Dave G - Ответить Поделиться

I wrote up my notes, including the critical (missing) PFC lock directions in a separate blog post:

http://tech.kateva.org/2011/01/repair-of...

jfaughnan - Ответить Поделиться

Добавить комментарий

Статистика просмотров:

За последние 24 часов: 5

За последние 7 дней: 48

За последние 30 дней: 226

За всё время: 571,538