Эта версия возможно содержит некорректные исправления. Переключить на последнюю проверенную версию.
Выберете то, что вам нужно
-
Этот шаг не переведен. Помогите перевести
-
Power off your iPhone before beginning disassembly.
-
Remove the two 3.4 mm Pentalobe screws on either side of the Lightning port.
-
-
Этот шаг не переведен. Помогите перевести
-
Pull the blue handle backwards to unlock the Anti-Clamp's arms.
-
Slide the arms over either the left or right edge of your iPhone.
-
Position the suction cups near the bottom edge of the iPhone just above the home button—one on the front, and one on the back.
-
Squeeze the cups together to apply suction to the desired area.
-
-
Этот шаг не переведен. Помогите перевести
-
Pull the blue handle forwards to lock the arms.
-
Turn the handle clockwise 360 degrees or until the cups start to stretch.
-
Insert an opening pick under the screen when the Anti-Clamp creates a large enough gap.
-
Skip the next three steps.
-
-
Этот шаг не переведен. Помогите перевести
-
If you don't have an Anti-Clamp, follow the next three steps to use a suction handle.
-
Apply mild heat to the lower edge of the iPhone using an iOpener or hair dryer for about a minute.
-
-
Этот шаг не переведен. Помогите перевести
-
Apply a suction cup to the lower left corner of the display assembly.
-
-
Этот шаг не переведен. Помогите перевести
-
Pull up on the suction cup with firm, constant pressure to create a slight gap between the front panel and rear case.
-
-
Этот шаг не переведен. Помогите перевести
-
The safest place to pry from is the notch in the front panel above the headphone jack.
-
While still maintaining pressure on the suction cup, insert the flat tip of a spudger into the gap, directly above the headphone jack.
-
-
Этот шаг не переведен. Помогите перевести
-
Twist the spudger to widen the gap between the front panel and the rear case.
-
-
Этот шаг не переведен. Помогите перевести
-
While firmly pulling up on the suction cup, slide the edge of the spudger under the bottom left corner of the display.
-
-
Этот шаг не переведен. Помогите перевести
-
Slide the tip of the spudger up the left side of the phone, between the front panel and the rear case.
-
-
-
Этот шаг не переведен. Помогите перевести
-
Insert the flat tip of the spudger under the right edge of the display.
-
Slide the spudger up the right side.
-
-
Этот шаг не переведен. Помогите перевести
-
Use a plastic opening tool to hold down the rear case while pulling up the suction cup to open the phone.
-
-
Этот шаг не переведен. Помогите перевести
-
Pull up on the small nub on the suction cup to remove it from the display.
-
-
Этот шаг не переведен. Помогите перевести
-
Gently grasp the display assembly and lift it up to open the phone, using the clips at the top of the front panel as a hinge.
-
Open the display to about a 90º angle, and lean it against something to keep it propped up while you're working on the phone.
-
Add a rubber band to keep the display securely in place while you work. This prevents undue strain on the display cables.
-
-
Этот шаг не переведен. Помогите перевести
-
Remove two Phillips screws securing the battery connector bracket to the logic board, of the following lengths:
-
One 2.9 mm screw
-
One 2.3 mm screw
-
-
Этот шаг не переведен. Помогите перевести
-
Use a spudger or a clean fingernail to disconnect the battery connector by prying it straight up off the logic board.
-
-
Этот шаг не переведен. Помогите перевести
-
Bend the connector back to ensure it doesn't make contact and power the iPhone on while you're working on it.
-
-
Этот шаг не переведен. Помогите перевести
-
Remove the following Phillips screws:
-
Three 1.3 mm screws
-
One 1.6 mm screw
-
One 3.0 mm screw
-
-
Этот шаг не переведен. Помогите перевести
-
Use a plastic opening tool to disconnect the front-facing camera and sensor cable connector.
-
-
Этот шаг не переведен. Помогите перевести
-
Use a plastic opening tool to disconnect the digitizer cable by prying it straight up from its socket on the logic board.
-
-
Этот шаг не переведен. Помогите перевести
-
Disconnect the home button/fingerprint sensor cable by prying it straight up from its socket on the logic board.
-
-
Этот шаг не переведен. Помогите перевести
-
Peel up any tape covering the iSight camera bracket screws.
If like me you are only wanting to clean out the speaker, you do not need to do this step. You can skip to step 50
Mine had no tape there
-
-
Этот шаг не переведен. Помогите перевести
-
Remove the following Phillips screws over the camera bracket:
-
One 1.9 mm screw
-
One 2.4 mm screw
-
-
Этот шаг не переведен. Помогите перевести
-
Remove the iSight camera bracket.
When replacing the bracket be sure to get the other end of the NFC bracket included with the right hand screw.
-
-
Этот шаг не переведен. Помогите перевести
-
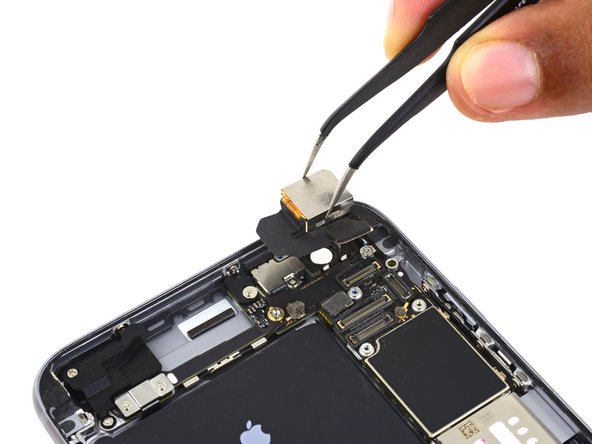
Disconnect the iSight camera connector from its socket on the logic board.
If necessary, the sticky patch on top f the connector should be removed. Helped my case a lot :)
-
-
Этот шаг не переведен. Помогите перевести
-
Insert the flat end of the spudger between the iSight camera and rear casing.
-
Gently pry the camera out from its housing.
-
-
Этот шаг не переведен. Помогите перевести
-
Remove the iSight camera.
-


Отменить: Я не выполнил это руководство.
127 участников успешно повторили данное руководство.

35 Комментариев
really useful.
Great instructional video which saw me through the entire disassembly of my phone, and then clear and concise enough steps on the page to help me put it back together after installing the new camera. Thank you!!!!
I completed this repair at the same time as replacing my battery and headphone/lightening jack assembly. The problem I was experiencing with my camera was jittery video and unusable photos. The stabilization gimbal had died, though I am not sure that is the right word for it. It's more like it had an overdose. Anytime I would come to use the camera you could hear a tiny clicking noise as the lens armature shot itself about within its tolerances. Photos were out of focus and jittery, even when taken with the phone completely stable and untouched. I could most of the time just manage to make it take photos to deposit checks by holding the phone horizontally and in very bright sunlight, sometimes tapping the phone until the clicking noise stopped. Videos would hunt for focus and look as though I was actively shaking the camera, no matter what. Sometimes it was worse than others. Replacing this assembly completely fixed all issues.
Michael, you might have been interested to know that the focusing problems you experienced are chronic in the iPhone 6 Plus and Apple has created a repair program. You might have found this page useful if your serial number was eligible. https://www.apple.com/support/iphone6plu...
Micheal, I am having that same problem as well! Good to know that replacing it fixes it!
Talon, the repair program Apple has is only for the 6 plus not the 6s plus.
By the camera lens is a tiny strap piece that I bumped off and now I am not sure how to put it back on?? Do you have any pictures or advice that would show me how it goes back in the phone?
If you check out the video at the top of the page, go to time 3:57 (https://youtu.be/asLTAhYISOA?t=237) and this will clarify it for you ;)
Note that your question prompted me to go back and change how I did it to only realise I had it correct all-along ;)
Hi, I was wondering if it was possible since my camera on iphone 6 plus is damaged, if I can replace it with a 6s since it's 12 megapixels. Let me know your though.
i got this and accidentally got a regular 6 plus not the 6s plus camera . apparently there is a difference because it wouldn't work. Replaced it and works great. anyone with a brain and a steady hand can do this.
so I installed a new camera and after re-installing the front of the phone…the screen is unresponsive to typing in the passcode or accepting a fingerprint to open the phone back up. everything works fine..i’m even seeing txt messages come in…just cant seem to unlock the phone because the keypad isn't responsive. any advice?
I replaced my rear camera and now neither camera has an image! What did I do wrong?
I have the same problem :( did you get any answers? thanks
I had very bad issues with the i-Sight cam! it was shaking so wild, you couldnt see anything on the pictures. Apple said, my 6S+ is not under this special i-Sight change programm which was describing precisely the same issues!
But the new cam fixed it all! And put a new battery as well ;-)
I just discovered that the iSight camera does not include the camera cover. I also cannot find the camera cover for sale on this site. This is very frustrating. I didn’t know the camera and cover were separate pieces. I think I just bought the camera when I didn’t need it and didn’t buy the cover that I do need.
This is not good. Please help!
Couldn’t have done it without the step by step guidance and video. Thanks for the help. New camera works great!!!
Dropped my iPhone and the camera succumbed to the “Black Death”. No software fix for this one. Bought a great toolkit from iFixit along with a new iSight camera. Following these well documented instructions had the phone fixed in short order. What a great website!
Really fun to do and the breakdown was helpful and easy to follow, thank you
Is the iphone 6S plus camera the same as the iphone 6.
Newbie question. If I replace camera as in the instructions, will I need to reloadd all apps and data ?
No this dosent effect the data on your phone only the camera which you are changing
Help!
ipone 6s +.
Had blurry rear camera. Ordered new camera. I Just replaced camera this morning & now when I powered. Ack on…black screen for rear & FRONT camera as well now!
I rebooted phone.
i checked settings.
i reset setttings.
I even took apart again to double check my connections.
Any ideas?
Hello, did you ever find a resolution to this? I have the same problem :( thanks
I followed this and now neither camera works. the old camera jiggled. I put the old camera back but had the same result, i.e. neither camera works.
did you solve this? I have the same issue :( thanks
Super Anleitung. Hat alles wunderbar in ca. 40 Minuten geklappt.
Ich habe ich ein Gelpad verwendet, welches ich in einer Schüssel mit Wasser aus dem Wasserkocher erhitzt hatte, und damit den Kleber am unteren Displayrand weich bekommen.
Jetzt habe eine neue Hauptkamera, deren Bild stabil bleibt. Danke für die tolle Anleitung!
Hi, I need to know if I need to order a new lens with my replacement back camera. When you remove the back camera- does the lens (outer piece that is exposed to the outside of the phone, the piece that could be scratched) come with it and do replacement pieces usually include this lens piece too? Thanks
The lens is replaced separately (as you can see from the guide) and would need to be ordered separately as well. Most camera replacements do not require a new lens. Most lens replacements do not require a new camera.
Talon -
very easy to follow. Was able to replace my camera and now my 6s Plus is back in business.
I successfully repaired my 6s Plus by transplanting the rear camera and lightning/headphone jack assembly from a badly damaged donor phone. I was worried about all of the adhesives, but the whole process was pretty straightforward with this guide. Looking forward to getting another couple of years out of this phone!