Перейти к основному содержанию

iPhone 7 Display Assembly Replacement

Абсолютно необходимое руководство
Это руководство предназначено только для использования в качестве обязательного условия для других руководств. Оно не полностью само по себе.

Выберете то, что вам нужно

  1. iPhone 7 Display Assembly Replacement, Display Assembly: шаг 1, изображение 1 из 3 iPhone 7 Display Assembly Replacement, Display Assembly: шаг 1, изображение 2 из 3 iPhone 7 Display Assembly Replacement, Display Assembly: шаг 1, изображение 3 из 3
    • Make sure the battery is disconnected before you disconnect or reconnect the cables in this step.

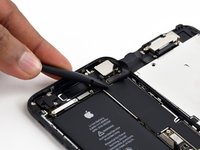
    • Use a spudger or a fingernail to disconnect the two lower display connectors by prying them straight up from their sockets on the logic board.

    • To reconnect these cables, press down on one end until it clicks into place, then repeat on the opposite end. Do not press down on the middle. If the connector is even slightly misaligned, the connector can bend, causing permanent damage.

    • If you have a blank screen, white lines on the display, or partial or complete lack of touch response after reassembling your phone, try disconnecting and carefully reconnecting both of these cables and make sure they are fully seated.

  2. iPhone 7 Display Assembly Replacement: шаг 2, изображение 1 из 3 iPhone 7 Display Assembly Replacement: шаг 2, изображение 2 из 3 iPhone 7 Display Assembly Replacement: шаг 2, изображение 3 из 3
    • Remove the two 1.3 mm Phillips #000 screws securing the bracket over the front panel sensor assembly connector.

    • Some phones could be Y000. Apple started using Y000 for these at some point in the middle of the product's lifecycle.

  3. iPhone 7 Display Assembly Replacement: шаг 3, изображение 1 из 2 iPhone 7 Display Assembly Replacement: шаг 3, изображение 2 из 2
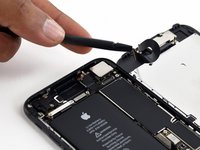
    • Disconnect the front panel sensor assembly connector from its socket on the logic board.

    • This press connector should also be reconnected one end at a time to minimize the risk of bending.

  4. iPhone 7 Display Assembly Replacement: шаг 4, изображение 1 из 1
Заключение

To reassemble your device, follow these instructions in reverse order.

4 участников успешно повторили данное руководство.

Evan Noronha

Участник с: 02/05/15

223 163 Репутация

Автор 168 руководств

0 Комментариев

Добавить комментарий

Просмотр статистики:

За последние 24часов: 0

За последние 7 дней: 0

За последние 30 дней: 0

За всё время: 2,651