Введение
This guide shows the user how to replace the hard drive cable from an iPod Video.
Выберете то, что вам нужно
-
-
Free the first retainer clip on the bottom of the iPod using the iPod opening tool. The tool's edge should point towards the metal back case to prevent scratching the plastic front.
-
-
-
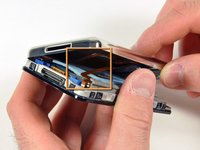
Use this photo of the OPENED iPod for the reference, in order to locate the areas where the retaining clips are - 4 per side, one on top and two at the bottom. It should save you a lot of frustration and help avoid scratching the plastic cover.
-
-
-
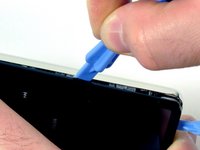
Insert the iPod opening tool into the left side of the iPod, with the edge of the tool pointing towards the metal back.
-
A small guitar pick can be extremely helpful in opening the iPod. Simply insert it and slide the pick around the case to free the clips to streamline the process.
-
Gently enlarge the existing crevice by wiggling the iPod opening tool and moving it to the left.
-
Continue doing so until the entire side of the iPod is loose.
-
You can then insert an iPod opening tool to the right of the Hold button. Be very careful while inserting the tool, as the display is very fragile.
-
-
-
-
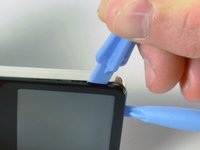
Gently glide the iPod opening tool on the top of the display, making sure to free the retaining clips.
-
The other sides of the iPod should now easily come loose. If they do not, use iPod opening tools on the right side of the iPod in the same way as on the left side of the iPod.
-
Separate the front of the iPod from the back about an inch (or a couple of centimeters).
-
-
Инструмент, используемый на этом этапе:Tweezers$3.99
-
Use angled tweezers or an iPod opening tool to slide up the brown connector latch, holding the orange battery ribbon cable in place. Make sure you pull from both sides of the latch. You only need to lift the brown connector latch up about 1-2mm to free the cable. Do not lift more or remove the latch, or you might pull the white connector with it!
-
Remove the cable from the connector.
-
-
-
You should now have one orange ribbon cable still attaching the front case to the back.
-
At this point you are able to remove and replace the blue rubber bumpers, or continue with separating the case.
-
-
-
Lift up the hard drive to expose the headphone jack ribbon connector (indicated by the yellow box).
-
-
-
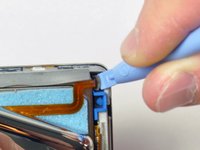
With the iPod opening tool, gently lift the brown tab of the headphone ribbon cable connector. The tab will rotate up 90 degrees, releasing the ribbon cable.
-
Using your fingers, pull out the headphone jack ribbon cable.
-
-
-
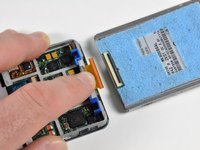
The front and back of the iPod should now be completely separated.
-
-
-
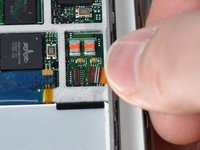
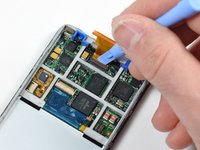
Use a small iPod opening tool to release the black hinge holding the hard drive ribbon cable. The tab will rotate up 90 degrees towards the logic board, releasing the ribbon cable.
-
Use your forefinger to hold the ribbon cable in place; disconnect the drive from the ribbon cable.
-
-
-
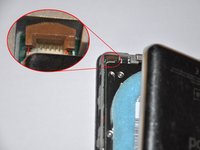
Use the small iPod opening tool to release the brown clamp holding the hard drive cable in place. The tab will rotate up 90 degrees towards the display, releasing the ribbon cable.
-
Slide the orange hard drive ribbon cable directly out of its connector. The cable may be attached to the logic board with some adhesive. If the cable doesn't immediately come free, carefully pull up on the cable to loosen the adhesive.
-


To reassemble your device, follow these instructions in reverse order.
Отменить: Я не выполнил это руководство.
25 человек успешно провели ремонт по этому руководству.
