Перейти к основному содержанию

iPod Nano 4th Generation Display Replacement

Выберете то, что вам нужно

  1. iPod Nano 4th Generation Display Replacement, Glass Panel: шаг 1, изображение 1 из 2 iPod Nano 4th Generation Display Replacement, Glass Panel: шаг 1, изображение 2 из 2
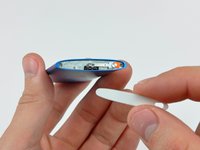
    • Insert the edge of an iPod opening tool into the gap between the outer case and the top bezel.

    • Pry the top bezel off the adhesive securing it to the display retainer.

    • At this point the hold switch slider is free and may fall. Be careful not to lose it.

  2. iPod Nano 4th Generation Display Replacement: шаг 2, изображение 1 из 1
    • Remove the hold switch slider from the top of the Nano.

  3. iPod Nano 4th Generation Display Replacement: шаг 3, изображение 1 из 1
    • Remove the two angled Phillips screws from the two corners of the display retainer.

    • These screw heads are extremely small and easily stripped.

  4. iPod Nano 4th Generation Display Replacement: шаг 4, изображение 1 из 1
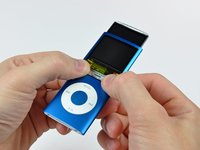
    • Insert an iPod opening tool between the outer case and the display retainer.

    • Use the tool to slide the display assembly out of the case slightly.

    • Do not rotate the display retainer about the top edge of the display, as it is attached to a thin steel bracket that is easily broken.

    • Do not forcefully remove the display retainer, as the hold switch cable is liable to snap.

  5. iPod Nano 4th Generation Display Replacement: шаг 5, изображение 1 из 1
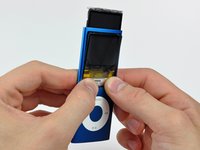
    • Slide the display out of the Nano. It will move about .5" until the display data cable limits its travel.

    • Do not put unnecessary tension on the very thin display data cable.

  6. iPod Nano 4th Generation Display Replacement: шаг 6, изображение 1 из 2 iPod Nano 4th Generation Display Replacement: шаг 6, изображение 2 из 2
    • With the display pulled out of the case as much as possible, gently press on the lower edge of the glass panel until it pops in slightly (~1 mm).

    • Use your thumbs on the lower edge of the glass panel to slide the glass down and into the case until the top edge pops up out of the case.

  7. iPod Nano 4th Generation Display Replacement: шаг 7, изображение 1 из 1
    • Lift the glass panel out of the Nano.

    • Before reinstalling the glass panel, be sure to clean the face of the display and the inside of the panel as any dust or fingerprints will be annoyingly visible when the Nano is turned on.

  8. iPod Nano 4th Generation Display Replacement, Display: шаг 8, изображение 1 из 1
    • Use the edge of an iPod opening tool to separate the hold switch from the adhesive securing it to the top edge of the display.

    • The hold switch ribbon cable is extremely fragile and easily broken. Work gently.

  9. iPod Nano 4th Generation Display Replacement: шаг 9, изображение 1 из 1
    • Peel back the Kapton tape covering the display data cable socket.

  10. iPod Nano 4th Generation Display Replacement: шаг 10, изображение 1 из 1
    • While holding the light colored socket down with one finger, use the tip of a spudger to flip the ZIF cable lock up toward the bottom of the Nano.

  11. iPod Nano 4th Generation Display Replacement: шаг 11, изображение 1 из 1
    • Use an iPod opening tool to peel the display data cable off the thin metal plate attached to the display.

    • Be careful not to rip the display data cable.

  12. iPod Nano 4th Generation Display Replacement: шаг 12, изображение 1 из 1
    • Pull the display out of the Nano, minding the hold switch cable that may get caught.

    • As you pull the display out of the case, be careful not to break the hold switch cable.

  13. iPod Nano 4th Generation Display Replacement, Display: шаг 13, изображение 1 из 1
    • If present, remove the strip of tape covering the display electronics.

  14. iPod Nano 4th Generation Display Replacement: шаг 14, изображение 1 из 2 iPod Nano 4th Generation Display Replacement: шаг 14, изображение 2 из 2
    • The display bracket is attached to the display by a strip of adhesive around its perimeter.

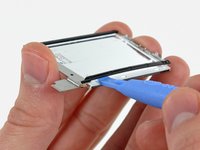
    • Use the edge of an iPod opening tool to carefully pry the display bracket off the rear of the display.

    • Continue separating the display bracket along the side of the display.

  15. iPod Nano 4th Generation Display Replacement: шаг 15, изображение 1 из 1
    • Separate the display bracket from the other side of the display.

  16. iPod Nano 4th Generation Display Replacement: шаг 16, изображение 1 из 1
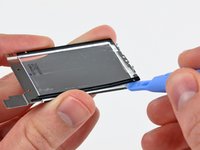
    • Use an iPod opening tool to carefully peel the display electronics off the display bracket.

  17. iPod Nano 4th Generation Display Replacement: шаг 17, изображение 1 из 1
    • Remove the display from the display bracket.

Заключение

To reassemble your device, follow these instructions in reverse order.

48 участников успешно повторили данное руководство.

4 Комментариев

And what to do if you break the hold switch?!

Fred Rodolf - Ответить

Hello, can I connect a 10" LCD display to the iPod display connection instead of it's original display?

irrevocablemihiranga97 - Ответить

No. No idea what you're talking about because even if it was connected it wouldn't physically fit. TV out would be your best friend.

the bongo guy -

Your instructions are well prepared and very helpful! Thanks a lot!

ndinijimi - Ответить

Добавить комментарий

Просмотр статистики:

За последние 24часов: 11

За последние 7 дней: 35

За последние 30 дней: 130

За всё время: 78,534