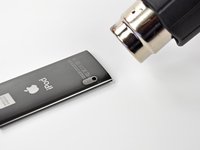
Перейти к основному содержанию

iPod Nano 5th Generation Battery Replacement

Выберете то, что вам нужно

  1. iPod Nano 5th Generation Battery Replacement, Glass Panel: шаг 1, изображение 1 из 3 iPod Nano 5th Generation Battery Replacement, Glass Panel: шаг 1, изображение 2 из 3 iPod Nano 5th Generation Battery Replacement, Glass Panel: шаг 1, изображение 3 из 3
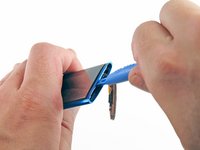
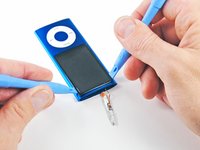
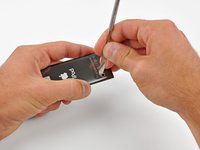
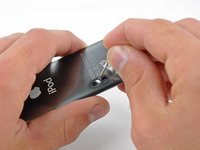
    • Insert an iPod opening tool between the outer case and top bezel near the screen.

    • Lifting up on the iPod opening tool, gently pry the top panel off of the device.

    • The bezel is attached with adhesive, and may require some force to remove.

  2. iPod Nano 5th Generation Battery Replacement: шаг 2, изображение 1 из 1
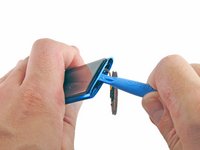
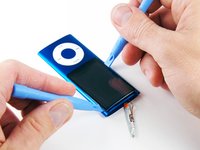
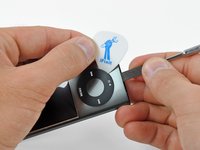
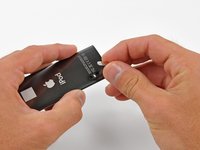
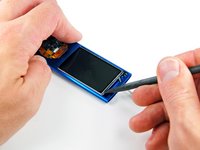
    • Use an iPod opening tool to pry the hold switch button off of the hold switch plate.

  3. iPod Nano 5th Generation Battery Replacement: шаг 3, изображение 1 из 1
    • Remove the two 3.2 mm screws.

    • These screws are angled toward the outer case and are also very small. Use a sharp screwdriver and be careful not to strip the screws.

  4. iPod Nano 5th Generation Battery Replacement: шаг 4, изображение 1 из 1
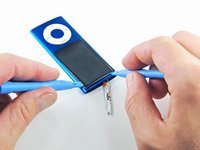
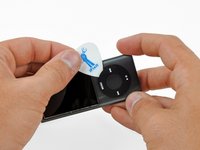
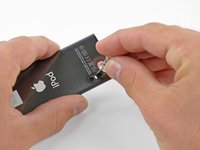
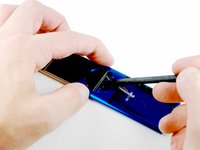
    • Insert an iPod opening tool between the outer case and the metal hold switch plate near the top of the screen .

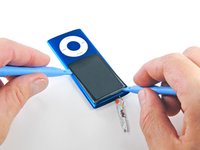
    • While slightly lifting up on the iPod opening tool, pull the hold switch plate out of the iPod.

    • The hold switch plate is still attached to iPod by a very thin, very fragile ribbon cable. Be careful not to break it.

  5. iPod Nano 5th Generation Battery Replacement: шаг 5, изображение 1 из 2 iPod Nano 5th Generation Battery Replacement: шаг 5, изображение 2 из 2
    • The glass panel is held in place by adhesive on all four sides. In the following steps, work carefully to avoid cracking the glass.

    • Insert an iPod opening tool between the display and the glass panel at the top of the device.

    • Rotate the iPod opening tool towards the rear of the device, slightly lifting the top of the glass out of the outer case.

    • The glass panel does not raise very far. Do not attempt to completely remove the panel yet, or you are likely to break the display screen.

  6. iPod Nano 5th Generation Battery Replacement: шаг 6, изображение 1 из 1
    • While lifting the screen up with one iPod opening tool, insert a second iPod opening tool in between the outer case and the top left edge of the glass panel.

    • Remove the first iPod opening tool from between the glass and LCD in the top of the device.

  7. iPod Nano 5th Generation Battery Replacement: шаг 7, изображение 1 из 2 iPod Nano 5th Generation Battery Replacement: шаг 7, изображение 2 из 2
    • Prying up slightly on the iPod opening tool, insert a second iPod opening tool in between the front glass and the outer case, on the right side of the screen.

    • Slide the second iPod opening tool along the right edge of the panel to remove the adhesive.

  8. iPod Nano 5th Generation Battery Replacement: шаг 8, изображение 1 из 2 iPod Nano 5th Generation Battery Replacement: шаг 8, изображение 2 из 2
    • With one iPod opening tool still between the glass and outer case, insert a second iPod opening tool in between the front glass and outer case, on the left side.

    • Slide the second iPod opening tool toward the bottom of the device to remove the adhesive.

  9. iPod Nano 5th Generation Battery Replacement: шаг 9, изображение 1 из 1
    • Lifting the glass from the side nearest the top of the iPod, remove the glass panel from the Nano.

  10. iPod Nano 5th Generation Battery Replacement, Click Wheel: шаг 10, изображение 1 из 2 iPod Nano 5th Generation Battery Replacement, Click Wheel: шаг 10, изображение 2 из 2
    • Use a heat gun to soften the adhesive underneath the plastic bezel at the bottom of the iPod.

    • Use a low heat setting and do not hold the heat gun in place for too long to avoid melting the plastic bezel.

    • Use a plastic opening tool to pry the bezel from the case of the iPod and remove it.

  11. iPod Nano 5th Generation Battery Replacement: шаг 11, изображение 1 из 3 iPod Nano 5th Generation Battery Replacement: шаг 11, изображение 2 из 3 iPod Nano 5th Generation Battery Replacement: шаг 11, изображение 3 из 3
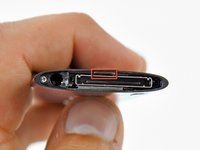
    • Unscrew three screws from the bottom of the iPod:

    • Two 4.4 mm angled Phillips screws

    • One 5.4 mm Phillips screw.

    • These screws may not come out on their own, so be sure not to lose them when removing the retainer.

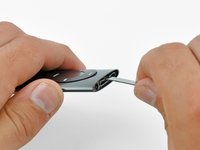
    • Use a plastic opening tool to pry the metal retainer out from the bottom of the iPod and remove it.

  12. iPod Nano 5th Generation Battery Replacement: шаг 12, изображение 1 из 2 iPod Nano 5th Generation Battery Replacement: шаг 12, изображение 2 из 2
    • Insert a metal spudger into the slot at the bottom of the iPod just above the dock connector.

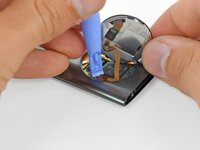
    • Use the metal spudger to pry up the bottom edge of the click wheel.

  13. iPod Nano 5th Generation Battery Replacement: шаг 13, изображение 1 из 2 iPod Nano 5th Generation Battery Replacement: шаг 13, изображение 2 из 2
    • Place a guitar pick between the click wheel and the case of the Nano and remove the metal spudger.

    • Pry up the edges of the click wheel with the guitar pick until the click wheel comes free from the case.

    • Do not try to completely remove the click wheel yet, as it is still held in place by a ribbon cable.

  14. iPod Nano 5th Generation Battery Replacement: шаг 14, изображение 1 из 2 iPod Nano 5th Generation Battery Replacement: шаг 14, изображение 2 из 2
    • Lift the click wheel out of the way with one hand and use a plastic opening tool to pry the click wheel ribbon cable connector off its socket on the logic board.

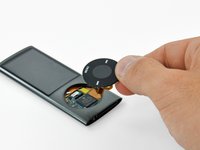
    • Remove the click wheel.

  15. iPod Nano 5th Generation Battery Replacement, Logic Board Assembly: шаг 15, изображение 1 из 3 iPod Nano 5th Generation Battery Replacement, Logic Board Assembly: шаг 15, изображение 2 из 3 iPod Nano 5th Generation Battery Replacement, Logic Board Assembly: шаг 15, изображение 3 из 3
    • Use a heat gun to soften the adhesive underneath the camera/microphone cover.

    • Pry the camera/microphone cover off the case with a metal spudger and remove it.

    • It is extremely difficult, if not impossible, to avoid damaging the iPod case near the camera. While this will not affect the iPod's functionality, it will hurt its cosmetic appearance.

    • You can try this alternative method for removing the cover:

    • Use a hot glue gun to apply a bead of glue across the cover.

    • Move the nozzle in the glue for 20 seconds to heat the lens adhesive holding the lens in place.

    • Press a spudger into the hot glue and hold it in place until the glue cools and hardens.

    • Pull on the spudger with firm steady force, while using a fingernail to pry on the cover edge.

  16. iPod Nano 5th Generation Battery Replacement: шаг 16, изображение 1 из 1
    • From the top of the iPod, insert a metal spudger between the outer case and the battery to remove the adhesive that holds the battery in place.

    • Be extremely careful not to poke or puncture the battery itself, as this may cause the battery to combust.

  17. iPod Nano 5th Generation Battery Replacement: шаг 17, изображение 1 из 3 iPod Nano 5th Generation Battery Replacement: шаг 17, изображение 2 из 3 iPod Nano 5th Generation Battery Replacement: шаг 17, изображение 3 из 3
    • There is a small white retainer between the camera and microphone that keeps the inner components from sliding around.

    • Insert a push pin into the hole at the corner of the retainer and lift it out of the case.

  18. iPod Nano 5th Generation Battery Replacement: шаг 18, изображение 1 из 1
    • Once the retainer has been pushed past its hole in the outer case, the spudger used to depress it is no longer necessary.

    • Using gentle but steady force, push on the top of the LCD to slide the logic board assembly out of the bottom of the iPod.

    • Do not push on the battery, as this may puncture it and cause it to combust.

    • Constantly mind the hold switch plate, making sure it doesn't snag on an edge and tear the ribbon cable.

  19. iPod Nano 5th Generation Battery Replacement: шаг 19, изображение 1 из 2 iPod Nano 5th Generation Battery Replacement: шаг 19, изображение 2 из 2
    • Continue to push the logic board assembly through the outer case of the iPod with a spudger.

    • Tolerances inside the Nano are extremely tight. Be very patient and go slowly when removing the logic board assembly, and make sure no components or ribbon cables get caught on the case.

    • To make sure that the hold switch plate does not catch on the housing of the iPod and tear the cable, feed the switch straight down the center of the device, where the opening is the widest.

  20. iPod Nano 5th Generation Battery Replacement: шаг 20, изображение 1 из 1
    • Once the top of the LCD has cleared the bottom edge of the outer case, remove the logic board assembly from the body of the iPod.

    • Again, be sure to mind the hold switch plate, that it doesn't catch on the bottom of the click wheel hole.

  21. iPod Nano 5th Generation Battery Replacement, Battery: шаг 21, изображение 1 из 2 iPod Nano 5th Generation Battery Replacement, Battery: шаг 21, изображение 2 из 2
    • Use your fingers to carefully lift the battery off the back of the LCD, starting at the top of the LCD.

  22. iPod Nano 5th Generation Battery Replacement: шаг 22, изображение 1 из 1
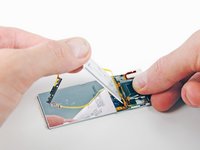
    • Turn the battery over so the orange hold button ribbon cable is visible along the underside of the battery.

    • Peel the hold button ribbon off the battery.

    • The delicate ribbon cable is held in place by adhesive. Work slowly, taking care not to tear the ribbon.

  23. iPod Nano 5th Generation Battery Replacement: шаг 23, изображение 1 из 1
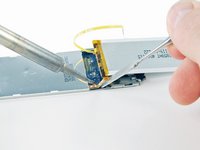
    • Use a pair of tweezers to remove the orange tape that covers the three solder connections for the battery.

  24. iPod Nano 5th Generation Battery Replacement: шаг 24, изображение 1 из 1
    • The battery on the Nano is attached via solder pads with small holes that go through the battery ribbon cable and attach to flat pads on the face of the logic board. In this step, you will heat each solder pad individually while using a metal spudger to pry it up from the logic board.

    • DO NOT bridge the connection between the solder pads both on the board and on the ribbon cable with your spudger. Shorts have the potential to ruin the logic board.

    • Beware of overheating the board and the cable. Only hold the tip of the iron against the pad long enough to let the solder melt. Excess heat buildup has the potential to ruin the logic board or melt the ribbon cable.

    • Start working from the right side of the battery ribbon cable. Heat the rightmost solder pad while gently prying up from under the ribbon cable to free it from the board.

  25. iPod Nano 5th Generation Battery Replacement: шаг 25, изображение 1 из 3 iPod Nano 5th Generation Battery Replacement: шаг 25, изображение 2 из 3 iPod Nano 5th Generation Battery Replacement: шаг 25, изображение 3 из 3
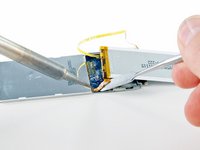
    • Repeat the previous step for the two remaining solder pads, working from right to left.

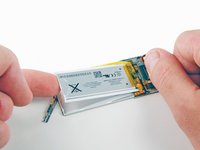
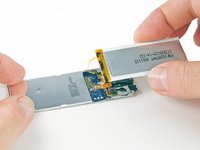
    • Once the three connections have been desoldered, lift the old battery off the logic board.

Заключение

To reassemble your device, follow these instructions in reverse order.

104 участников успешно повторили данное руководство.

David Hodson

Участник с: 04/13/10

150 352 Репутация

Автор 127 руководств

31 Комментариев

On step 15, I used a thiny needle (for knitting or something like this) placed into the microphone hole and use this gently to lift up the plate. A head gun must heat the glue before. That saves the ipod from scratches

christian - Ответить

This it bs. I need to buy new device now. Nothing comes off that easy. My screen shattered when I was trying to pull it up. If you are not a pro, don't do it.

fwitkowski - Ответить

Obviously you weren’t careful enough.

DWEGFERG EWFW4ET43RF -

You are supposed to push down from the top of the screen, not up. I managed to get mine out but I ripped the hold ribbon in the process. Luckily I have another one for spares. Good luck next time

George Tivda -

I'm sure this can be done, but the tools included in the Ifixit kit are not up to the task. Spent about 45 minutes with the flimsy blue tools and distorted the LCD trying to remove the glass. Then took a heat gun and used the black nylon tool (which I suppose is the replacement for the metal spudger) in the kit. Had the glass out in a single minute. There is no tool in the kit long enough to dislodge the click wheel. I got out my dental tools and finished the disassembly. It is cheaper at this point to just buy another than replace the broken parts. It is a poor carpenter that blames his tools, but you can't cut down a tree with a fish. Use your own tools

drbernie - Ответить

Добавить комментарий

Просмотр статистики:

За последние 24часов: 53

За последние 7 дней: 344

За последние 30 дней: 1,650

За всё время: 262,593