Этот перевод был сделан машиной и пока не проверен человеком. Говорите на этом языке? Просмотрите его.
Введение
Если ваш iPod работает исправно, за исключением элементов управления, возможно, вам потребуется заменить Click Wheel. Замена Click Wheel — недорогой, но требующий аккуратности ремонт.
Выберете то, что вам нужно
-
-
-
Используйте термофен, чтобы размягчить клей под пластиковой рамкой в нижней части iPod.
-
Используйте пластиковый инструмент для открывания, чтобы поддеть рамку и отсоединить её от корпуса iPod, затем снимите её.
 Спросите у FixBot
-
-
-
Открутите два винта из металлического фиксатора в нижней части iPod:
-
Угловой винт Phillips длиной 4,4 мм
-
Винт Phillips длиной 5,4 мм
-
Используйте пластиковую лопатку, чтобы поддеть металлический фиксатор в нижней части iPod и извлечь его.
-
-
-
-
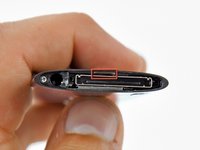
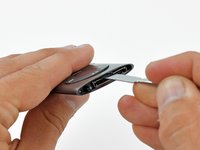
Вставьте металлический spudger в паз в нижней части iPod прямо над разъемом док-станции.
-
Используйте металлический spudger, чтобы поддеть нижний край колеса управления click wheel.
-
-
-
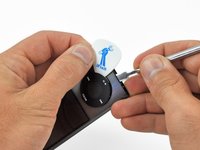
Вставьте медиатор между колесом управления Click Wheel и корпусом Nano, а затем извлеките металлическую лопатку.
-
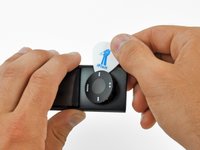
Поддевайте края колеса Click Wheel медиатором, пока оно не отделится от корпуса.
-
-
-
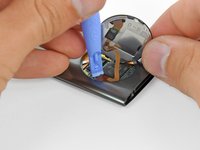
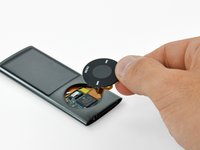
Одной рукой отведите в сторону сенсорное колесо Click Wheel, а другой с помощью пластикового инструмента для открывания отсоедините разъем шлейфа Click Wheel от гнезда на логической плате.
-
Снимите сенсорное колесо Click Wheel.
-
-






Для сборки устройства выполните эти действия в обратном порядке.
Отменить: Я не выполнил это руководство.
45 человек успешно провели ремонт по этому руководству.

14 Комментарии к руководству
I just replaced the click wheel on my iPod Nano 5th Gen and I found that this guide could be better. The reason is that the bottom edge of the click wheel is held in place by the same metal bracket that surrounds the connector port at the bottom of the iPod. So, before you remove the click wheel I recommend performing the following three steps:
1. Remove the plastic cover at the bottom of the iPod
2. Unscrew the two screws on either side of the connector port. Of the three screws at the bottom of the iPod, these are the middle and right hand screws as you look at the front of the iPod.
3. Remove the metal bracket that surrounds the connector port of the iPod.
After replacing the click wheel, perform the above three steps in reverse order. Make sure that when the metal bracket is re-inserted that it secures the click wheel and prevents it from falling out as some people have experienced after replacing the click wheel.
I discovered the same solution after having destroyed one wheel by trying to pry it out without taking out that bottom bezel.That should definitely be the first step in this guide.
PLEASE READ slith's comment, it's extremely important, or you will not be able to get the click wheel installed. There are notches on the click wheel that have to go in at the top and bottom, but the bottom notch is PART OF THE GREY METAL BRACKET that you take out of the bottom of the iPod. DO NOT re-install the grey bracket at the bottom until you have installed the replacement click wheel, otherwise the wheel will not go in.
Thanks slith, I just wanted to emphasize this because I screwed up quite a few of these click wheels before I read your comment.
Agreed. I ended up breaking 3 of my six tabs. It works but the wheel isn't quite flush now. Wish I'd looked at the tear down instructions first. That should be at the top of the list as well. This description just isn't at all complete.
I agree with the other notes please see step 3 BEFORE 1&2
