Введение
Remove the glass front panel to access your Touch's internals.
Выберете то, что вам нужно
Видеообзор
-
-
The picture at left (front panel already removed) shows the locations of the metal clips (shown in red) that snap on to the plastic frame. In the next few steps, try to pry the front panel up from the gaps between these clips.
-
-
-
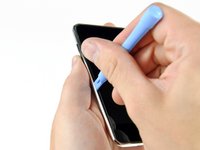
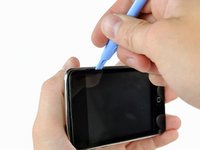
Gently insert an iPod opening tool between the glass front panel and its plastic surround near the volume adjust buttons.
-
Rotate the tool away from the Touch to pry up on the glass panel.
-
-
-
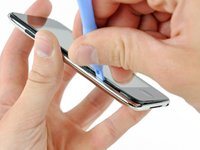
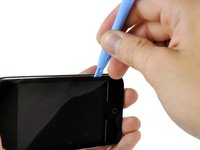
Insert the iPod opening tool between the front panel and its plastic surround and pry up at several points along the left edge of the Touch.
-
-
-
-
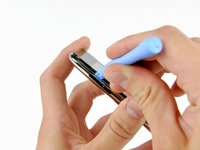
Continue prying up the left edge until the top and bottom edges start to lift out of the Touch.
-
Once the top and bottom edges have lifted slightly out of the Touch, use the opening tool to assure the plastic surround is detached from the clips along the inside of the Touch.
-
-
-
Continue the prying procedure, now focusing on detaching the plastic surround from the internal metal clips.
-
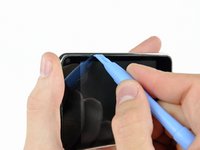
Pry along the top edge of the Touch to further separate the front panel from the rest of the device.
-
-
-
Pry up the front panel along the right edge using the method described in previous steps.
-
Eventually work around the entire perimeter of the front panel until it is lifted slightly from the rear panel.
-
-
-
Lift the front panel out of the rear case minding the cable still attaching it near the upper left corner of the Touch.
-
-
-
Use the flat end of a spudger (or an opening tool) to very carefully pry the touch screen cable connector up off the upper logic board.
-


To reassemble your device, follow these instructions in reverse order.
Отменить: Я не выполнил это руководство.
97 человек успешно провели ремонт по этому руководству.

6 Комментарии к руководству
When prying up - make sure that you lift the black plastic frame. I got trouble because on side I managed to lift the glass of the plastic frame on one side, and lifted the plastic frame out of the clips on the other sides, making it very hard to get the panel out. When I at last succeeded it was because the plastic frame broke in the lower right corner – when I had lifted the panel off the right side of the plastic frame was still attached (it needed to break at the top too before I could lift of the panel completely).
will i because to put the panel back on easily?
Patience and a can of compressed air are mandatory. The inside of my iPod Touch was pretty dusty after two years in my pocket. Before putting on the new digitizer, everything needs to be clean.
Also, I used my spudger to pry half the broken frame out of the left gutter (see Michael above). Doing that without damaging the screen was the hardest part.
I'm getting ready to do this and have the old screen partially off to let things dry out. I am, however, unclear on what to pry on to release the ribbon. From past experience with other iPod products, I'm thinking it is a small clamp that needs to be pried up. Is that the case and, if so, is it located where the picture indicates? I think the clamp is under the small grey plastic cover.
I watched the iFixit video & read the steps. I found out that when removing screen...be very careful not to stick pry tool in to deep to lift out frame, it can crack the LCD, which is what I did.