
were is the write proctection screw?
i want to turn my school laptop into a regular one but i dont know were the screw is.
Это хороший вопрос?
Счет
6

Репутация: 73
![]() 2
2
![]() 2
2
i want to turn my school laptop into a regular one but i dont know were the screw is.
Это хороший вопрос?

Репутация: 25
![]() 1
1
The link above is not working, so I attached update photo
https://preview.ibb.co/dxADNH/photo_jpg....
Were is TWO contact pad divided into quarters, but only one has 4 soldering contacts and was covered by screw.
This is applicable for HP Chromebook 11 G4 for US market, version of hardware board DA0Y07MBAF1 rev F
Был ли этот ответ полезен?

Репутация: 13
![]() 1
1
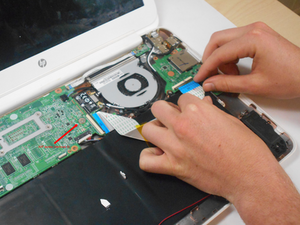
Remove the keyboard by
1) Remove the rubber plugs over the screw access holes. Note that there's one in the top centre of the backing within the product label. It elided me and made me wonder why it was so hard to pry off the keyboard. Luckily I didn't break anything.
2) Remove the screws. There are 9 of them phillips head (I don't know what size, but not overly tiny)
3) Using a plastic pry tool, work around and pry open the gap between the keyboard deck where it nestles into the main body/frame.
4) Carefully lift the keyboard up and to the left. You don't need to disconnect the keyboard to get at the screw, just set it aside.
Image of motherboard with write protect screw bottom right.
5) The write protect screw on mine (HP Chromebook 11 G4) is in the slot on the right with the contact pad divided into quarters. Remove.
Reassemble in reverse of disassembly.
Был ли этот ответ полезен?
is my chromebook supposed to be a white screen after i do this?
dude, i had my chromebook shut down and i did what you said, i removed the screw and when i put the keyboard back in my laptop was on and with a white screen. please help
Did you disengage the battery cable before you unhooked the keyboard?

Репутация: 13
![]() 2
2
![]() 1
1

Репутация: 8,7к
![]() 26
26
![]() 14
14
![]() 8
8
I couldn't find a similar document for the G4 but perhaps the G3 docs referenced below will help? HP is getting more tight with PDF documentation apparently.
Anyone know where the BIOS Write-Protect Screw is on this image?
Был ли этот ответ полезен?
That should work. The G3 and G4 are practically the same from what I've seen.
i cant find write protect screw for hp fortis 14 g11
Был ли этот ответ полезен?
За последние 24 часов: 5
За последние 7 дней: 23
За последние 30 дней: 71
За всё время: 19,427