Введение
This guide details how to replace the battery in the Astro A50 2014 headset. Because the A50’s battery is a lithium-ion, it will eventually burn out after a couple years of average use. However, there’s nothing to fear as a replacement battery is only $30 and, with a soldering iron and a screwdriver, you can replace it yourself.
Выберете то, что вам нужно
-
-
To begin, remove the foam cushions from each earpiece by gently pulling the cushion away from the housing.
-
Use a small Phillips-head screwdriver to remove the 4 screws.
 Спросите у FixBot
-
-
-
After setting aside the black plastic covers, use the screwdriver again to remove the two screws.
-
Identify the foam inner covers and peel back the upper corners of each foam to expose and remove the screws beneath.
-
-
-
-
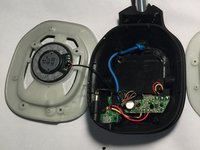
Gently fold aside the speaker assembly to expose the internals of the earpiece. Use caution to avoid damaging the black wires.
-
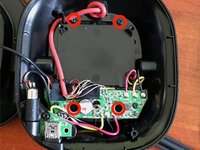
Remove the four screws marked in red to release the faceplate on the outside of the headset.
-
-
-
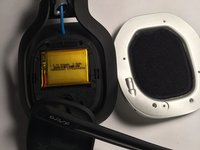
Turn the earpiece over, and expose the battery by folding the microphone and cover plate away from the battery housing.
-
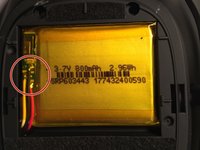
Desolder battery connections to disconnect the three colored wires from the old battery. Make note of corresponding colors/locations for installation of new battery.
-
Carefully remove the old battery by wedging a plastic opening tool or spudger underneath the battery to release the adhesive.
-
-
-
For reassembly, follow steps 1-4 in reverse order:
-
Take care to ensure battery wires are soldered correctly with each color on its corresponding pad.
-
Use minimal amounts of adhesive to re-attach the speaker foam to avoid glue making a mess.
-


Be sure to test your new battery to make sure the fix succeeded.
Отменить: Я не выполнил это руководство.
40 человек успешно провели ремонт по этому руководству.
Команда

UMass Dartmouth, Team 2-5, Shastany Fall 2015 Участник UMass Dartmouth, Team 2-5, Shastany Fall 2015
UMASSD-SHASTANY-F15S2G5
4 членов
Автор 10 руководств
33 Комментарии к руководству
Could you post the dimensions of the battery itself? Seems like it's hard to find one that may or may not fit. That or could you recommend where to get a battery?
i'd also like to know where to source the battery
Search for part no: 603443 on Ebay - ~$10 or buy one from Astro for $75
So, which battery is the best replacement for the original? Is it possible to put some bigger batteries inside with some modding?
Battery sizes are mAH, just by a 900 or more and that should do the trick. The actual size of the battery must be identical for a perfect fit and confortable headsets. Just make sure you get the correct voltage and size.
The battery comes with a cable, instead of soldering, can I tie those cables in? Also, what is the best way to remove and reattach foam cushions without damaging them?