Перейти к основному содержанию
Присоединяйся к сообществу ремонтников - Создай аккаунт

Comfort Zone CZ6C Power Cable Replacement

Выберете то, что вам нужно

    1. Comfort Zone CZ6C Power Cable Replacement, Power Cable: шаг 1, изображение 1 из 3 Comfort Zone CZ6C Power Cable Replacement, Power Cable: шаг 1, изображение 2 из 3 Comfort Zone CZ6C Power Cable Replacement, Power Cable: шаг 1, изображение 3 из 3
      • Make sure to unplug the Comfort Zone CZ6C before cutting any wires.

      • Before attempting to replace your power cable, learn how to solder using the How To Solder and Desolder Corrections Guide.

      • Start with the fan on its back. Unscrew the back panel to expose the internal wiring.

      Спросите у FixBot

      Добавить комментарий

    2. Comfort Zone CZ6C Power Cable Replacement: шаг 2, изображение 1 из 3 Comfort Zone CZ6C Power Cable Replacement: шаг 2, изображение 2 из 3 Comfort Zone CZ6C Power Cable Replacement: шаг 2, изображение 3 из 3
      • Unscrew the yellow cap that connects the black wire and the gray power cord wire. Then, unwind the tied wires and pull them apart.

      Спросите у FixBot

      Добавить комментарий

    3. Comfort Zone CZ6C Power Cable Replacement: шаг 3, изображение 1 из 2 Comfort Zone CZ6C Power Cable Replacement: шаг 3, изображение 2 из 2
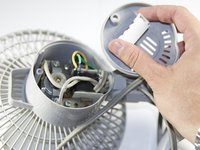
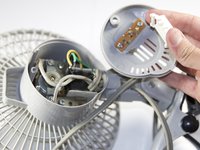
      • Remove the plastic cover on the switch by pulling it apart from the back panel.

      Спросите у FixBot

      Добавить комментарий

    4. Comfort Zone CZ6C Power Cable Replacement: шаг 4, изображение 1 из 1
      • Use the soldering iron with caution. Don't touch the tip of the soldering iron to avoid the risk of injury.

      • This step can be made easier with the help of a partner to hold the wiring while you desolder the connection.

      • Disconnect the gray power wire from the switch by desoldering the connection.

      Спросите у FixBot

      Добавить комментарий

    5. Comfort Zone CZ6C Power Cable Replacement: шаг 5, изображение 1 из 1
      • Strip the end of the gray power cord.

      • Then solder the end of the gray power cord to the switch.

      Спросите у FixBot

      Добавить комментарий

Заключение

To reassemble your device, follow these instructions in reverse order.

Отменить: Я не выполнил это руководство.

Nishanth Dara

Участник с: 04/08/15

153 Репутация

1 руководство автора

Команда

Cal Poly, Team 17-5, Forte Spring 2015 Участник Cal Poly, Team 17-5, Forte Spring 2015

CPSU-FORTE-S15S17G5

4 членов

Автор 7 руководств

0 Комментарии к руководству

Добавить комментарий

Статистика просмотров:

За последние 24 часов: 2

За последние 7 дней: 9

За последние 30 дней: 34

За всё время: 3,368